As a software engineer and consultant, I have been responsible for designing, developing and deploying custom websites and systems for a range of private and public sector companies and agencies. With most of my time being spent on other people’s sites and systems, I’ve never actually created any of my own. Today that changes. I have finally decided to use all of the knowledge I’ve gathered over the years to create my own website with the additional decision of letting you guys in on it. In a series of future blog posts, I will create and deploy a simple website to AWS using a variety of tools. With each blog post I will either improve or add functionality to the site and its CI/CD processes whilst letting you guys in on all the action.
Initial choice of tools
To begin creating the site, I will need to choose a static site generator. After a few Googles, I came across Hugo. As a fan of Golang (which Hugo is written in) and Hugo’s speed with site generation, I concluded that it would be a great choice to create my site with. Next I need to choose a hosting service. There are many ways to host a static site online. Some popular choices are GitHub pages, Netlify, Firebase and S3, however, I need one that won’t take any additional registration or learning and one that is minimal hassle. This means that Netlify and Firebase are out of the equation as I have no experience in either and I don’t have an account with Netlify. GitHub pages is an extremely popular choice due to its simplicity and cost (it’s free). In fact it’s what this very same Capgemini Engineering Blog uses, however, with Hugo, it’s a bit more work to get up and running, as detailed here on the Hugo site. So now the options have been filtered down, I’m left with S3. S3 is incredibly easy to use and setting up a static hosting site only takes a few steps. I also, as a Certified AWS Developer, have experience with S3 and the AWS platform, so this was the most obvious option.
So now I have chosen my tools, with Hugo being the site generator and S3 being the hosting service, I can start creating.
Site creation
With Hugo installed, the first thing I want to do is choose a Hugo theme. As I’m not particularly interested in spending hours and hours creating an accessible and stylistically sugary site, I can use a theme that has already had said time spent on it. Additionally, in my case, where I just want to get a basic site up and running and available to the world, I want to avoid copious amounts of time being spent on padding and margin issues. After a quick browse on the Hugo themes site, I’ve found that hugo-coder has caught my eye due to its simplicity, minimalism and clean look. Let’s use that and get to work.
To create the site on my laptop, I can immediately take advantage of Hugo’s functionality by using it to create the site. By running hugo new site chrisjburns.com Hugo automatically generates a skeleton site for me to start from. Next I installed the hugo-coder theme by navigating into the site folder and running git submodule add https://github.com/luizdepra/hugo-coder.git themes/hugo-coder. After the theme has been installed, I can use an example config.toml already provided and when I run hugo server -D (-D, –buildDrafts) the site is served to me instantly with the following outputted to the terminal:
Running in Fast Render Mode. For full rebuilds on change: hugo server --disableFastRender
Web Server is available at http://localhost:1313/ (bind address 127.0.0.1)
Press Ctrl+C to stop
When I go to the URL: http://localhost:1313/ I see the following…
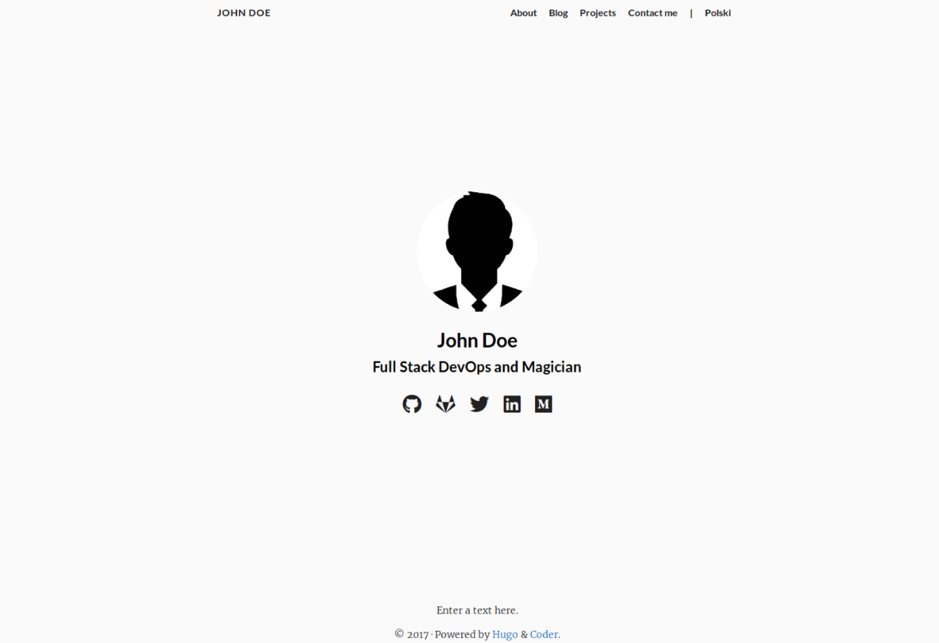
Look at that, I’ve instantly got a site created. Thank the Universe for Hugo themes as this would have taken me hours to do from scratch.
However, in all its glory, there are some minor problems. One being that my name is not John Doe and I’m also not a Magician – so let’s change some of this. I will additionally remove some icons, the menu at the top and the title at the top left as currently I just want to setup a basic front page as a base to get my site out to the world.
After some chopping and changing of the config.toml file, I have now got the following:
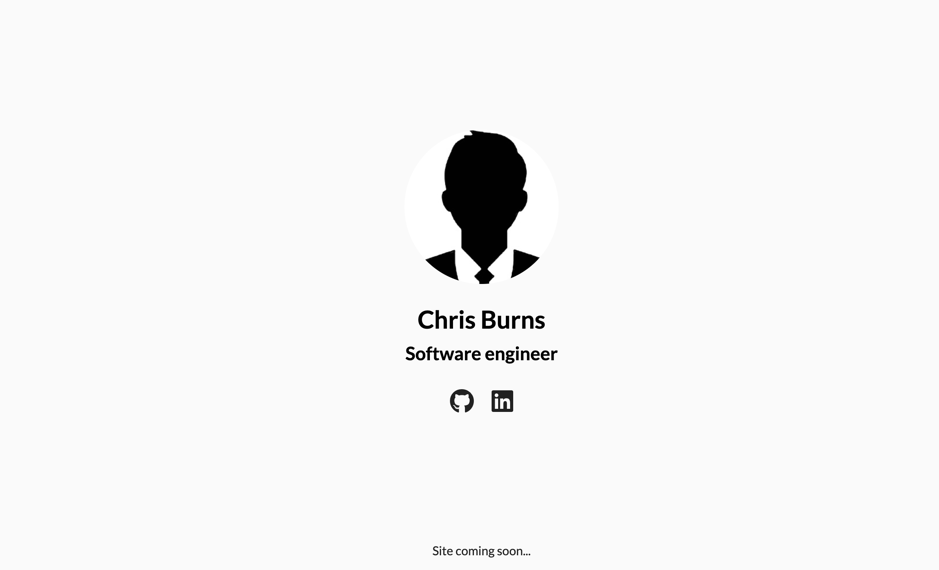
Nothing fancy, just something basic. For reference, in the config.toml file I have only really commented out the menu items at the bottom:
# [[menu.main]]
#     name = "About"
#     weight = 1
#     url = "about/"

# [[menu.main]]
#     name = "Blog"
#     weight = 2
#     url = "posts/"
As well as only including my specific social URLs for the icons:
[[params.social]]
    name = "GitHub"
    icon = "fab fa-github"
    weight = 1
    url = "https://github.com/ChrisJBurns/"
[[params.social]]
    name = "LinkedIn"
    icon = "fab fa-linkedin"
    weight = 2
    url = "https://www.linkedin.com/in/chris-j-burns/"
I have additionally commented out the title at the top as I don’t really want the title in my page, at least not yet.
# title = "chrisjburns"

# theme = "hugo-coder"
Lastly, as shown above, I have commented out the theme = coder line which basically points Hugo to the hugo-coder theme that I added as a git module. The reason for this is because I don’t really want to have to strictly adhere to the way the styling and colours look in the theme, and I want to personalise it in some sense. An example of this would be the fonts that I have already changed at the bottom. All I’ve done is removed the dependency of relying on a theme to be existent, and by doing this, I copied over all of the theme settings, stylings and layouts into the assets and layouts folders. Now these settings, styles and layouts are completely free for me to modify to my own taste. For a beginner user, this may take a bit more time to do as it requires some knowledge about Hugo and front-end web development.
Now I have a basic version of the site, I want to generate it. Generating the site is as simple as one command; hugo. When run, Hugo will render the site and its contents into a directory in root called public/. This directory will be what is deployed/uploaded onto S3.
Uploading Site to S3
When creating a static website for S3, it already provides functionality to do this.
First, I created a public bucket that I aim to use for my site. It is always recommended to use the domain that you wish to use for your site. In my case it shall be chrisjburns.com.

Now I have the bucket, I can upload my site. I do this uploading the rendered public/ directory. Next, I enable static hosting by going to to the Properties tab in the bucket settings and choosing Static website hosting whilst entering the following settings:
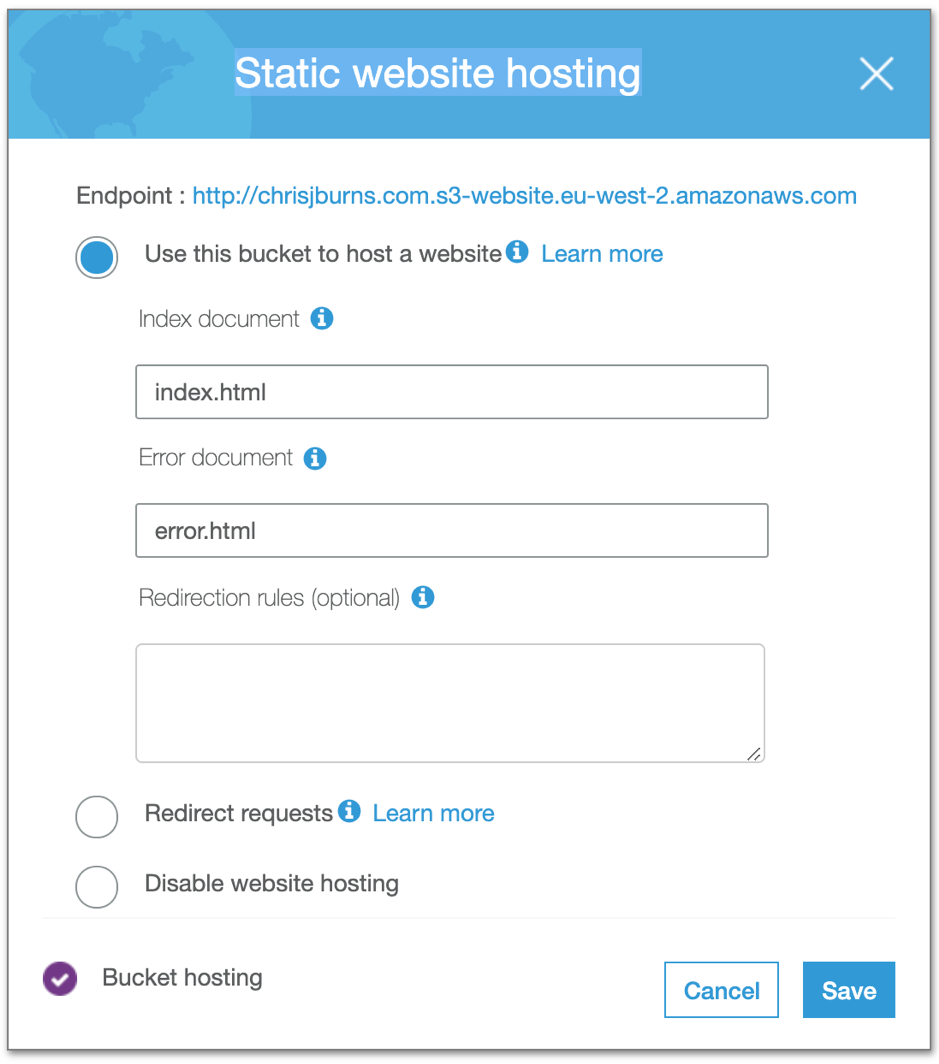
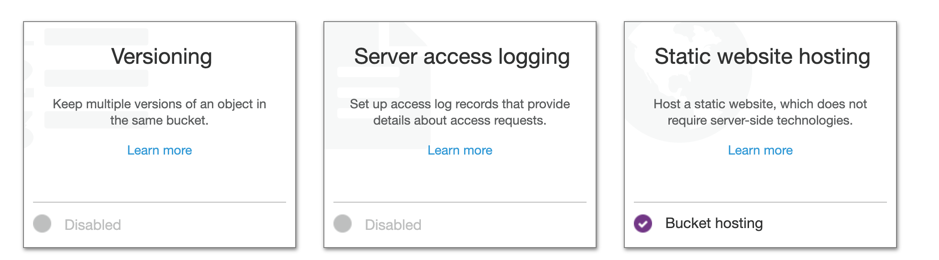
Make sure to make a note of the endpoint URL as I will refer back to it in a few moments. When I click Save the following is shown to state that the static hosting is enabled.
Now I have enabled the static hosting, I need to give the public read access in order for them to see the website.
To do this I created a bucket policy that gives anyone read access to the content in the chrisjburns.com/ bucket. The policy looks like the following:
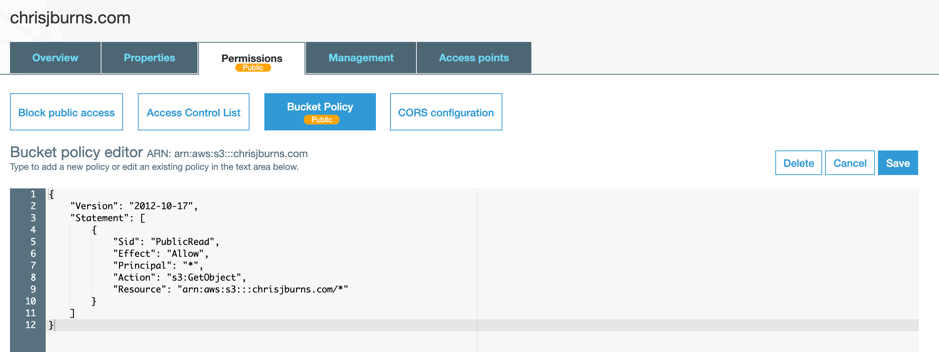
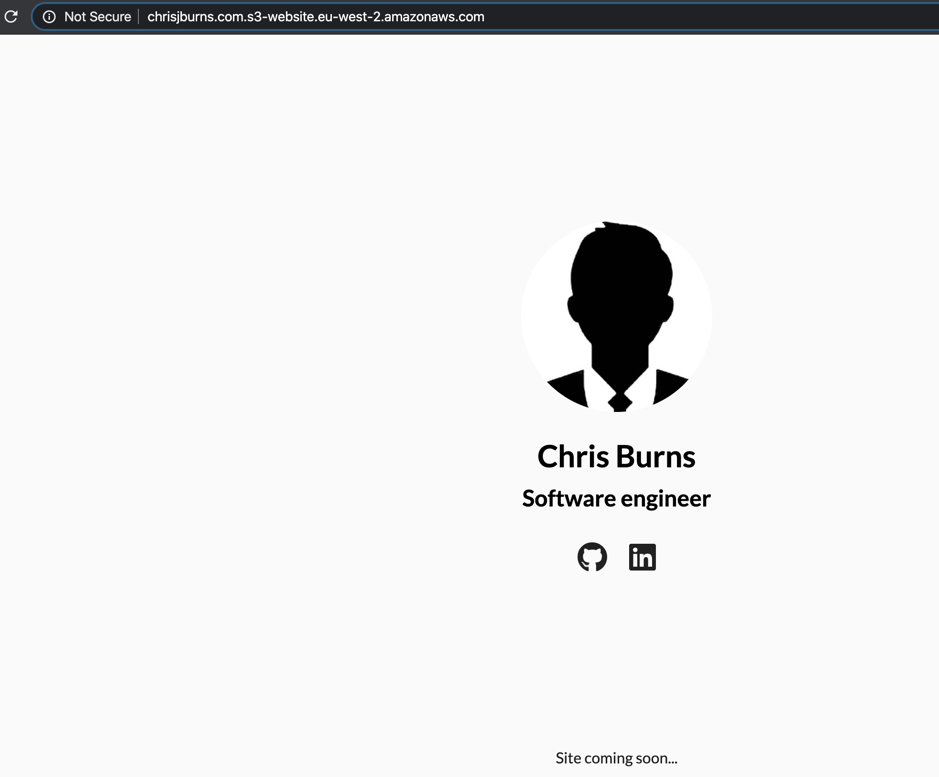
Now when I go to the Endpoint URL that I mentioned a few moments ago we should see the site in all its basic glory.
This is the most basic way of setting up a static site in S3. Obviously, sites with programmed functionality behind them won’t really fit this model that well due to the restrictions on only static content being allowed - although JAMStack is pushing the boundaries on this very restriction. However, for a site that has just static content then it can work wonders and is amazingly cheap. If at any point you wanted to modify something on the site, just make the changes that you want and the regenerate the site by running hugo and re-upload the public/ directory into the bucket.
With all its pros, there are some cons. First among these that I’m not using a domain name. Instead I’m using an S3 endpoint URL, which works fine as we’ve seen, but nobody wants to enter this to get to your site. Additionally, not only is this a very basic site, but it is also an insecure one. Currently the site is served over http and not https which means that all information being sent over the internet is unencrypted. Additionally, this bucket exists in the eu-west-2 region (London), this means that if someone in Japan (shout out to my Japanese readers) wants to view this site then they will have to load all of the content from London. This, as you can imagine, is terribly inefficient as depending on the content of the site and the size of the images, things may take a few seconds longer. To get over this, a content delivery network (CDN) would be needed. The benefits to using a CDN is that there will be edge locations that are spread around the world that all cache the content of the site so if someone in Japan makes a request, they are just making a request to their nearest edge location, instead of making a request to London. This speeds up the loading of the site and in fact reduces the costs involved as the requests do not need to go to S3 every time as the CDN will have all of the content already cached in its edge locations - therefore reducing the load on S3.
However, this is beyond the scope of this post. Stay tuned, as I will be covering the upgrading of this very basic site to use a CDN in the next blog post. I have also got some more exciting content coming up in future posts around registering a domain and introducing CI/CD into the mix for our site to get rid of the manual work. So, stay tuned and in the meantime, find me on the socials.