Over the years there have been countless websites that offer free hosting to users, with the limitation that you use their specific URLs. As shown in previous blog posts where I create a static site and host it on S3 and then use CloudFront as a CDN, S3 and CloudFront are no exception to this. Both services have their own flavour of URLs that are not user friendly in the slightest therefore making it more challenging to direct someone to. Conveniently for me, AWS have their own domain name system (DNS) called Route 53 that allows you to register a custom domain name that you can choose yourself.
Registering a Domain Using Route 53
For my site I use CloudFront for my CDN in order to deliver the content around the world and if you followed my last blog post, you know it’s completely public and also secure via HTTPS. The only issue is that I am forced to use the CloudFront URL i.e. su3jcsi39s.cloudfront.net. This isn’t exactly a catchy URL that someone will remember when I tell them – providing I can even remember it myself. To get over these inconveniences, you would use a custom domain name. As I have used AWS for all of my hosting needs so far, it made sense to stay within the AWS platform and use the AWS DNS system – Route 53.
First, I needed to come up with a catchy domain name that people can remember. If you’ve been reading my previous blog posts, you can probably guess what I went with. That’s right: chrisjburns.com.

For an annual payment of $12.00 I was in possession of my own domain name that I’ll be sure to remember. I haven’t bought my first house yet – but I can imagine this is what it feels like when you finally take a step onto the ladder – only in this case it’s a step onto the ladder of acquiring my own “home” in the world of the internet.
Apply for an TLS Certificate
After my domain name was acquired, I applied for my own SSL/TLS certificate. This is so users of my site can verify that I am indeed the owner and that all communication will be secure and encrypted. It also increases my Google rankings and improves conversion rates whilst building users trust.
Again, I was in luck as AWS has their own Certificate Manager called, wait for it, AWS Certificate Manager.
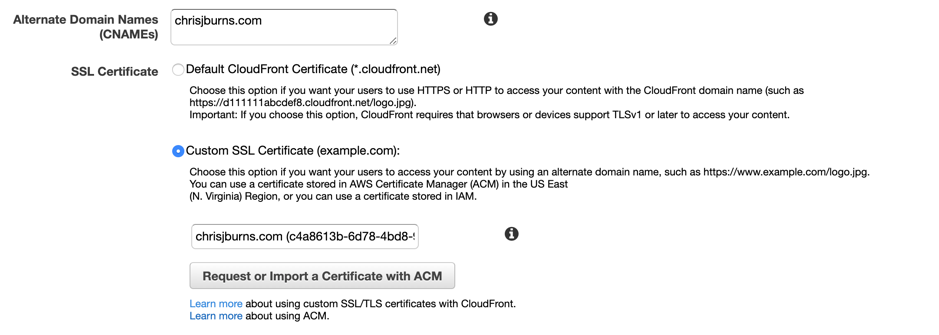
As I had no Certificates with Amazon and have never applied for one before, I had to follow the documentation. However, summarised, I applied for a “Public Certificate” and added the domain chrisjburns.com and sub-domains *.chrisjburns.com. The second is to ensure that if I ever wanted to create any sub-domains to my site – possibly a blog? Then when I create the sub-domain blog.chrisjburns.com, then the certificate will also apply to the new sub-domain.
After some DNS validation, which was a slightly more convoluted and tricky task as documented here, I had finished the certificate application and all I had to do was wait. Within an hour I had the result and it had been approved and issued to me.

Connect new Domain Name with CloudFront
Once all of the individual components were ready, it was time to connect them all together. All I had to do was hook my new certificate and domain name up to my CloudFront distribution.
First things first, I modified the CloudFront distribution that I created as part of the previous blog. After going into the distribution’s “Distribution Settings”, I edited the “General” page so that the distribution used my Custom SSL certificate and CNAMEs.
The last step was to route all inbound queries to “chrisjburns.com” to the CloudFront distribution. Again, in classic AWS style, this was simple.
Going into the Route 53 Hosted Zone that I had for my new domain, I created a new record set with type “A – IPv4 Address” and an Alias with the target being the CloudFront distribution URL (this was also a drop-down list to choose from).
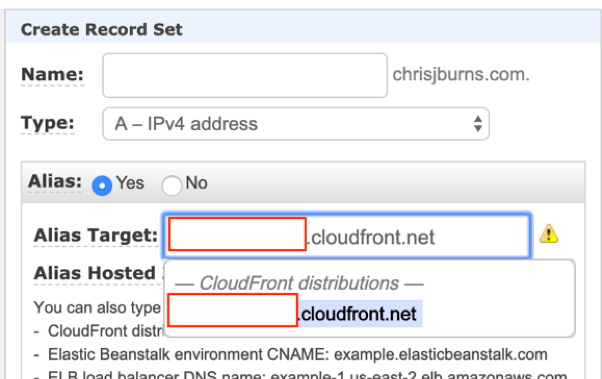
Once the new record set was created I hung around and waited for Route 53 to do its thing with regards to setting up the routings. After a few minutes I was able to see my new domain name point to the CloudFront distribution.
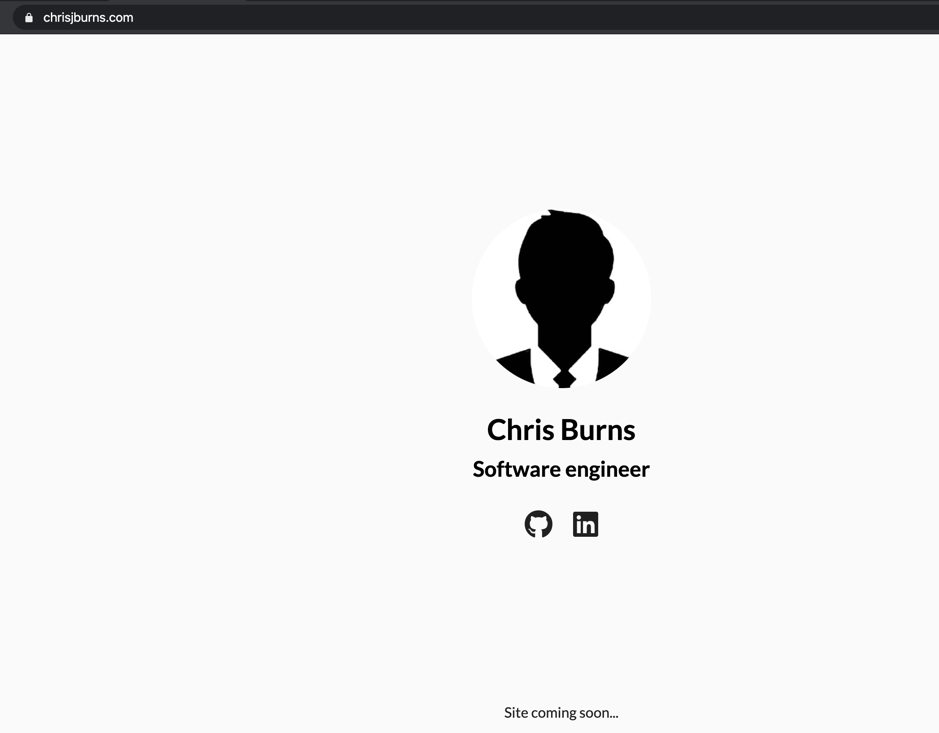
There you have it, a completely static site hosted on S3 and served by CloudFront with domain routings handled by Route 53.
Prevention of DDoS Attacks
With my site being available to use under its new domain name there is one last point to make. Due to the sites infrastructure being serverless, I do not pay for any monthly hosting fees. Instead, I pay each time the site is used (due to the low price of each request, I more than likely won’t be paying anything for my site’s use). This makes it vulnerable to DDoS attacks – or in my case, denial of wallet attack (DDoW). However, due to the highly scalable and highly available services that I am using, denial of service is unlikely. What is more likely is someone running a program that bombards my site for hours which in turn sends my billing costs through the roof.
To counter this, there is managed DDoS protection provided by AWS Shield that is integrated with both Route 53 and CloudFront. This means if said attacks were to happen, I don’t have to worry.
Closing Thoughts
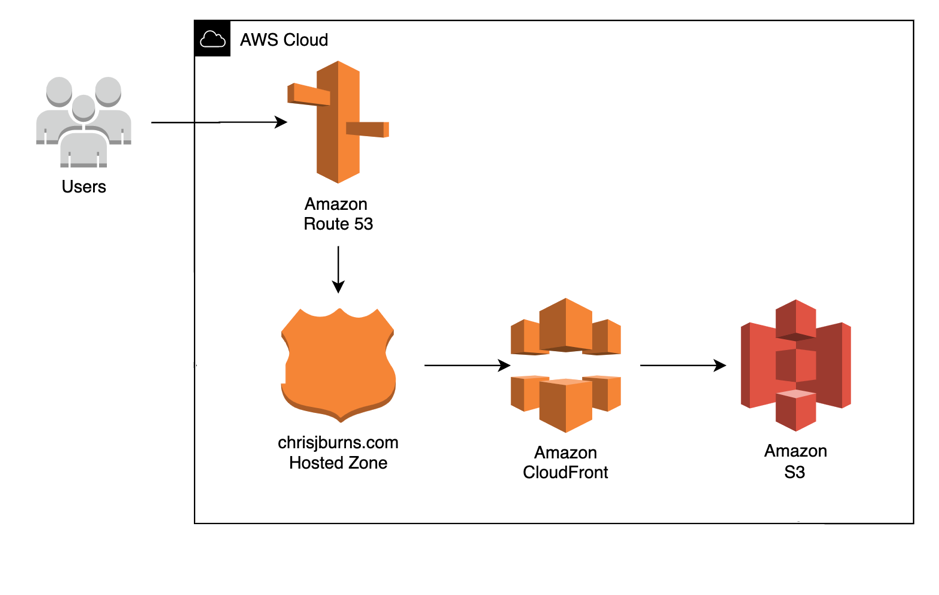
With the final solution architecture looking like the below, I have a fully available and scalable website that is accessible to the world via my new domain.
I can start adding new features to my site whenever I want as the underlying infrastructure is all in place. In the future, I won’t do any blog posts talking about minor changes to the site as it would essentially just consist of me amending/adding a few new pages and reuploading to S3. However, if I were to make any updates with the process or architecture to the site, then I’ll be sure to let you guys know in a new post. My next blog will probably be around creating an automated CI/CD pipeline so I can commit and push to a Git repository that in turn triggers a pipeline that automatically deploys my new site to S3. But for now, enjoy the content and if you have any questions, find me on the socials.