Back in November 2014, AWS completely changed the paradigm of modern Cloud computing by releasing a service called AWS Lambda. Consequently, this changed the future product road map offerings for a lot of technology companies around the world that have since followed in Amazon’s footsteps by releasing their own Serverless technologies into the ecosystem. Moreover, leading companies like Microsoft and Google – who both join Amazon in being the top three Cloud providers today – have attempted to chase Amazon’s spot in being the leading Serverless platform provider but it seems that due to an already large developer community and plethora of use cases, AWS still dominate the Serverless landscape.
What is Serverless?
As this article will be more centred around using AWS Serverless technologies, I won’t be going into detail about what Serverless is. However, in a nutshell, Serverless is an execution model where Cloud providers allow you to dynamically use their resources in order to run your code – with the key point being that you are only billed for what resources are used in order to complete an executable run of your code. Although they are used interchangeably, it is important to point out that Serverless and FaaS are not the same thing. The difference being that, Serverless is more of a system approach whereas FaaS is more in line with running event (often ephemeral) driven code statelessly on a third party vendor platform (AWS Lambda). Unlike with Virtual Machines, where the application is continuously running waiting for requests, with Serverless, nothing is running until the code is triggered, and when the code is triggered, however long it took to finish its execution, you are only billed for its duration. In AWS you are only billed when your Lambda functions are invoked and they are billed both per request and duration taken to complete request. Amounts include examples such as $0.0000002 per request and as low as $0.000000208 per 100ms. This is attractive to many companies as it can reduce costs significantly whilst also drastically cutting the extent of traditional infrastructure setup and configuration. This therefore minimises the amount of moving parts that an organisation has to keep track of as AWS guarantees that all this will be handled by them with high rates of availability within their SLAs of each service. Additionally, due to the cut in the amount of moving parts, this can decrease the time to production which appeals to many organisations for the obvious reasons.
AWS Serverless
Traditionally, to do Serverless work on AWS, there has always been the option of being able to go into the console (AWS Website UI) and set up what you need. For example, in the console you could manually setup the Lambda function with a DynamoDB backend and expose the Lambda with an API Gateway so it is accessible externally. However, in this new world where Infrastructure as Code (IaC) is the preferred approach when setting up and configuring Cloud infrastructure, you also want to keep this approach with Serverless infrastructure.
AWS CloudFormation
This is where AWS CloudFormation (CF) came in. CF is AWS’ own IaC offering that allows you to set up AWS resources in the Cloud via either YAML or JSON. CF is available at no extra cost and you only pay for the resources you create – which is dependent on the pricing of those resources. To create a Lambda Function in AWS using CF we could follow the AWS Documentation online that details how to not only set them up but we could also set up a Lambda Function that can talk to a DynamoDB with an API Gateway in front of it that altogether allows a public user to call the Serverless function which retrieves information from the database whilst outputting its response. We can do all that in CF – however, it isn’t an easy task to an individual fresh to CF and although CF is just YAML or JSON (depends on user preference), the actual discovering and understanding of the common resources types within CF can be quite daunting initially. This is where Serverless comes in.
What is Serverless?
No, you are not reading that wrong, those are the same words you saw above, however, we are now asking a different question – the difference being the word ‘Serverless’. Confused yet? Let me help. It is very important to note that there is the Serverless concept and the Serverless framework. The Serverless concept as said above is a cloud execution model, however, there also exists something called the Serverless framework – that is just like Terraform (TF) and CF in that it is just another IaC tool. For ease of reading I will reference the Serverless concept as ‘Serverless’ and the Serverless Framework as ‘SF’. Although SF is Infrastructure as Code like Terraform and CloudFormation, it is important to note that it’s actually more similar to TF in the sense that it’s Cloud provider agnostic whereas CF is AWS specific. TF, some could argue, is much more comprehensive in what it offers as it allows you to create all kinds of resources in the Cloud, whereas SF is more fine-tuned for setting up Serverless infrastructure and its shared resources. I would even argue it is much easier to set up Serverless infrastructure with SF than it is with TF – from experience. However, Yan Cui has shown that you can actually use SF and TF together in order to take advantage of the best features of both – those being TF’s extensiveness and SF’s simplicity around deploying Serverless infrastructure.
As Yan also mentions, SF is the most popular deployment framework for Serverless applications as it offers a suitable abstraction over CF and some of the best practises out of the box. Something I don’t disagree with in the slightest. Additionally, even if SF doesn’t offer their own implementation around simply deploying shared resources you can always just resort to using CF syntax in YAML as SF actually boils all of its templates into CF syntax anyways. This allows for a lot of flexibility, especially if you want to stick to one framework. Lastly, SF also enables you to test your functions, something we will explore a little below. I make this point because with TF, it is mainly infrastructure only and does not offer you the ability to test what you have created.
Now, enough of the background, let’s get creating some Serverless-ness…
Using Serverless Framework to Deploy Serverless Functions onto AWS
So, with the background above setting the foundations of understanding what Serverless is, let’s dive into some examples. As we’ve discussed, using CF to create your Serverless infrastructure can be a daunting task for someone fresh to the world of Serverless, so bearing this in mind we are going to use the Serverless Framework instead.
I will skip all the pre-requisites of setting up AWS CLI, configuring AWS Access Keys and installing the Serverless Framework with NPM as those are well documented online. So, let’s jump right in.
Once the SF has been installed, create a folder for our code and inside it all we need is two files, a handler.js file and a serverless.yml. The purpose of these are the following:
handler.jsis the file that includes the code in which will get uploaded and invoked in AWS Lambda.serverless.ymlis the file that SF looks at for instructions on what resources to deploy and what configuration to deploy with them.
In the handler.js file, include the following code:
'use strict';

module.exports.helloWorld = async (event, context) => {
  return {
    statusCode: 200,
    body: JSON.stringify({
      message: 'Go Serverless v1.0! Your function executed successfully!',
    }),
  };
};
Here we see a simple exported function called helloWorld that accepts event and context. These are passed into the function when the Lambda is called. The event will contain data about the resource or request that triggered the function and the context object will contain information about the invocation, function and execution environment. There is also a callback argument that we can accept, however callback is only accepted for non-async functions and since we are declaring an async function, we don’t need it. Additionally, in non-async functions you can call the callback function to send a response and it typically takes two arguments, error and response. For async functions you return a response, error or promise to the runtime instead.
For our code, we are declaring an async function that returns a response that contains just an OK status code of 200 and a body that just outputs a message. Not much to it.
In the serverless.yml file, include the following code:
service: serverless-hello-world

provider:
  name: aws
  runtime: nodejs10.x
  region: eu-west-2

functions:
  helloWorld:
    handler: handler.helloWorld
We have the service name line at the top that tells SF that this is the name of the service. Next we have described details about the Cloud provider (for us is aws), our runtime which is NodeJS as well as our region: eu-west-2 (London).
Below that is the functions section. This is what SF will read in order to create and deploy to AWS Lambda. For us, it just declares that we want a function named helloWorld and that its handler is the helloWorld function we created in the handler file.
Now let’s deploy to AWS by running the following (-v is to give verbose output):
serverless deploy -v
SF will now deploy our code to AWS according to what we specified in serverless.yml whilst also performing some other bits like setting up IAM Roles and LogGroups. You will see in the terminal that it prints what resources it is creating as well as their success. Once completed it will print information about our Serverless function and its resources in the terminal. I won’t show you the full output I have as it includes account numbers. But what I can show you is the following:
Service Information
service: serverless-hello-world
stage: dev
region: eu-west-2
stack: serverless-hello-world-dev
resources: 5
api keys:
  None
endpoints:
  None
functions:
  helloWorld: serverless-hello-world-dev-helloWorld
layers:
  None
As we can see, the service name is what we specified as well as the region and under the functions section we can see it has created our helloWorld function. Ignore the other details for the time being as you can research them more later on – stage’s I would recommend looking into if you’re looking to get into the SF as it is a very nice way of being able to group your deployments into stages e.g. dev stage, test stage, prod stage etc.
Now, I know what you’re thinking. It’s worked but what have we actually done? So, let’s navigate into the AWS Console within the London region and go to the Lambda Service and click Functions. We should be able to see our helloWorld function and when we click it, if everything went well we should be able to see something like the following:
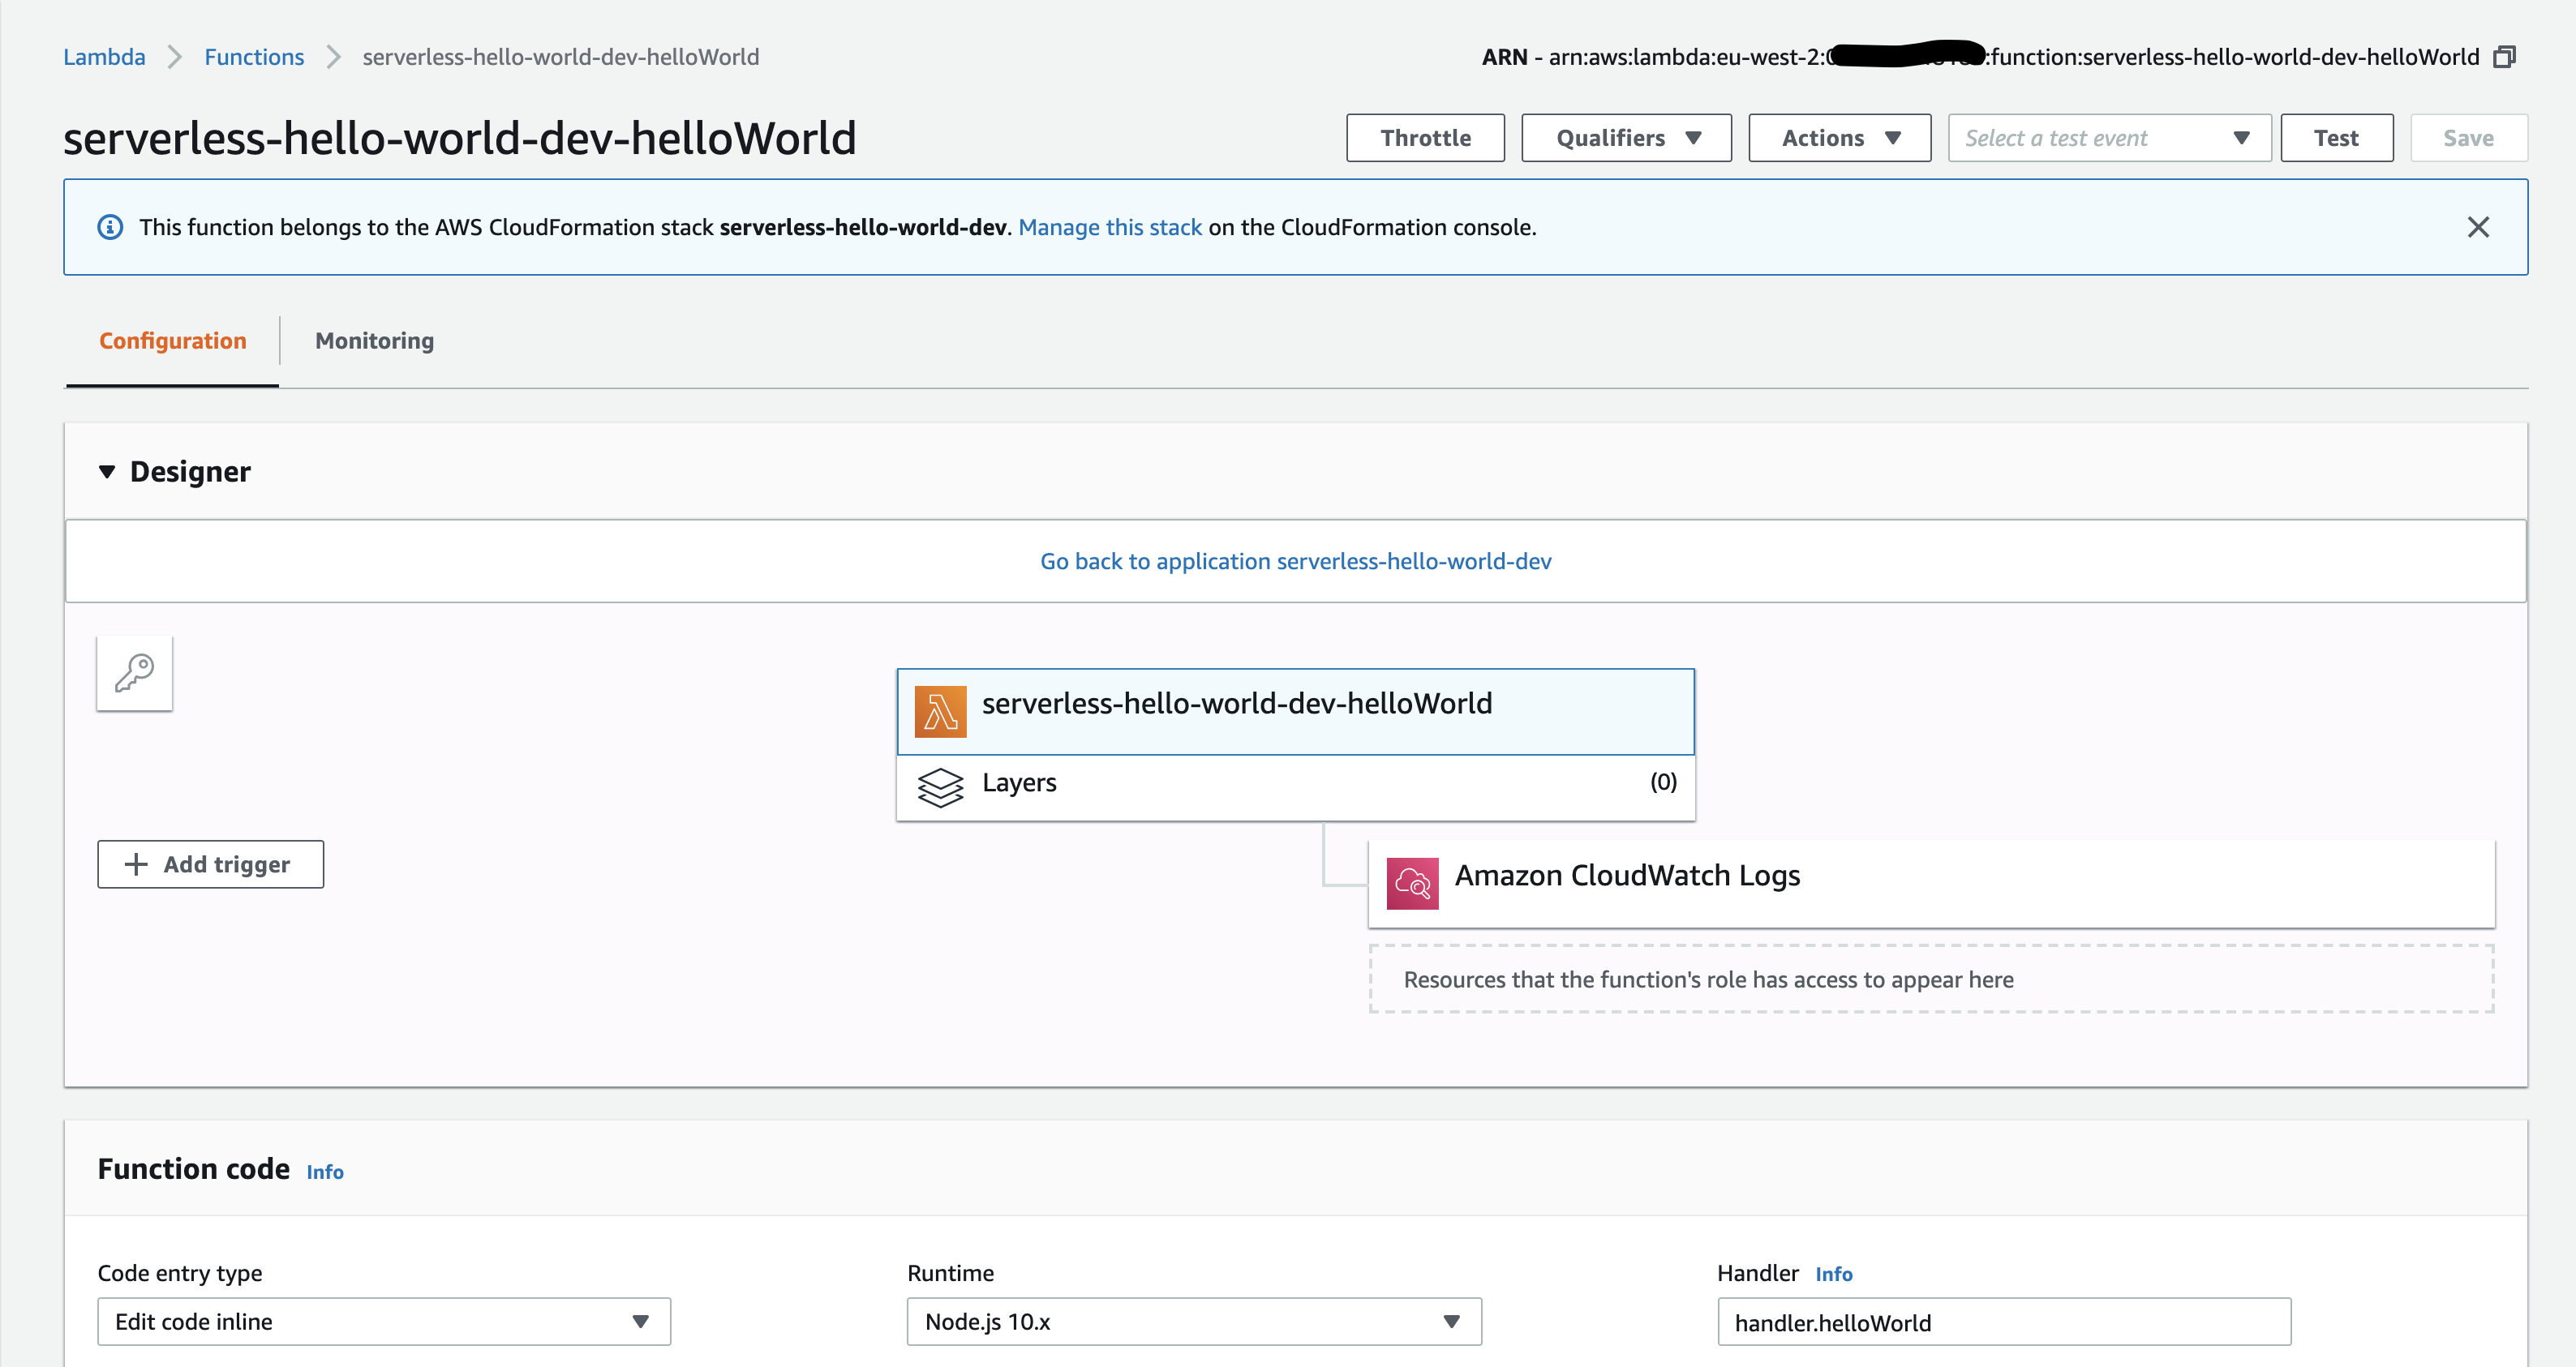
Here we see the helloWorld AWS Lambda function. In the designer view you should be able to see all of the resources that it is connected to but as we have only created something simple, you will not see much inside here. You can see the Amazon CloudWatch Logs resource attached to the function and that was the LogGroup bit that I mentioned earlier on that SF does as a default. This is very useful to us as we don’t have to worry about setting up a LogGroup in our serverless.yml file as SF automatically does it for us. You can even have a look at the CloudWatch resource and have a play around and see what you can see there – I always encourage putting this article on pause and just having a play around in the AWS Console as this is where you learn. Currently, there won’t be anything in the logs as we haven’t invoked the function yet. So, let’s do that.
In the top right hand corner you will see the ‘Test’ button, click that and select ‘Create new test event’ (is probably already selected as a default as there are no test events yet), in the event template select ‘helloWorld’ (again, it’s probably already selected) and then in the ‘Event name’ we want to choose the function name in the code, which in our case is ‘helloWorld’. Additionally, in the JSON below just put a body (just the beginning and end braces) like so:
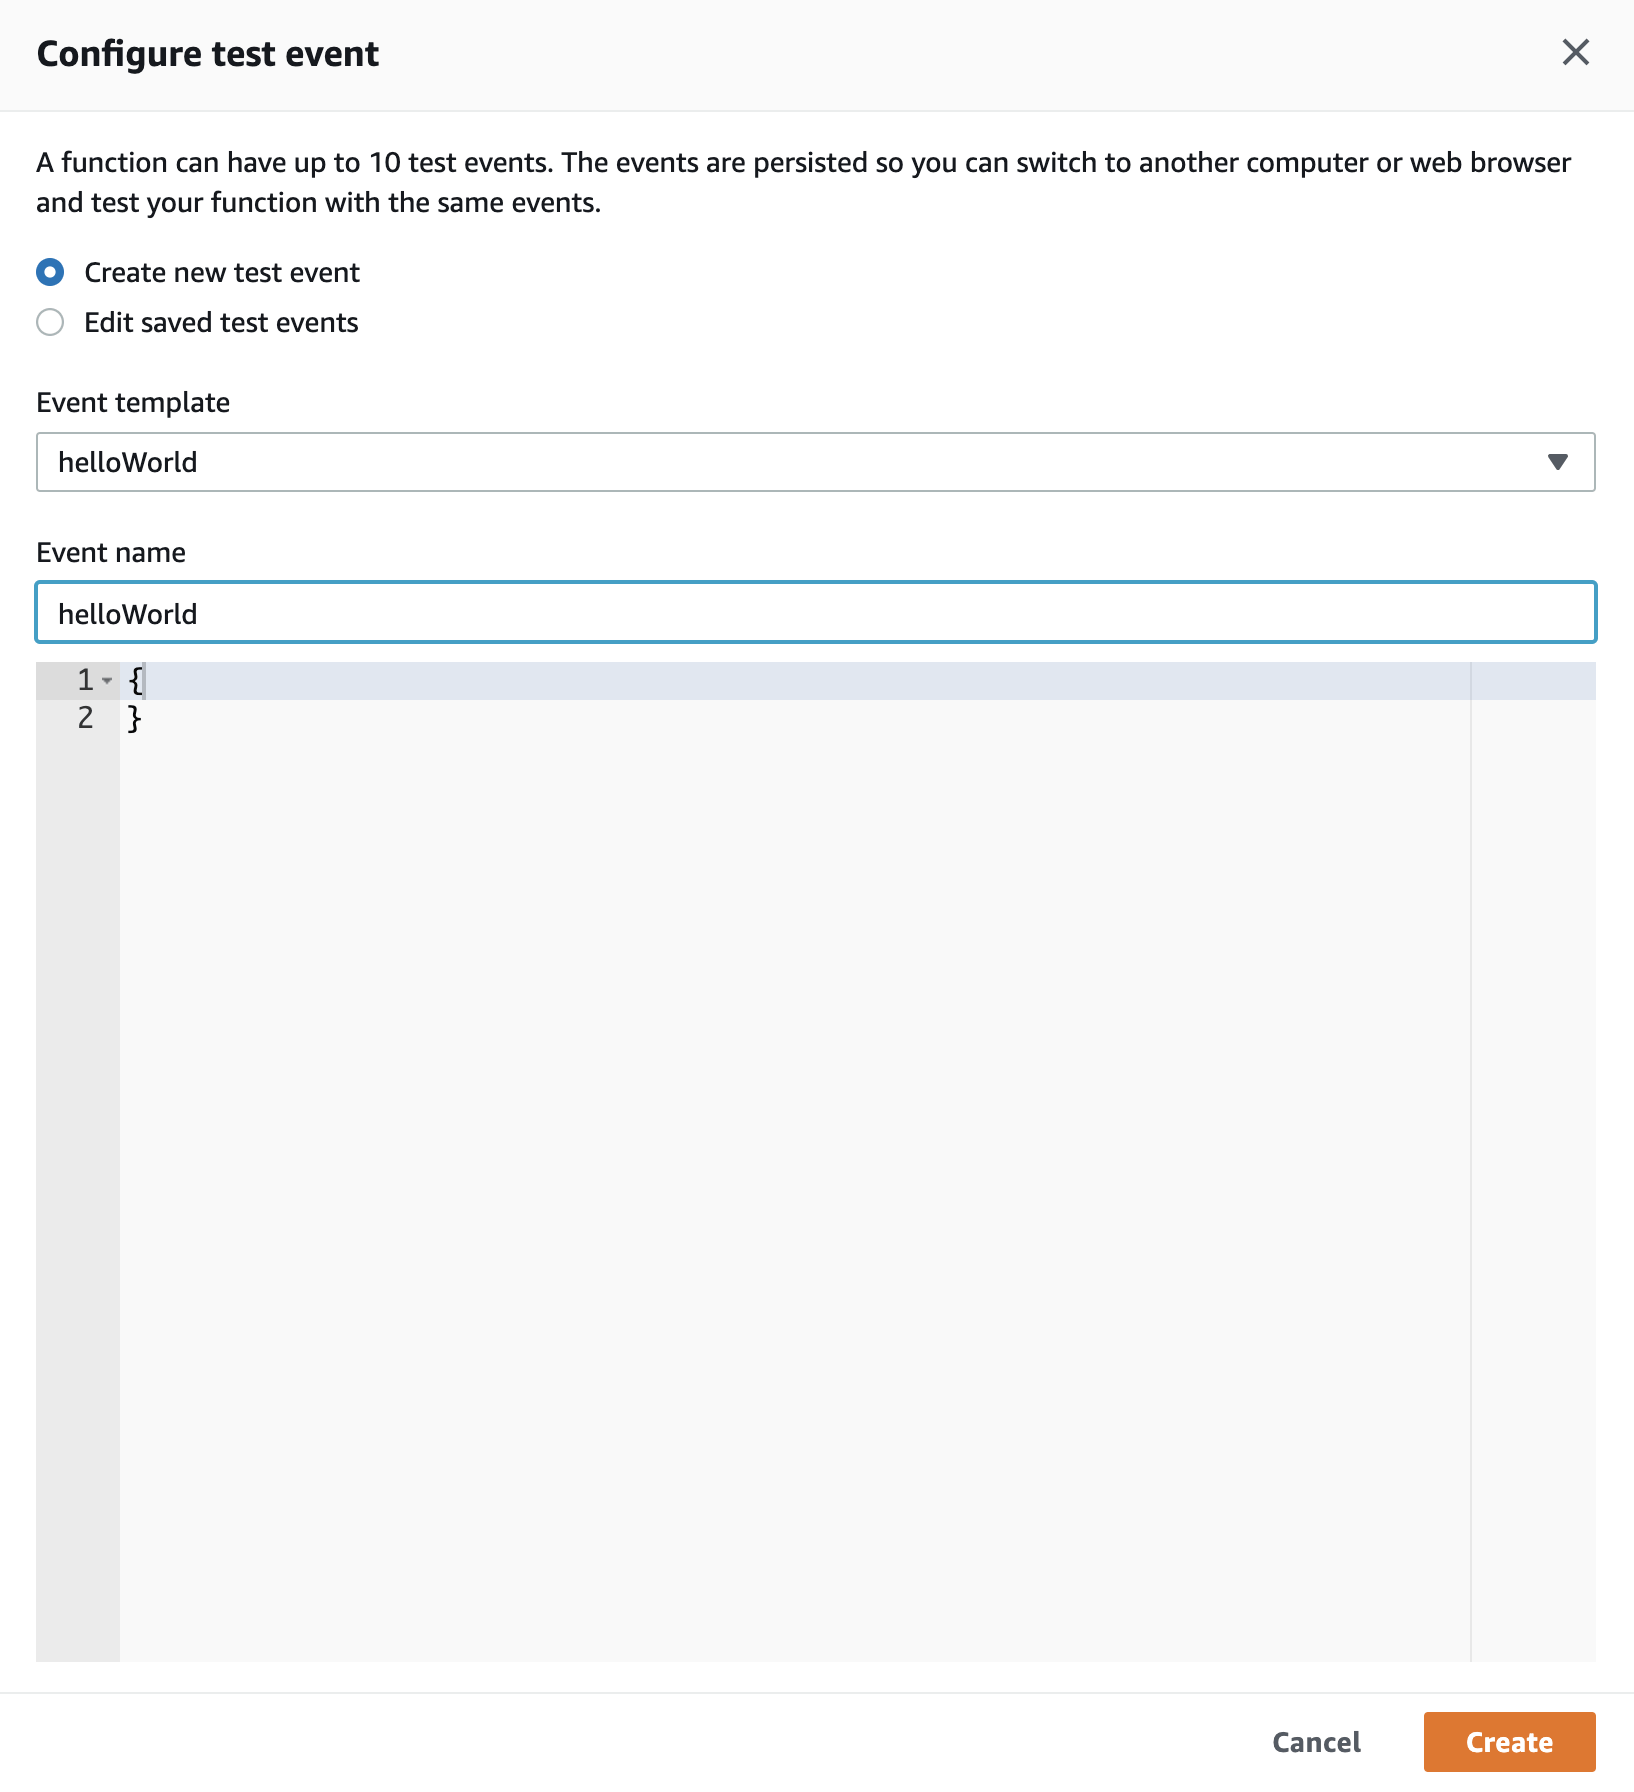
When your test event looks like the above, then click ‘Create’ and then click the ‘Test’ button again. This time it will run the test event we configured by invoking the helloWorld Lambda function whilst showing the results like below:
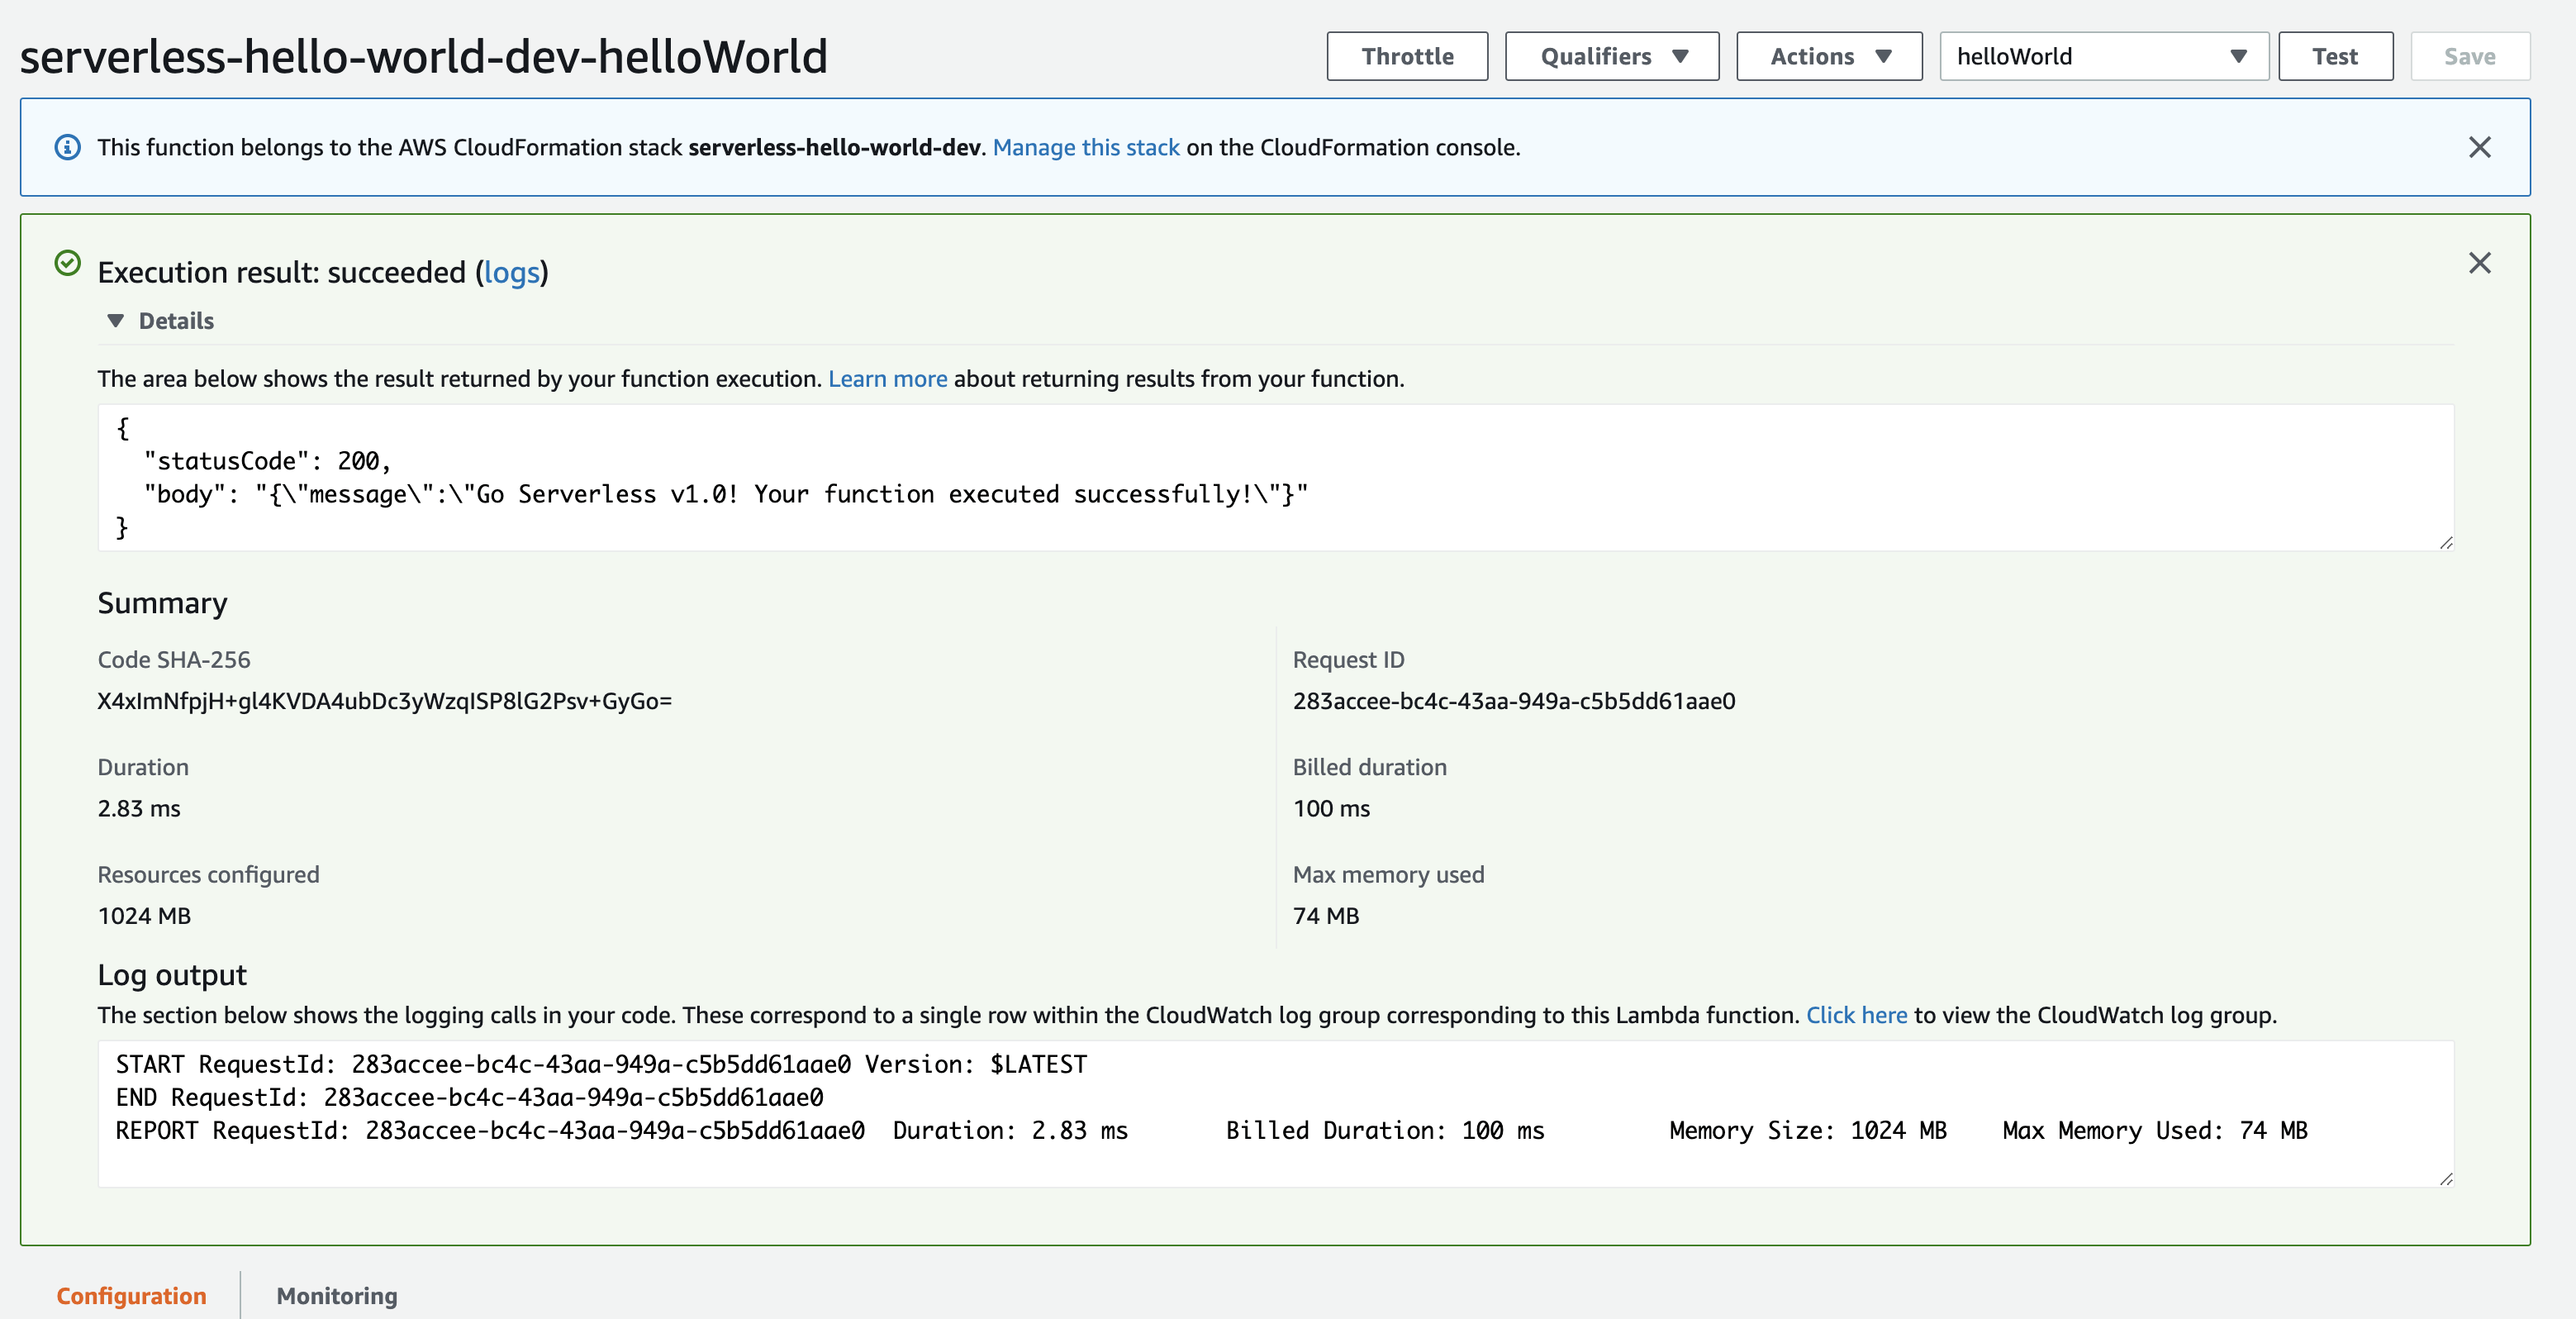
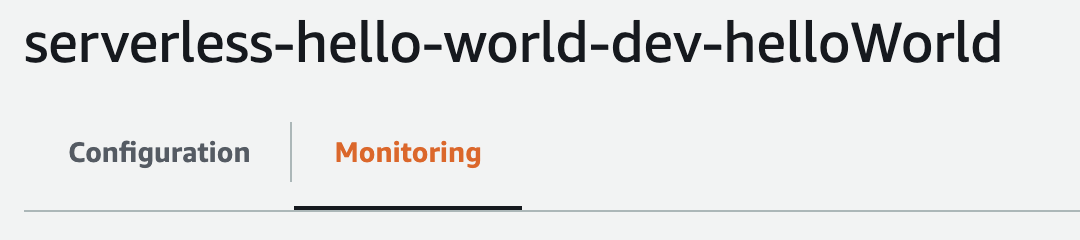
Hooray!! We can now see our message has been output to the screen. It also gives us a bit more information about the ‘Request ID’, billed duration and the duration it took to invoke the lambda and respond. Speaking about the duration, we can see it was 2.83ms, what that means is the Lambda existed for only 2.83ms and immediately after it finished outputting the message to the screen it terminated. We can even go and have a look in the CloudWatch looks and see what logs it has output. To do this, we go back to the Lambda screen we saw before when we first clicked on the function and this time, near the top left and select ‘Monitoring’.
This should take us to a screen that shows some nice fancy graphs and metrics about the Lambda and any information about its invocations. What we are interested in is the ‘View logs in CloudWatch’ option to the right-hand side of the screen, so select that and a new window will open with the option of being able to view the logs for our Lambda function. Have a look around and see if you can match up the ‘Test’ events with the log entries, hint.. use the ‘Request ID’.
Once you’ve had a play around with CloudWatch and seeing what it shows, you’re probably thinking, well, that’s all good and well but I don’t want to click a ‘Test’ button to invoke my Lambda function and you’re absolutely right – you wouldn’t want to do that. So, let’s instead use SF to invoke our Lambda from our local terminal. To do this we run the following serverless invoke --function helloWorld
What this will do is use SF to manually invoke the Lambda under the function name helloWorld that we specified in the serverless.yml file.
Here is our response:
{
    "statusCode": 200,
    "body": "{\"message\":\"Go Serverless v1.0! Your function executed successfully!\"}"
}
You can also navigate to CloudWatch and see the logs for that invocation. Pretty impressive right? Just to recap so far, we have:
- Defined the function code that gets run when invoked which only outputs a message response
- Deployed the function to AWS Lambda
- Created a test event that invokes the function
- Viewed the logs that get generated in CloudWatch as well as some metrics about the invocations
- Used SF to invoke the AWS Lambda from our local system
Now although we have created a Lambda, deployed it and invoked it, what we really want is to deploy our Lambda under a publicly available API endpoint that we can hit using a REST Client or a browser. Currently this is not possible as the Lambda is not exposed publicly. The test event is just a test that is run against the Lambda from within the console, and the SF invoke was only possible because it uses your AWS Access keys in order to invoke the function. In order to expose our Lambda publicly, we need an API Gateway.
We can either create the API Gateway through the console using the designer, or we can define it in the serverless.yml and let SF create it when we run a deploy. Since we are using SF to do all the manual lifting, let’s stick to that theme.
To create an API Gateway it is very simple, we just add the following lines to our helloWorld function in the serverless.yml file.
functions:
  helloWorld:
    handler: handler.helloWorld
    events:
      - http:
          path: hello-world
          method: get
The events section simply exposes the helloWorld function under the specified conditions. In our case, we are telling SF to create an GET HTTP Event that has a specified path. That is all we need to do. Now let’s rerun the serverless deploy command above. You will notice it may take longer to deploy this time because it is creating the API Gateway and configuring it with permissions for the Lambda Function. Once it has finished, you will notice some different output in the logs. This time some sections will have data in them (endpoints etc). What happens if we copy and paste the endpoint URL into a browser? Let’s try!

Would you look at that, there is our invoked response from our public Lambda. What do we see in the Lambda console when we refresh the page?
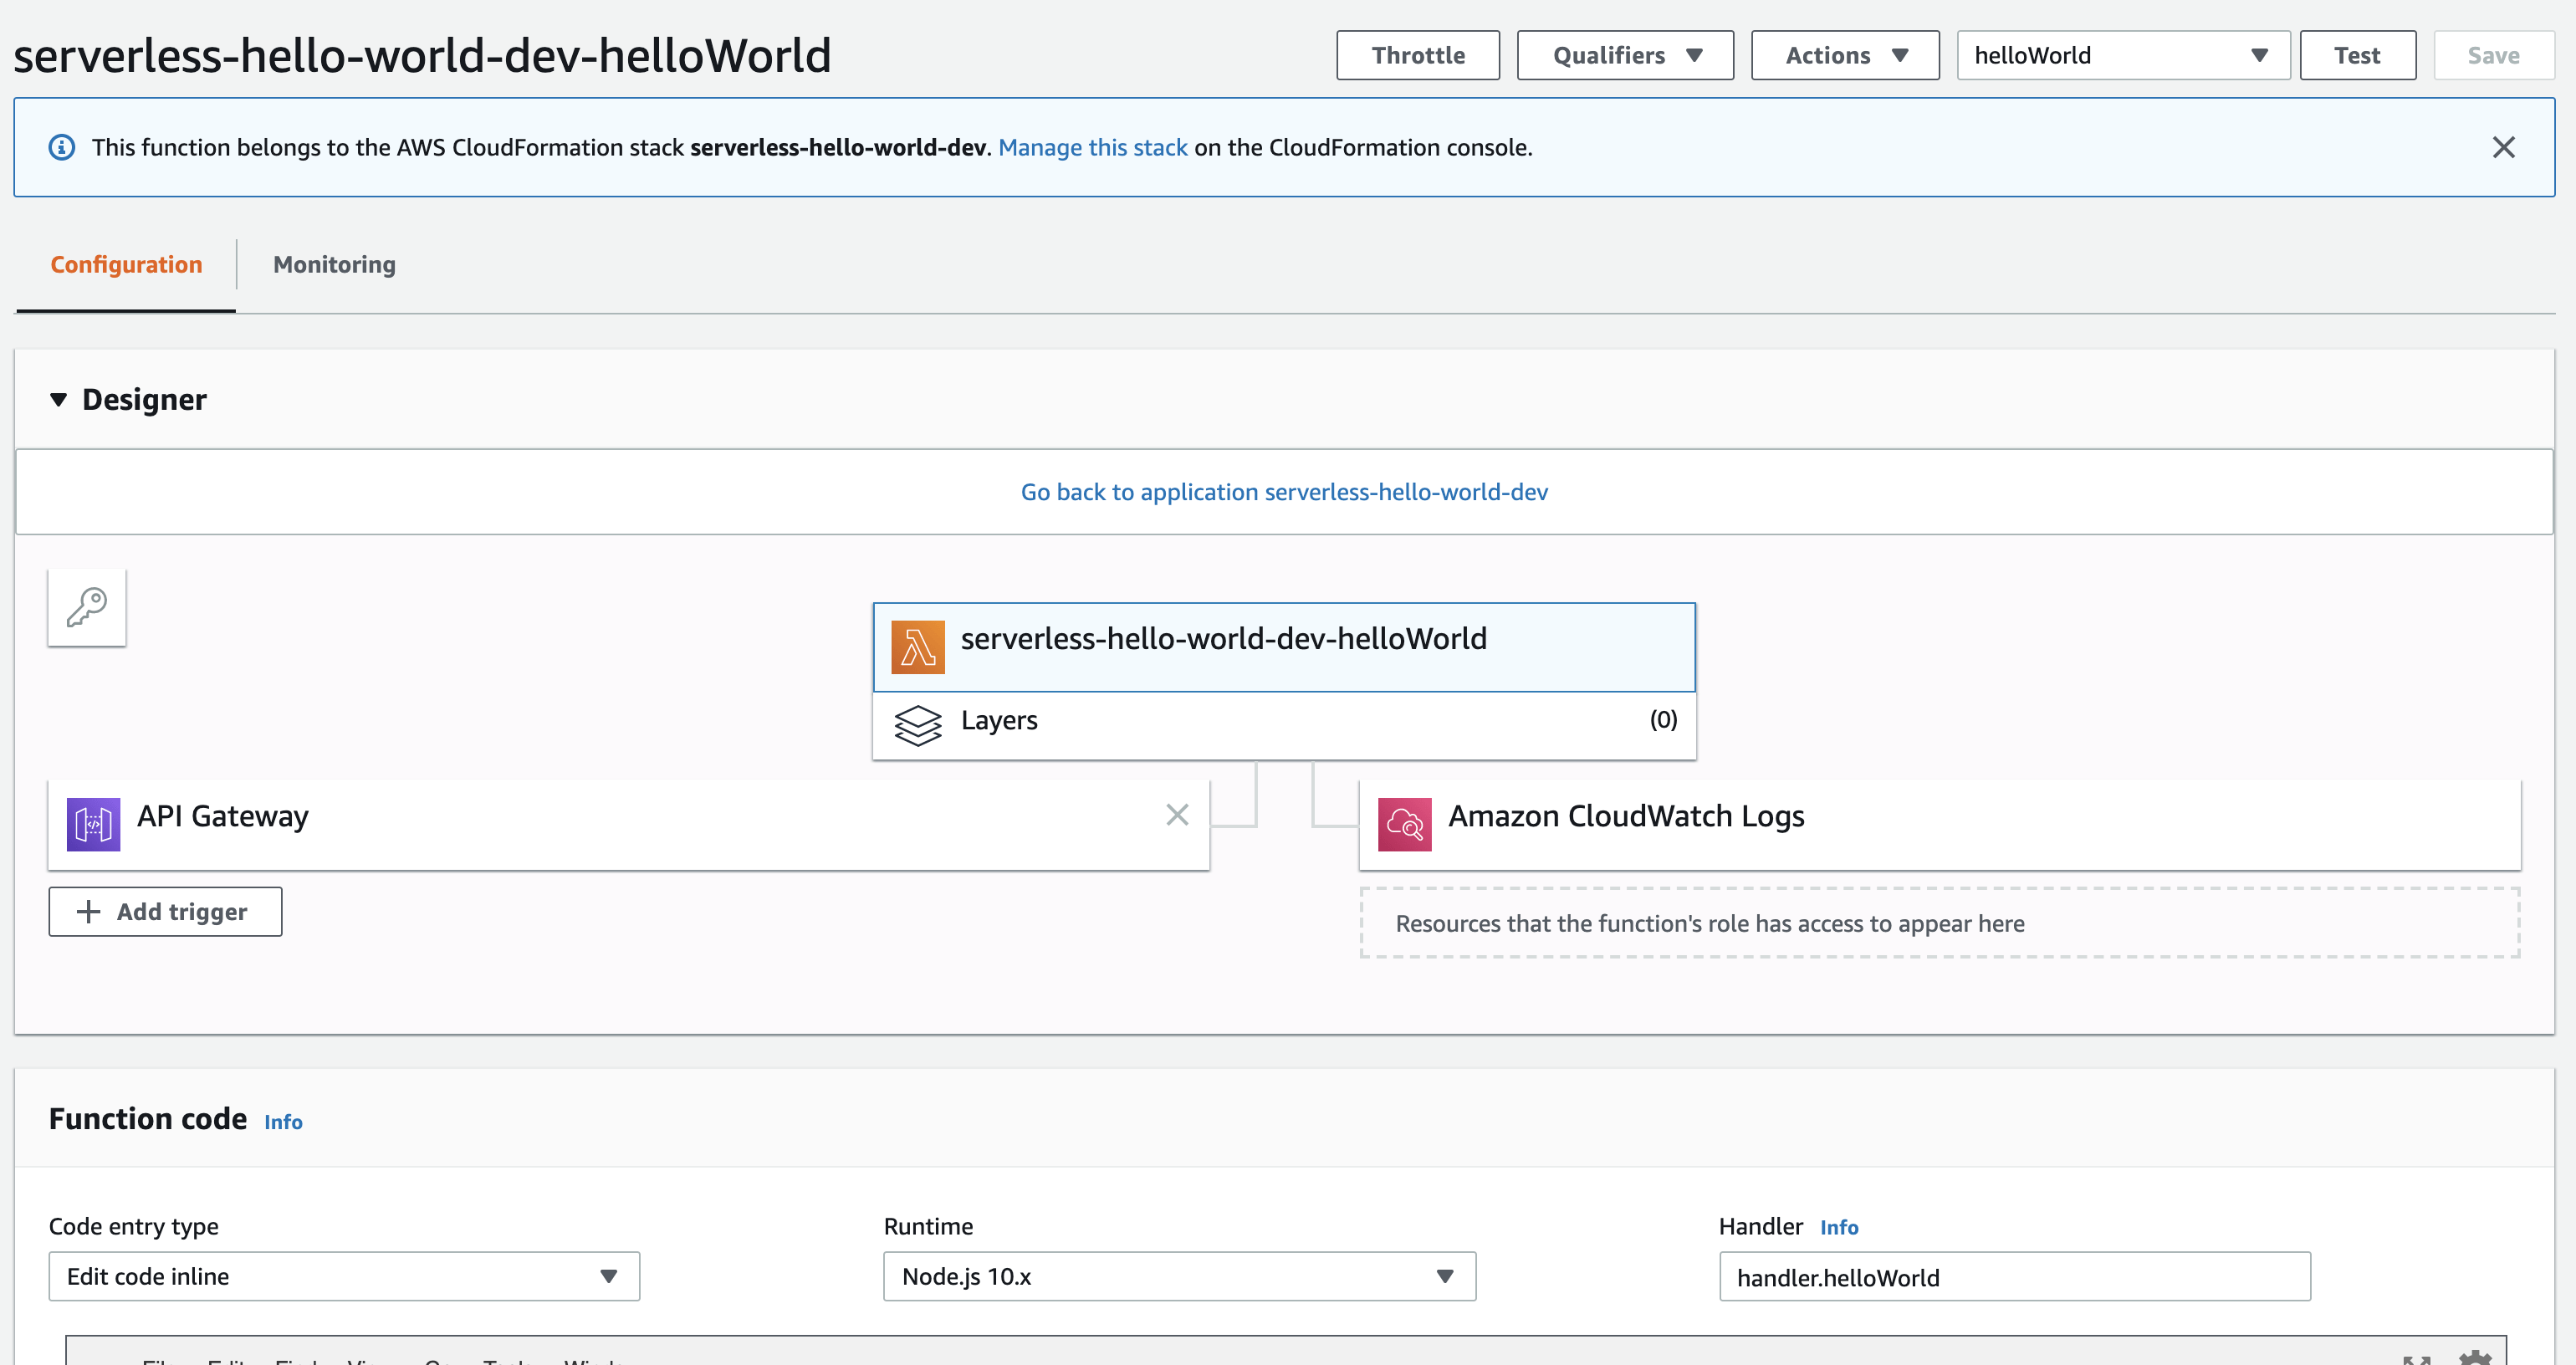
Well, there’s now an additional resource in the designer window. We now have an API Gateway attached. Now would be good time to pause this article and just go into the CloudWatch logs and see if you can see the logs being populated when you hit the URL again via the browser or a REST Client. Additionally, I would also advise going into the API Gateway service in AWS and just clicking around to see what you can see in efforts to become more familiar with it.
Architecture as Code?
Remember before when we mentioned that using CF to do all this would be quite daunting, well let’s go have a look how much code we would have had to have written to get all this to work.
Let’s go to AWS CloudFormation by selecting ‘CloudFormation’ in the ‘Services’ section of the menu at the top left of the Console.
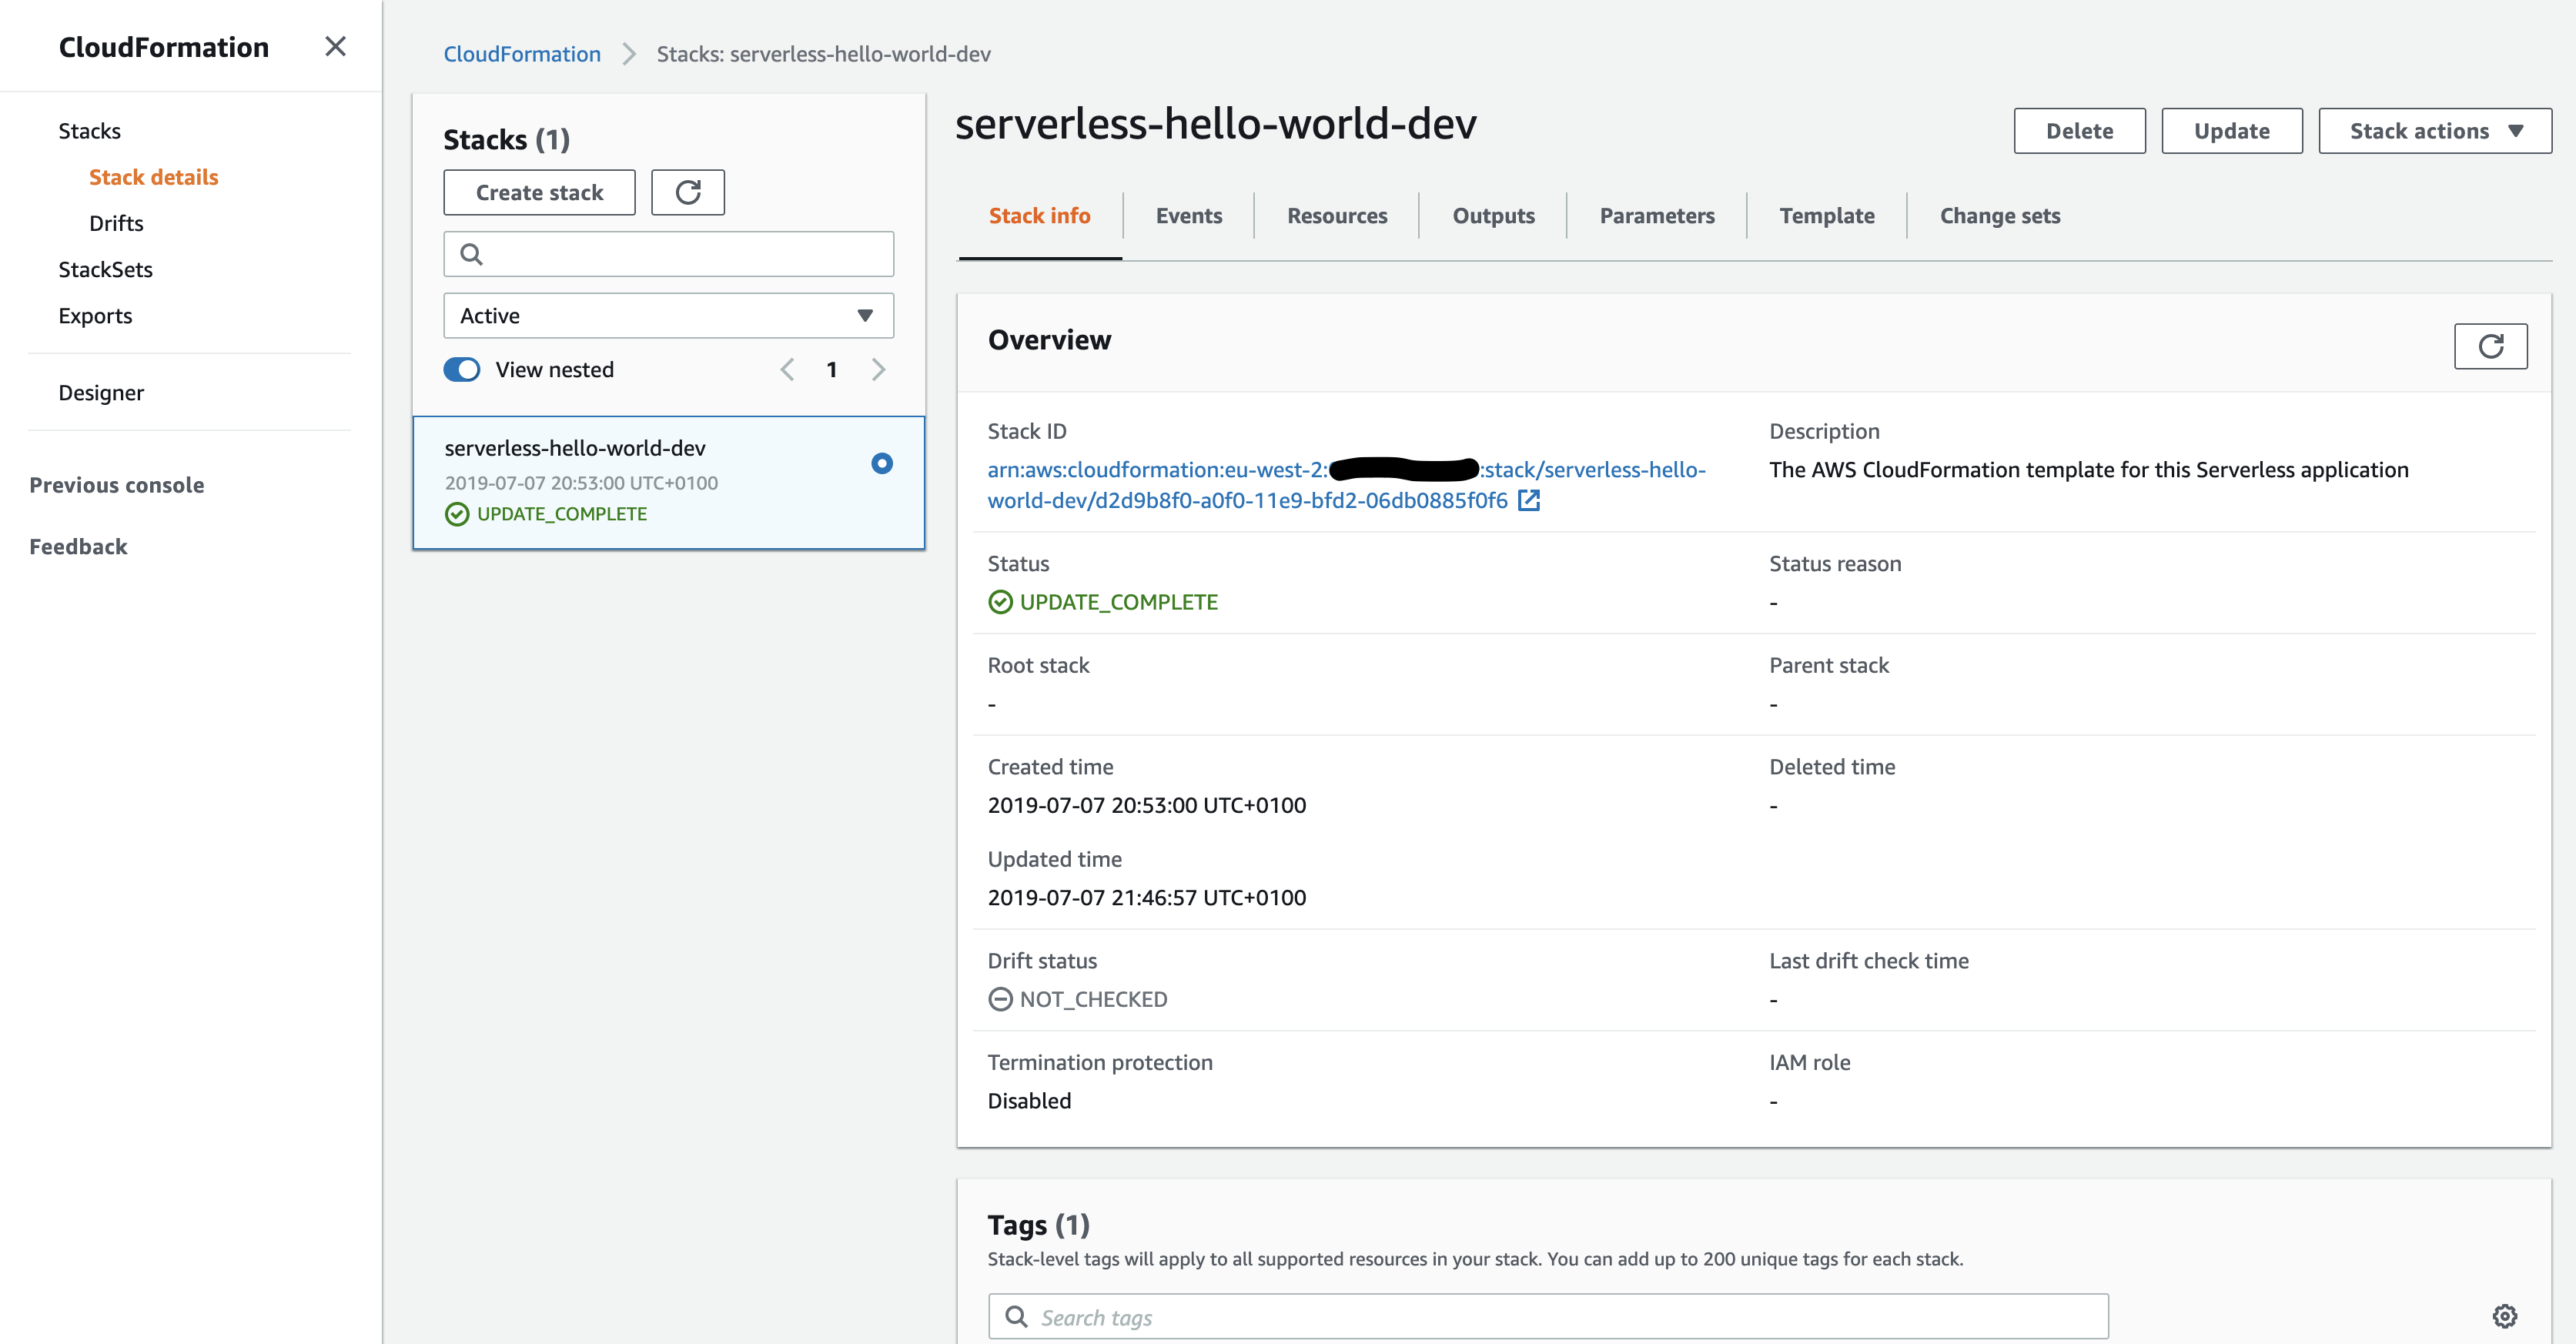
Here we can see we have a serverless-hello-world-dev stack. Remember earlier, I said that SF creates an abstraction over CF? Well at a lower level it actually just takes the serverless.yml files and converts them to a CF template as show above. So, when you do a serverless deploy you can actually just come to the CF stack and see what it has created as well as view additional information like event statuses, outputs etc.
One thing we will do is look inside the template. To do this we click the ‘Template’ tab in the ‘serverless-hello-world-dev’ CF window. Here you will see the CF template file in JSON form. This is what the SF generates at the lower level. This is what can be seen as the daunting part, imagine having to write all of that JSON just to do what we have done so far, which it’s worth noting, isn’t very complicated. Now you can start to appreciate why SF is popular. Due to it being simple to use, it also hides a lot of this stuff away from you, but not to the degree in which you can never see it – all you have to do is come into the CF Template window and view the raw CF JSON or YAML.
Something even more cool is hidden in here, just click the ‘View in Designer’ button.
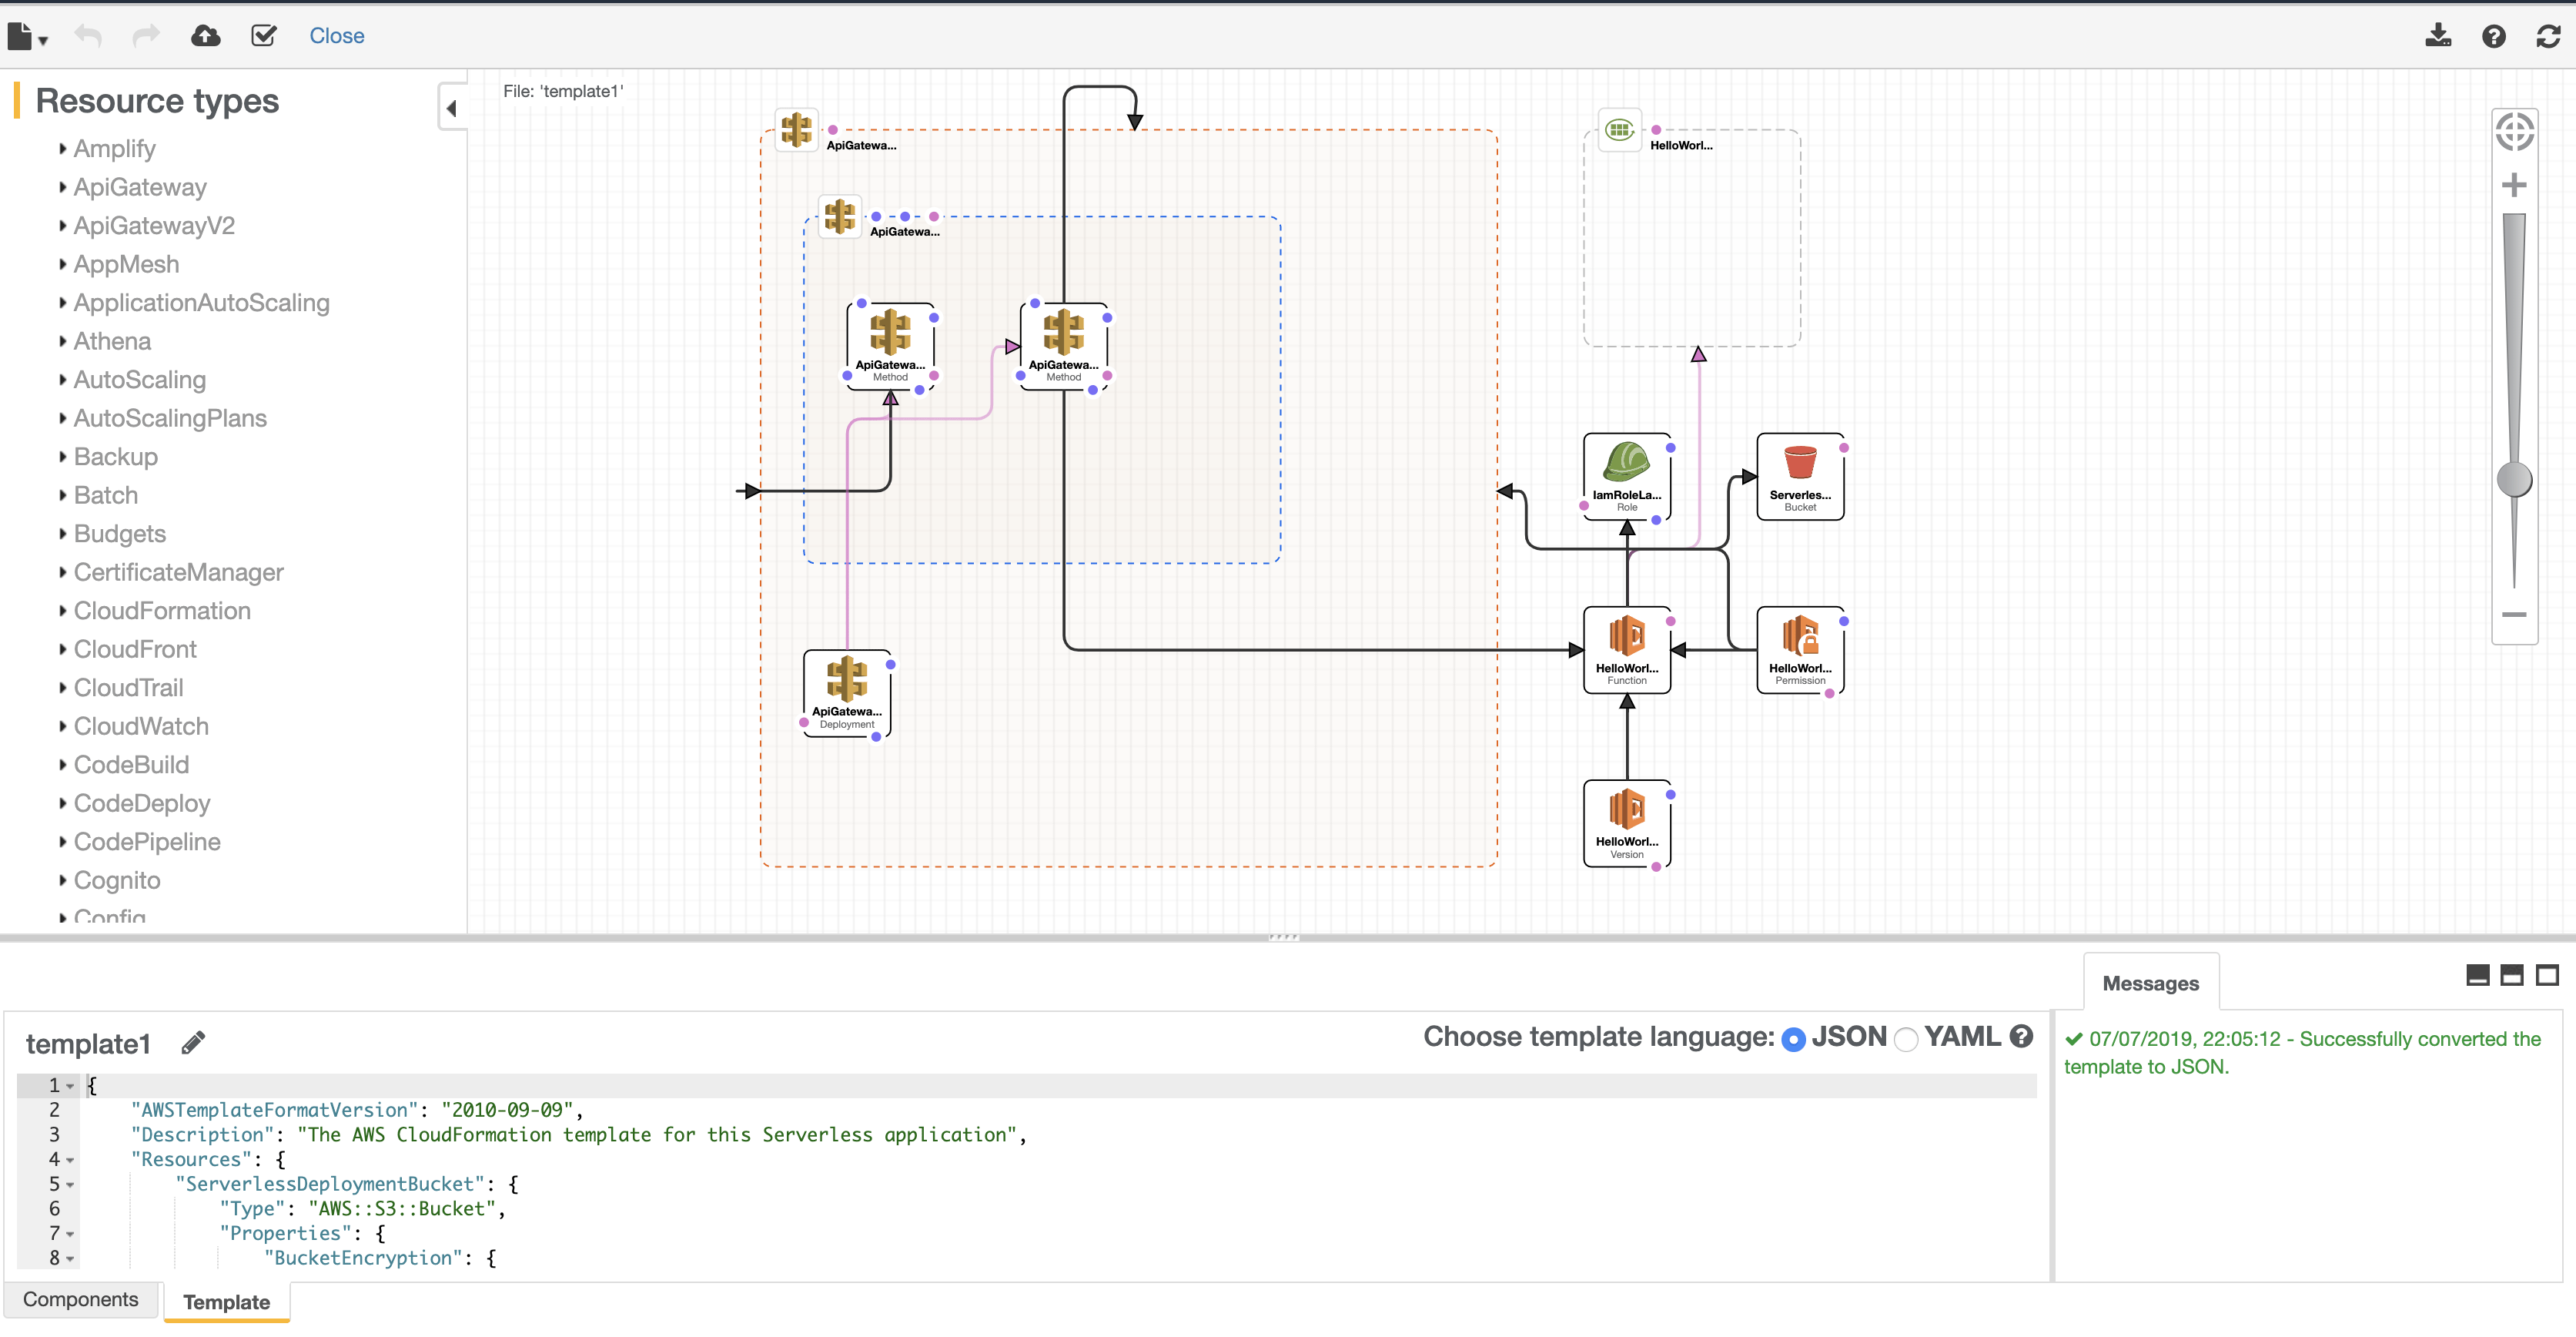
This is a little hidden gem that I think a lot of people aren’t aware exists. Let me tell you what you are looking at here. Not only are you looking at a real-time view of what your current Serverless infrastructure looks like in a nice and clear diagram, but you are also looking at a ‘Designer’ which essentially allows you to create or update your infrastructure. To do this, you would select the resource types on the left-hand side and drag them to the diagram. You can then connect them up to other services and even configure them more specifically in the code view below in either JSON or YAML as it is essentially a code version of what is on the design view. You can even select a resource within the designer view, and it will automatically take you to the CF Syntax code that it translates too. This was something that stood out to me as a pretty nice feature as it allows for a kind of architecture as code approach where you can design what you want your architecture to look like and then use the IaC below in your CI/CD pipelines.
Now, that’s it for the time being, in order to remove our Serverless infrastructure we can also use SF by running the following command in our terminal: serverless remove
This will remove all of the infrastructure we set up over the course of this article. To check everything has been removed, just refresh the CF window and you shouldn’t see the stack anymore. You can even check the Lambda window too. Man, I love IaC.
Closing thoughts
This article was not created in order to fill the theoretical gaps of doing Serverless computing on AWS neither the theoretical specifics about AWS Lambda and how they work at a lower level. If you wanted to read up on such topics, I would start with what a AWS Lambda is, what an Lambda execution context is, as well as just scouring the web for general content around developing Serverless applications on AWS. This information can be found online, there are plenty of resources on these topics. What I wanted this article to do was to show an individual how easy it was to set up a basic Serverless infrastructure in AWS using SF as well as the AWS Console in order to interact with what we created. Additionally we managed to create a AWS Serverless Function using AWS Lambda, we managed to attach a logging monitor and an API Gateway that exposes our Lambda to the public (try sending the exposed endpoint URL to someone and ask them what they see) as well as taking a basic look into CloudFormation and how it can be used in order to not only create and amend infrastructure but to view it in more detail.
All in all we have only covered the tip of the iceberg with what Serverless computing is about and keep a look out on this blog where I will be posting much more content around using Lambdas with DynamoDB, S3 as well as being able to perform Canary Deployments on our Lambdas using Aliases and Traffic Weightings. Another nice feature is being able to perform authorisation on entry to your Lambda using API Keys in API Gateway and Lambda Authorisers (formerly known as Custom Authorisers) that are additional Lambdas that you can create that enables you to perform more in-depth authorisation logic that you want to share across your infrastructure.
But as said above, that’s it for now, and until next time, see ya.