Owning a website can be fun. Rather than thinking of it as being a bunch of words followed by a “.com”, instead think of it like owning a home in the world of the internet. Your own personal space that you can customise to your heart’s content. Depending how you’ve set up your website, when adding or updating any content, in the beginning there can be the manual task of deploying your new content to your website. When updating my site with new content, I had to make the changes locally, render them and then upload the newly rendered content to S3. This task only took around 10 seconds, but I’m an engineer and I like automation.
In previous blog posts I documented my journey of creating a static site using Hugo and hosting it on S3 whilst then utilizing CloudFront in order to evenly deliver my content around the world. Finally I registered my own domain using Route 53 that served as the front door to my website.
Echoing the above, once all of the infrastructure was set up, there was still a hint of manual work needed when amending the site. This was bad, at least in my eyes. My next goal was to remove as much of the manual work around the site as I could in order to allow me more time to create new content.
Hugo Deploy
Fortunately for me, Hugo has the deploy functionality. This allows you to upload your site directly to a Google Cloud Storage (GCS) bucket, an AWS S3 bucket and/or an Azure Storage Bucket. Due to my storage bucket of choice being S3, I used the S3 deploy functionality.
Looking back, it was incredibly easy to automate the task of uploading my site onto S3. All I had to do was modify my config.toml with some deployment specific configuration and run hugo deploy. Not to forget having the AWS credentials and profile configured in order to integrate with AWS.
The config.toml deployment configuration looked like the following.
[deployment]

[[deployment.targets]]
name = "chrisjburns.com"
URL = "s3://[S3_BUCKET_NAME]?region=eu-west-2"

# If you are using a CloudFront CDN, deploy will invalidate the cache as needed.
cloudFrontDistributionID =	"[CLOUDFRONT_DIST_ID]"

[[deployment.matchers]]
# Cache static assets for 20 years.
pattern = "^.+\\.(js|css|png|jpg|gif|svg|ttf)$"
cacheControl = "max-age=630720000, no-transform, public"
gzip = true

[[deployment.matchers]]
pattern = "^.+\\.(html|xml|json)$"
gzip = true
deployment.targetsdescribe the name of the deployment as well as the URL of the bucket that the site will be uploaded tocloudFrontDistributionIDis the ID of the CloudFront distribution you use to deliver your site. If you do not use CloudFront, this can be removed ashugo deployuses it to perform cache invalidations- The
deployment.matchersdescribe the certain behaviour and caching policies for specific file types
After configuring the config.toml with the deployment configuration, I ran hugo to render the sites assets into the public/ directory and then ran hugo deploy --force --maxDeletes -1 –invalidateCDN to deploy the site to S3.
Here’s a breakdown of the deploy command:
--force- Forces any files that may not have changed to be reuploaded (in case of diff problems)--maxDeletes -1- Sets the maximum number of files to delete, or-1to disable (default 256)--invalidateCDN- Invalidates the CloudFront cache for my site. This means all cached content that is held in any of the CloudFront edge locations across the world will be removed ready for the retrieval and caching of new content.
Here was the output of the deploy:
Deploying to target "chrisjburns.com" (s3:// [S3_BUCKET_NAME]?region=eu-west-2)
Identified 34 file(s) to upload, totaling 38 kB, and 0 file(s) to delete.
Success!
Invalidating CloudFront CDN...
Success!
After about 30 seconds, once all of the CloudFront caches had been invalidated, I could navigate to my site and see the newly added/updated content.
Using GitHub Actions for the Deployment
As shown above, I reduced the effort of deploying my site down to one command. Instead of rendering my site’s assets and then manually uploading the content to S3, I could now do all this simply by rendering the assets and using the Hugo deploy functionality. On top of this, it also invalidated CloudFront caches which was previously a manual task. Although I only had to run two commands to render and deploy my site, there was one more step to add in order to make this entire process fully automated - GitHub Actions.
GitHub Actions as described on their website: “Automate your workflow from idea to production”. Since my website source code is checked into GitHub, this was great for me as it allowed me to easily automate my sites deployments every time I commit any changes - for free.
To enable GitHub Actions, I setup a workflow in the ‘Actions’ tab of my site’s repository. For my workflow, I wanted to be able to build and deploy my site for every merge to master. To do this, I added the below at the top of my main.yml in the .github/workflow/ directory.
# This is a basic workflow to help you get started with Actions
name: Build and Deploy Hugo Site

# Controls when the action will run. Triggers the workflow on push
# events but only for the master branch
on:
  push:
    branches: [ master ]
This will make sure that on every push to master a workflow build is kicked off.
Next, I added a build job that would contain the steps of building and deploying my site. These should look familiar with what I previously had to run manually.
jobs:
Build_and_Deploy:
    runs-on: ubuntu-18.04
    steps:
    # Checks-out your repository under $GITHUB_WORKSPACE, so your job can access it
    - uses: actions/checkout@v2

    # Sets up Hugo
    - name: Setup Hugo
    uses: peaceiris/actions-hugo@v2
    with:
        hugo-version: '0.63.2'
This would checkout the repository inside of the workflow and also use the peaceiris/actions-hugo@v2 featured action that installs Hugo inside of the workflow in order for it to perform builds and deploys.
Next I added the build step that would handle the rendering of my Hugo site’s assets.
# Builds chrisjburns.com repo
- name: Build
  run: hugo --minify
Lastly, I added the deploy step with the command that I used previously to deploy.
# Deploys built website to S3
- name: Deploy to S3
  run: hugo deploy --force --maxDeletes -1 --invalidateCDN
  env:
    AWS_ACCESS_KEY_ID: $
    AWS_SECRET_ACCESS_KEY: $
As you can see, I use the AWS credentials in order to deploy. This makes sure that the workflow has the correct permissions in order to deploy the site to S3. The credentials are provided using GitHub secrets, again, very easy to add.
After this, there was a fully working workflow that was triggered anytime it detected a change on master. Whether it be a direct push, or a merge request from a feature branch, any time it detects a push to master, it will kick off the pipeline.
Tidying up permissions
With the workflow set up and the building and deploying of the site being fully operational. There was just one thing I had to tidy up. If you’re familiar with AWS or any other cloud provider, you will more than likely be aware of the principle of least privilege. For those who aren’t well versed in what it entails, the principle of least privilege is a mantra that dictates that a user or resource only has the permissions it needs in order to perform its job function. At no point should it have more permissions than it needs.
For my pipeline, initially I had provided my personal AWS credentials that had admin access to all of the services within my account. This was bad. At no point should GitHub Actions have more permissions than it needs to be able to deploy my site. Knowing this, I created a new IAM User with its own set of AWS credentials, that I then used to replace my personal credentials in the pipeline.
For the new pipeline user, I created a policy that would include the permissions needed in order to deploy my site. After some investigation, I narrowed down the permissions that hugo deploy needs at a minimum in order to deploy from the pipeline. The following is the policy that was attached to the pipeline user, that is used to perform the deployment of the site – following the principle of least privilege.
{
    "Version": "2012-10-17",
    "Statement": [
        {
            "Sid": "GitHubActionsPolicy",
            "Effect": "Allow",
            "Action": [
                "s3:PutObject",
                "s3:PutBucketPolicy",
                "s3:ListBucket",
                "cloudfront:CreateInvalidation",
                "s3:GetBucketPolicy"
            ],
            "Resource": [
                "arn:aws:cloudfront::[ACCOUNT_NO]:distribution/[CLOUDFRONT_DIST_ID],
                "arn:aws:s3:::[S3_BUCKET_NAME]",
                "arn:aws:s3:::[S3_BUCKET_NAME]/*"
            ]
        }
    ]
}
As shown above in the policy, we are giving the pipeline permissions to update and add objects to the S3 bucket as well as adding permissions that allow for the creation of cache invalidations in CloudFront.
Once the policy was attached to the pipeline user, and the pipeline user AWS credentials were provided as secrets to the pipeline, I performed another push to master to ensure everything worked as expected and within a few seconds, I had all green from the pipeline with an updated site.
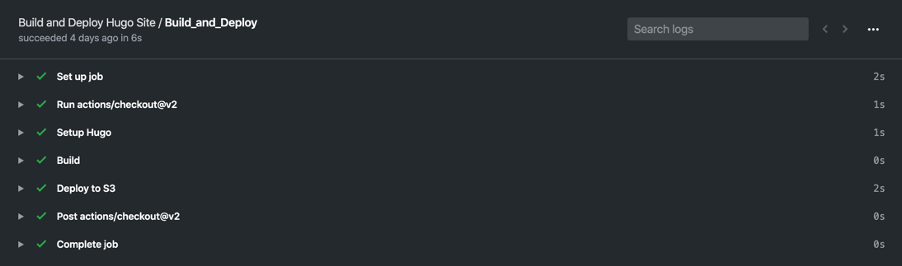
Closing comments
In this blog post I have detailed the steps I took in order to setup a fully functioning CI/CD pipeline for my site in GitHub Actions. The pipeline renders and deploys my site’s assets to S3 automatically. From what used to be manual tasks, GitHub Actions and Hugo Deploy have now taken these tasks off my hands leaving me – the engineer – more time to develop new features for my site without having to worry about the manual duties in between.
Hope you enjoyed this series of blog posts, any questions, you can contact me on the social networks listed in my bio.