Over the past year, I have been working on a programme of work that, initially, was intended to extend an existing Azure Service Fabric solution by adding a further 14 WebAPI endpoints. However, early in the project, we took the design decision to break the new APIs into their own solutions.
This decision was primarily based on start-up time of the application when debugging locally but presented an old foe - duplication of code. We had many hundreds of useful methods with thousands of lines of code and, whilst we could simply copy-n-paste the methods, that was clearly not a practical or sustainable solution - not to mention its total disregard for Don’t Repeat Yourself.
The customer had an on-premise TFS Server which we already used for the build process so the solution was simple: NuGet the methods and use TFS to host the feeds. After all, we’d only have 3-5 packages, right? Wrong! Whilst we genuinely thought there would not be hundreds of packages (and we were right on that!), we have reached 21 packages and, along the way, encountered the obvious problem; debugging. OK, maybe it is not really an obvious problem, but given the title of this blog, I hope it comes as no surprise!
This post isn’t intended to give a deep, exhaustive explanation of debugging - there is a brief overview in a moment - the intent here is to help solve the frustrating moment when you try to debug into a method only to find Visual Studio steps over the code (as it is in an included NuGet package rather than when you accidentally hit F10 instead of F11 - we’ve all done it!) and continues on its merry way. Often this won’t be an issue as the defect you are hunting down will be elsewhere, but what about when it’s not? What about when the code containing the bug is in a NuGet package you’ve created?
Debugging in Visual Studio - A Quick Overview
The screen-shots that follow have been taken from a scaffolded Console Application with no meaningful changes - I used the .Net Framework 4.6.1 but, that was for simplicity and I mention for reference only - any supported language will work; VB, .NetCore, etc. The screen-shots are from Visual Studio 2017 Enterprise, but NuGet Manager has been available in Visual Studio since Visual Studio 2010 and is available in all editions including Community.
Below is a very simple Main method. As you can see, it will create a new Contact and then write the details to the screen.
namespace NugetDebuggingDemo
{
    using System;

    class Program
    {
        static void Main(string[] args)
        {
            var contact = new Contact { Id = 1, Name = "Jay" };

            Console.WriteLine($"Id: {contact.Id}, Name: {contact.Name}");
            Console.WriteLine("Press any key to exit");
            Console.ReadKey();
        }
    }
}
The output will look like the example below:

I am sure the above output will not surprise you. However, below is the output when the Contact Id is not set:
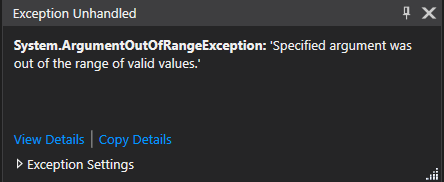
Now, in an ideal world, the exception would tell us which parameter was out of range and what that expected range was. Whilst this is a very basic error to locate (as the class below will reveal in a moment), in a real-world example, we may have to go through many classes before we reach the source of the error.
namespace NugetDebuggingDemo
{
    using System;

    public class Contact
    {
        private int id;

        /// <summary>
        ///     The Id for the contact.
        /// </summary>
        public int Id
        {
            get
            {
                if (id == 0)
                {
                    throw new ArgumentOutOfRangeException();
                }

                return id;
            }
            set
            {
                if (value == 0)
                {
                    throw new ArgumentOutOfRangeException();
                }

                id = value;
            }
        }

        /// <summary>
        ///     The name of the contact.
        /// </summary>
        public string Name { get; set; }
    }
}
For this example, we’d probably set a breakpoint on line 9 (as with everything in Visual Studio, there are many ways to do this - selecting the line and clicking “F9”, clicking in the left most column etc.) but we’d end up with a breakpoint:
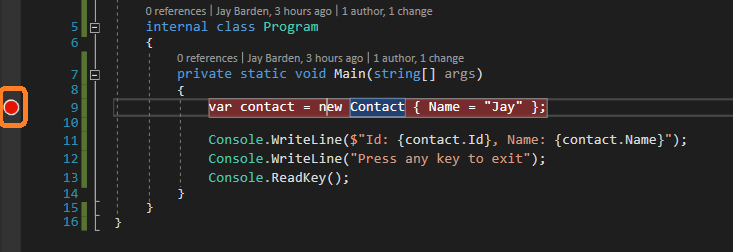
Debugging from here is as simple as clicking “F5” (if you prefer the menu option: Debug > Start Debugging). For this simple scenario, a few clicks of “F11” to step-into the code would locate our issue.
But wait, the class is in a NuGet package, not our solution…
When the class is inside a NuGet package and we “F11” at our breakpoint on var contact = new Contact { Id = 1, Name = "Jay" }; we come down to line 11, rather than step into the offending class (when we F11 during execution of Console.WriteLine($"Id: {contact.Id}, Name: {contact.Name}");), we are basically back to where we started:
Below are the steps on resolving this issue.
Setting Visual Studio to use a local feed for NuGet packages
Creating the local NuGet feed folder
The first step required is to create a local NuGet folder to host the debug NuGet packages. The word local here does not have to be taken literally – a network share or even a file share on Azure (AWS / etc.) will work. You can even create your own internal NuGet server if you want but that is outside of the scope of this article. For the remainder of this blog, we’ll assume the C: drive of the developer’s machine will be used.
The name of the folder is not important but, for simplicity, make sure the name is descriptive enough to be remembered: c:\Local NuGet Feed is a sensible name, c:\My stuff is probably not.
Setting Visual Studio to use the local NuGet feed
The screen-shots below are from Visual Studio 2017 but, other than potential location changes for some of the options, the steps should work for VS2010 and upwards.
Open Visual Studio and navigate to the NuGet options for the sources: Tools > Options > NuGet Package Manager > Package Sources (or type Package Manager in the Quick Launch search box). All being well, a screen like the one below will be shown:
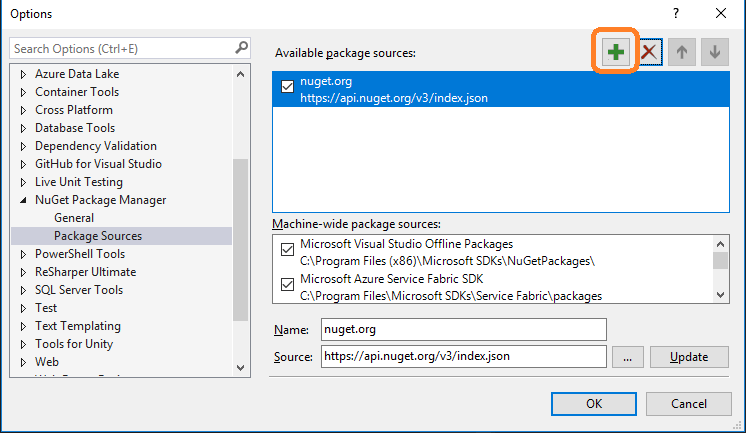
Click on the highlighted “+” button to add a new source location. The screen will update as shown (the blue-highlighted option is the newly created, default source):
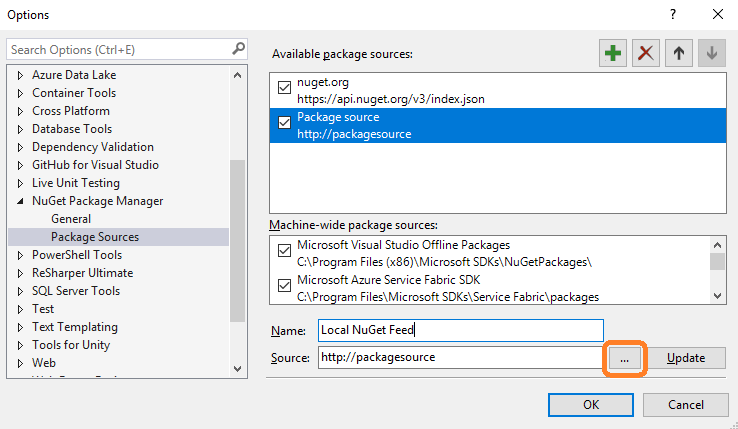
In the lower half of the window, we can change the name and the source. As with the folder itself, I recommend being explicit with the name to avoid confusion later. Once you are happy with the new name, click the ellipses highlighted below to change the source. A screen similar to the following will be displayed (normally it will default to your local Documents folder, I have pre-selected my new folder):
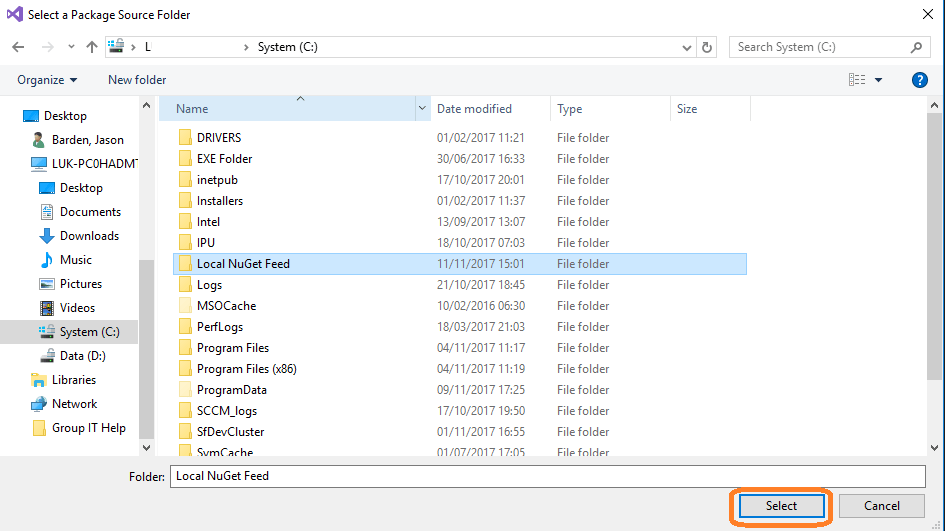
Once you have clicked on the desired folder (do not enter the folder, just single-click it), click the highlighted Select button to return to the previous screen:
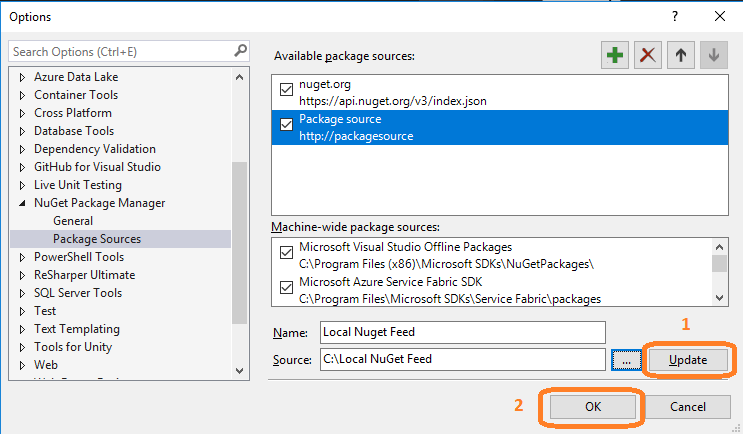
As you can see, the bottom half of the right-hand side is now correct but the blue highlighted source has not updated. To complete your update, click the Update button and then the OK button. The OK button does also update the screen but you will need to click it a second time to leave the screen completely.

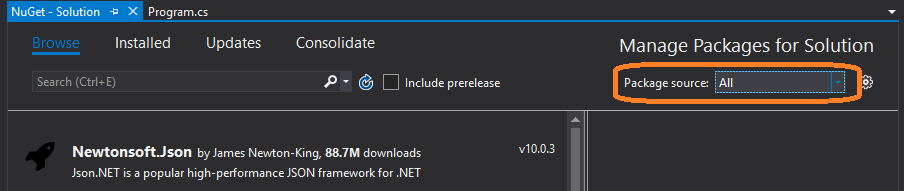
Visual Studio will now include this feed whenever it is specifically selected or when you have selected All as shown below:
Creating the local NuGet Package
If you do not have a copy of the NuGet executable, please take a moment to download the latest version from nuget.org. before continuing.
For simplicity, it’s recommended that you store the NuGet executable in your repository directory and add that directory to your Environment Variables path parameter. This isn’t 100% necessary but it does save typing!
The first step in building the NuGet package is to perform a Debug build of the solution you want to use as a NuGet package. For brevity, we will assume this has been done and you used a new version number. Updating the version number means you can update your solution - if you do not want to increase the version number, you will need to downgrade your solution before you can upgrade it to your debug-enabled version. You do not need to have a NuGet spec file anymore – the NuGet executable will use the .csproj file. You can use a .nuspec if you want / have one already but the examples are based on using a .csproj (to use the .nuspec, simply specify it instead of the .csproj file).
Please note: if you use the .csproj file, the NuGet version is based off the values in the AssemblyInfo.cs.
Once built, open a Command Prompt / PowerShell prompt in the project folder (the examples use a Command Prompt as the colours are clearer – the process works for both prompts) and enter:
nuget pack "NuGet Example.csproj" –symbols (where NuGet Example.csproj is the correct name for your project)
A short-cut for the above is:
nuget pack –symbols
Both commands will perform the same way if no .nuspec file exists. The second command will prefer the .nuspec if it exists (although NuGet may change this in a later version). With no .nuspec file, the only difference is you are being explicit in the first example. Depending on the size of the project, the command should only take a few seconds and produce output like below:
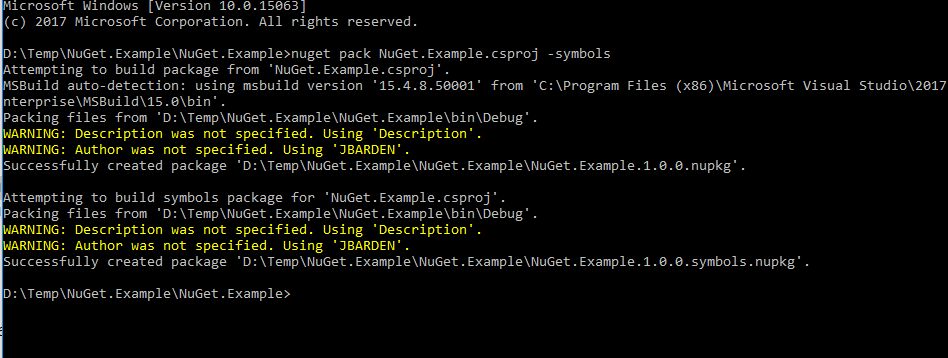
If you forgot to build the solution, the above would be an error message saying no binaries could be found. Alternatively, if you see an old version number, this means that the solution does have the binaries, but has not been rebuilt since the version number was increased.
As the solution is using the .csproj file and I have not populated the Company or Description in the AssemblyInfo.cs file, there are two warnings in the above screenshot. This was done to demonstrate how good the NuGet executable is at validating everything, it was not a mistake! ;-) Your project folder should now include two .nupkg files:
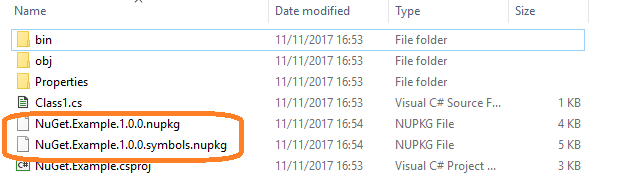
Copy the two NuGet files created to your local NuGet feed folder. Whilst writing an internal version of this blog, colleagues said “we don’t need to copy both packages - we have to rename the -symbols and include only that file” but, I’ve not had the same experience - YMMV. If you are unlucky enough to find debugging into the NuGet package still doesn’t work for you, please try the rename trick.
Update the NuGet package in the target Solution
I’ve cheated a little - I’ve already added the package to the demo solution and made it use the NuGet version of the highly useful Contact class. However, below are the details of how to update your solution assuming you already have a version of the package installed (which, if you are reading this, I think is a fair assumption). To facilitate this, I built a 1.0.1 version of the NuGet package - as the package is using the standard .csproj file, this was as simple as increasing the AssemblyVersion and AssemblyFileVersion in AssemblyInfo.cs to 1.0.1.0 (the final “0” - Revision - is ignored in the NuGet semantic versioning).
The last step is to update the target solution to use the new, debug-enabled, NuGet package. This process is almost identical to the standard process - the only difference is the source. From the target Project / Solution, open NuGet Manager as shown below:
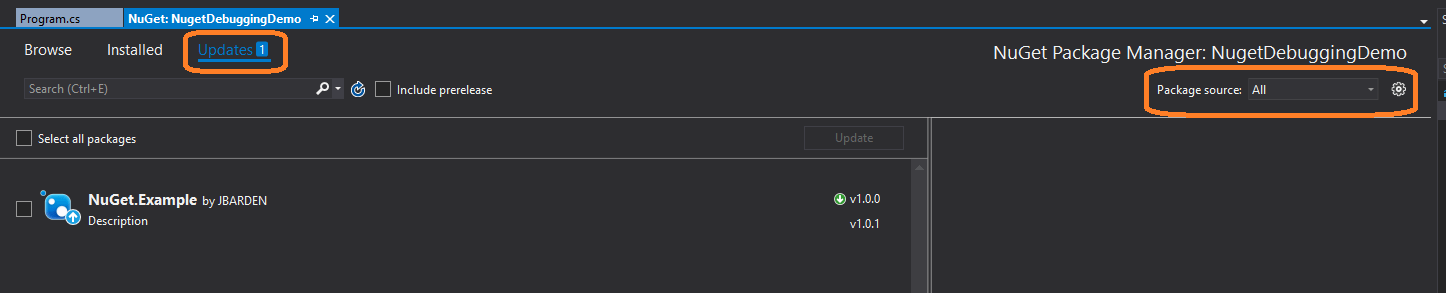
In the above, I have set the Package Source to All and changed to the Updates tab. As we saw earlier, the warnings generated by the NuGet pack command have been realised in the NuGet screen – the Description is, as it said, just “Description” and my username is showing as the author.
All that is left is to select the newer package (by ticking the box to the left of it - or, the Select all packages) and click the Update button to update the solution.
Finding the issue now we have a debug-able NuGet package
With the above in place, we can resume our debugging session. With the breakpoint still set on line 9, launching the console application via “F5” (or the Start button etc.), we can begin to step into the code (via “F11”) until we reach our destination. The Program class has not changed much - in fact, the only change is the additional using statement on line 4 - which brings in our NuGet package version of the Contact class:
namespace NugetDebuggingDemo
{
    using System;
    using NuGet.Example;

    class Program
    {
        static void Main(string[] args)
        {
            var contact = new Contact { Name = "Jay" };

            Console.WriteLine($"Id: {contact.Id}, Name: {contact.Name}");
            Console.WriteLine("Press any key to exit");
            Console.ReadKey();
        }
    }
}
As we step into our code, rather than being forced to step over the error and be faced with the less-than-helpful exception, we can now step into the NuGet package and into the class until we reach the actual issue:
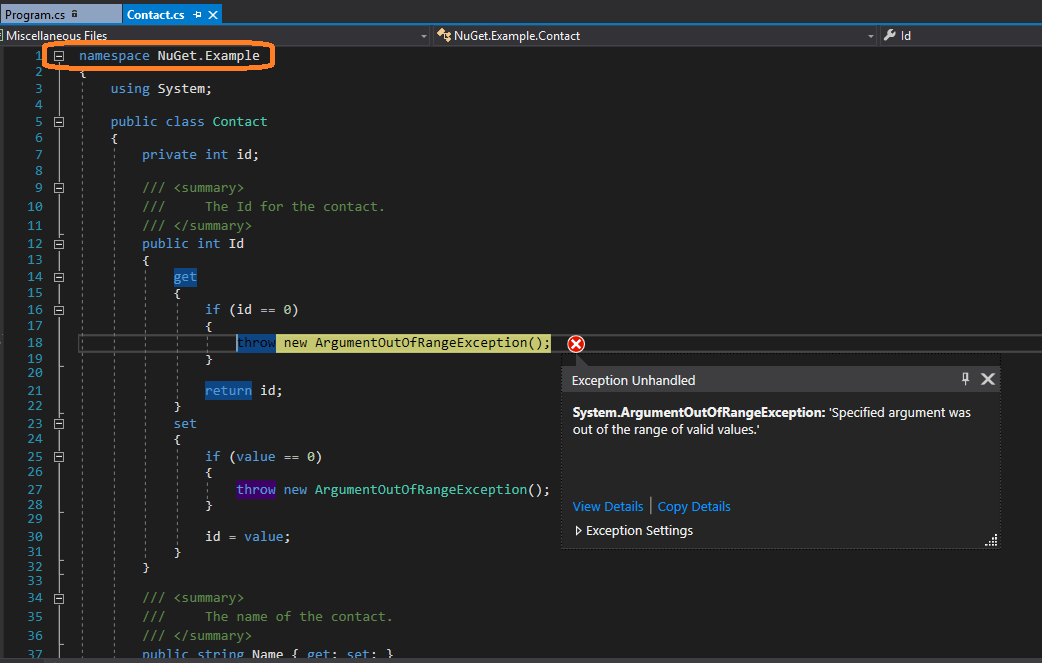
The above shows that we are actually in the Contact class from the NuGet.Example namespace - which, of course, is in our NuGet package, not our solution. :-)
Now we’ve found the cause, we can either fix it or change our calling code.
How to handle nested NuGet packages
If you, like the project I started this blog by referring to, have many NuGet packages, the chances are you will - sooner or later - end up with a hierarchy of dependent packages. You will, no doubt, be please to learn that the above works there too. The only things you have to do are:
- Starting at the deepest point in your NuGet package hierarchy, create a debug version of that package - don’t forget to bump the version number to avoid downgrading then upgrading the next package in the chain
- Update the next NuGet package up the chain to use the new debug version of the package - again, bump the version
- Rinse-n-Repeat up the chain until you reach the top-most NuGet package
- Update your solution to use the new chain of debug-enabled packages
- Debug as normal
Summary
Debugging an issue in a NuGet package is, following the above steps, almost as straightforward as debugging directly through the class. No more headaches guessing the problem and potentially losing hours only to find you were wrong.
Whilst I have not had the opportunity to try it, I have been made aware (Thanks Chris Dickson!) of a potentially very useful site that resolves the source issue for public NuGet packages that you have not built: SymbolSource. Let me know your experiences!
One final comment - assuming you followed the bump the version advice - don’t forget to either commit the updated NuGet packages to your build server or downgrade your application to the original versions before you commit it. Failure to do one of these will cause your Solution to fail to build on the build server (I know, it may seem unnecessary to say but, trust me, I’ve done - several times!)
Happy Debugging!
