The aim of this lab is that you will learn how to configure Postman and build basic CRUD (Create, Read, Update and Delete) requests to be used with Power Platform Web API. Postman is one of the most popular third-party tools that can be used to authenticate to Microsoft Dataverse instances and to create and send Web API requests and view responses.
Prerequisites
- Power Apps Dataverse instance that you can connect to. You can find more information around creating environments in - Environment Setup Codelab
- Azure Application User - You can find more information in how to register an application user in Environment Setup Codelab
- Download and install the Postman desktop application (Windows 64-bit)
Some links you might find useful through out this lab:
Postman is an API client that makes it easy for developers to create, test and share API requests. It allows users to create and save HTTP/s requests and it allows users to read their responses as well. Postman allows you to either create an account for free or continue to use the app without an account.
There are few features to point out about Postman before we continue with the rest of this lab.
API Client
Postman API Client is the main tool which enabled users to easily to define API requests. It automatically detects the language of response and format the text inside the body to make any inspection easy. The client also includes built-in support for authentication protocals like OAuth 1.2/2.0 and many more. API Client allows you to organize requests into collections to help organize the requests for reuse so you dont have to waste time building everything from scratch.
Environment and Variables in Postman
An environment in Postman is a set of key-value pair variables called ‘Environment Variables' that you can reference and use in your requests. When you create an environment inside Postman, any change to value of the key-value pairs will reflect in the requests so that we do not need to update the requests. Multiple environments can be created in Postman and each environment can have their own set of variables created. Variables created inside of an environment are ‘Local Scope Variables' and they will only work inside the environment they were created in. However Global variables can be created in Postman as well and they do not belong to any specific environment.
Workspaces
Postman Workspaces help you organize your API work and share with others. You will need to create a Postman Account to be able to use workspaces. In this lab we will be using Personal Workspace and they are designed for individual work. They contain all the tools required to work with APIs and you can access them between different Postman instances.
Postman Navigation
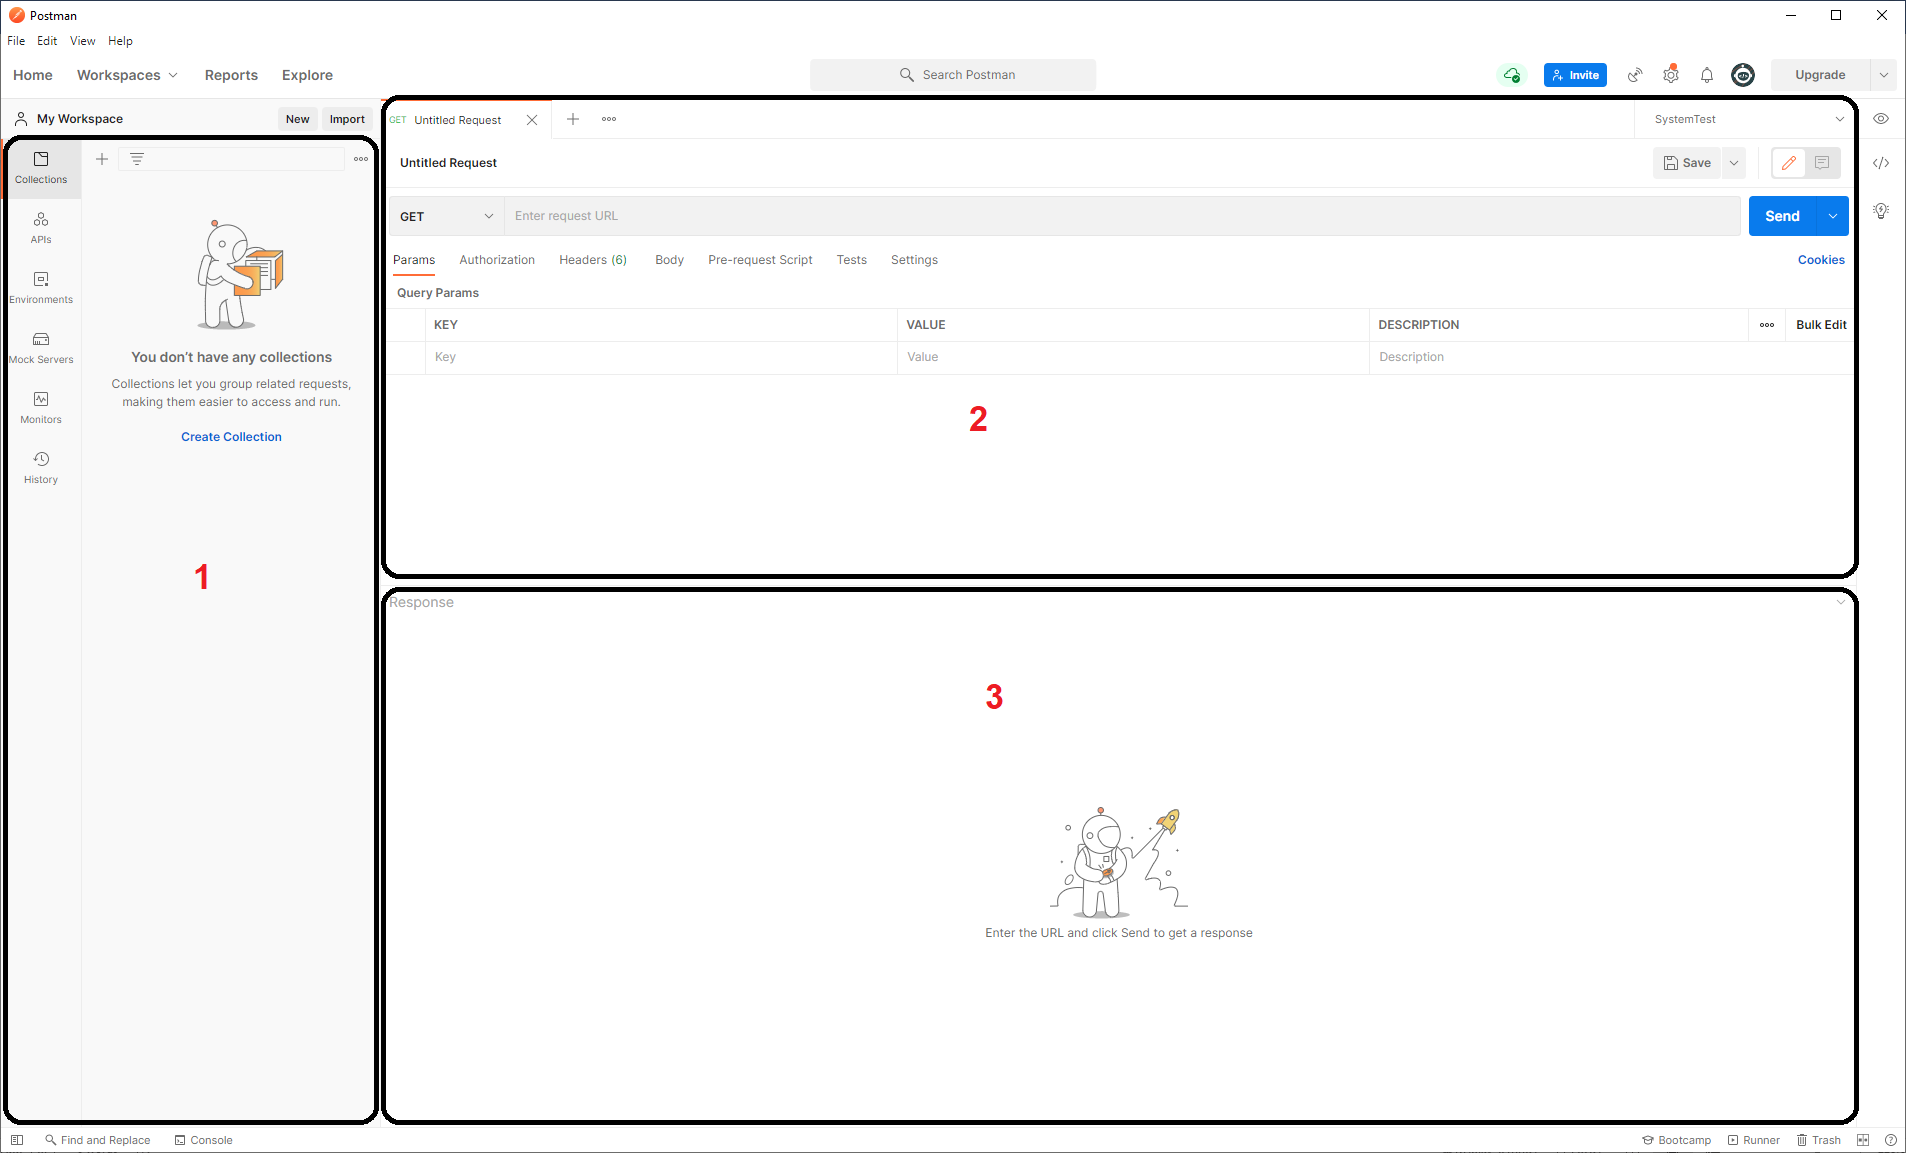
1 - Side Bar Section
This box is where you can find environments, history, collections and apis.
2 - Request Builder Section
This box is where you can build requests and select which environment to use.
3 - Response Section
This box shows the response from the server that you receive after executing a particular request.
Information on more complex tools in Postman, such as Collection Runner can be found in the Learning Postman link above. Collection Runner allows you to save multiple requests in a specific order and execute them.
Once you downloaded and installed postman, you will now need to sign up to a free postman account in order for you to be able to create a workspace and environment for this lab.
Launch Postman once it is installed and you will get the screen below to create a free account
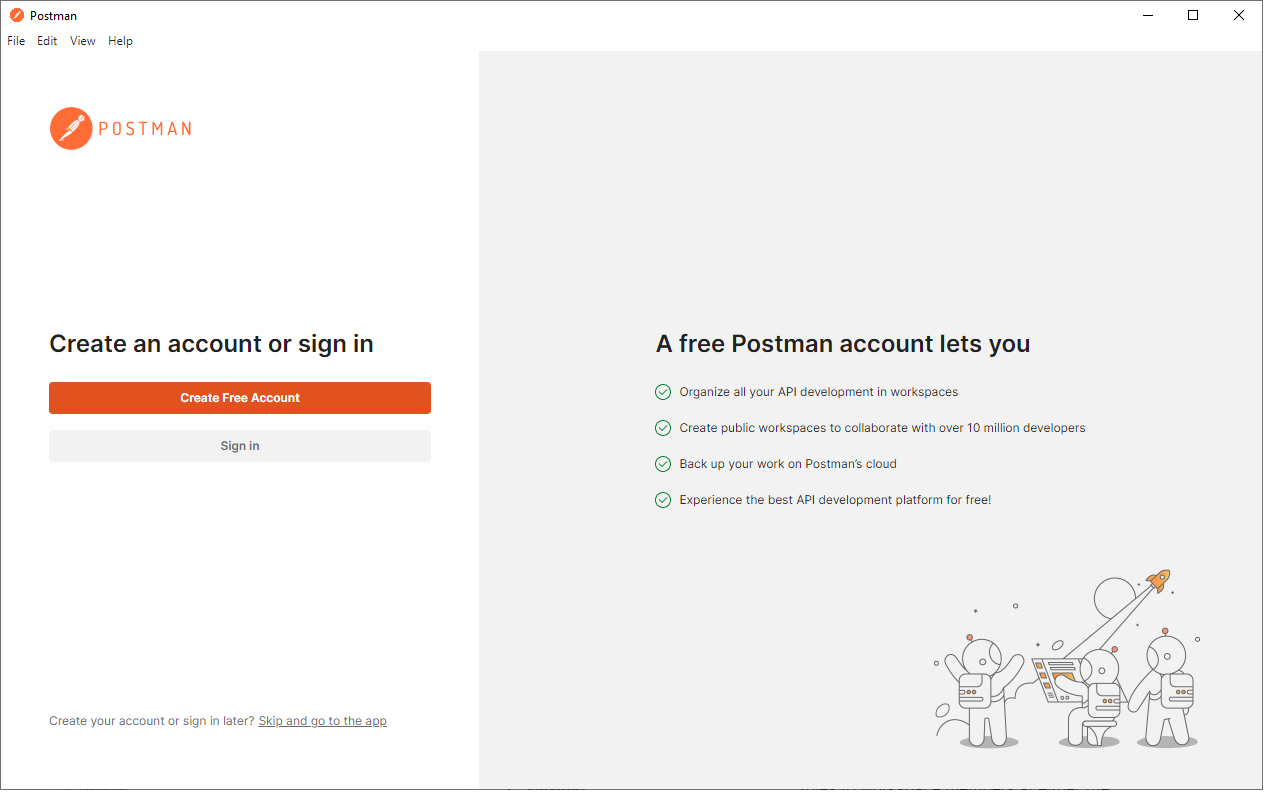
Go ahead and click Create Free Account and simply follow the steps by providing an email address and a password
When asked to Create your own team, please click on Continue Without a Team button as shown below
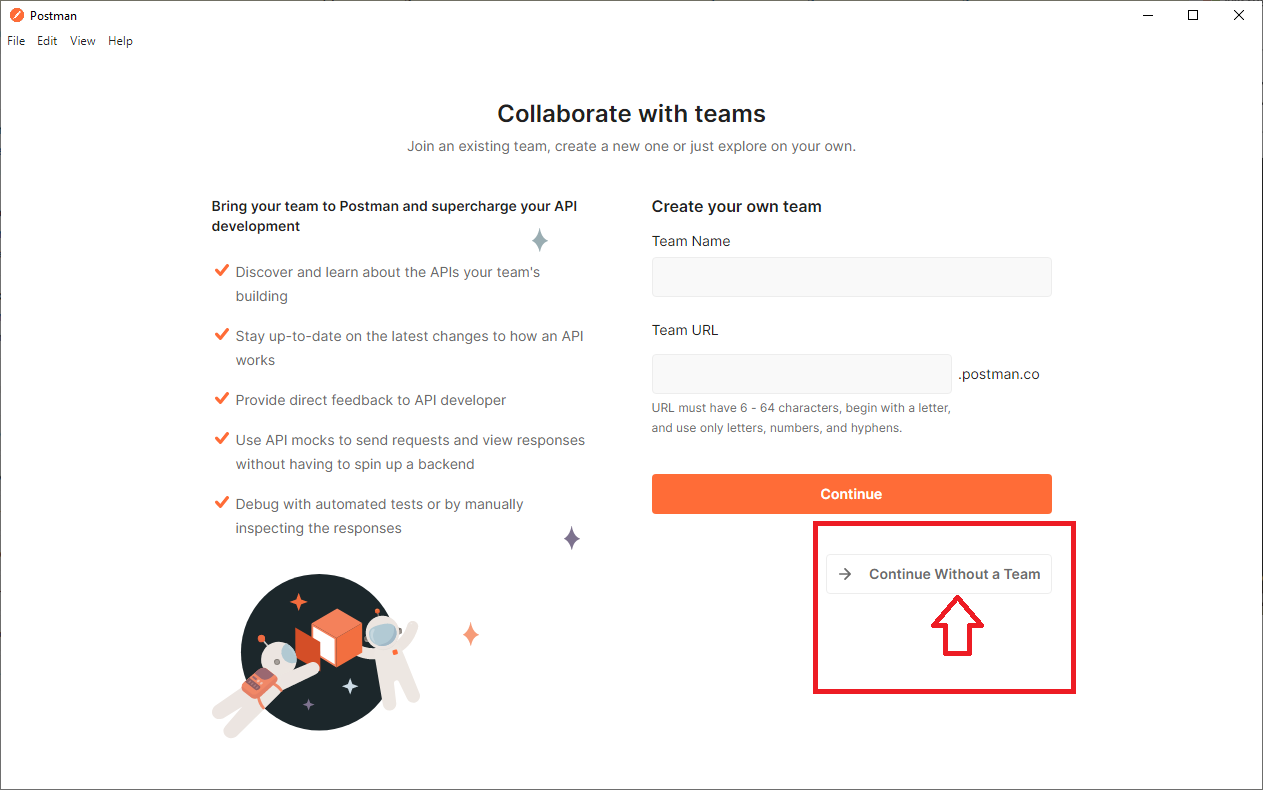
You should now on the screen below
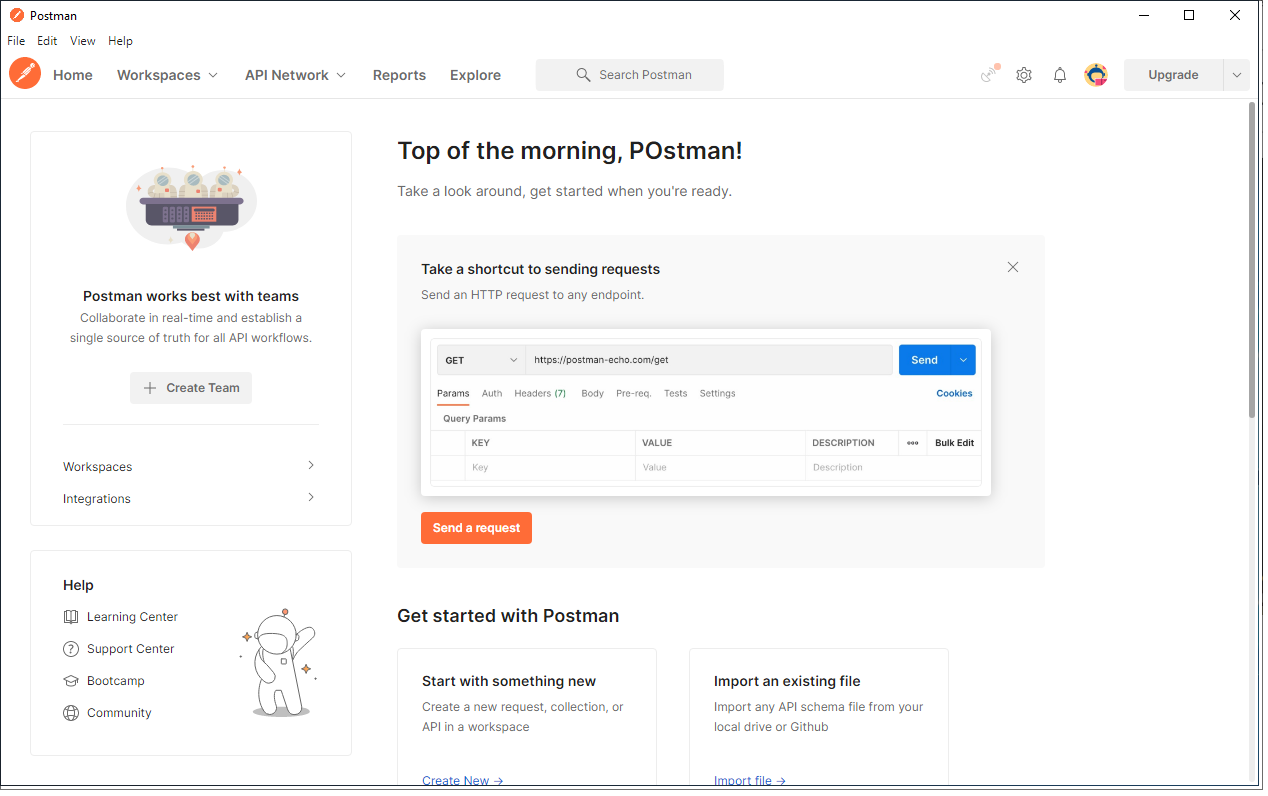
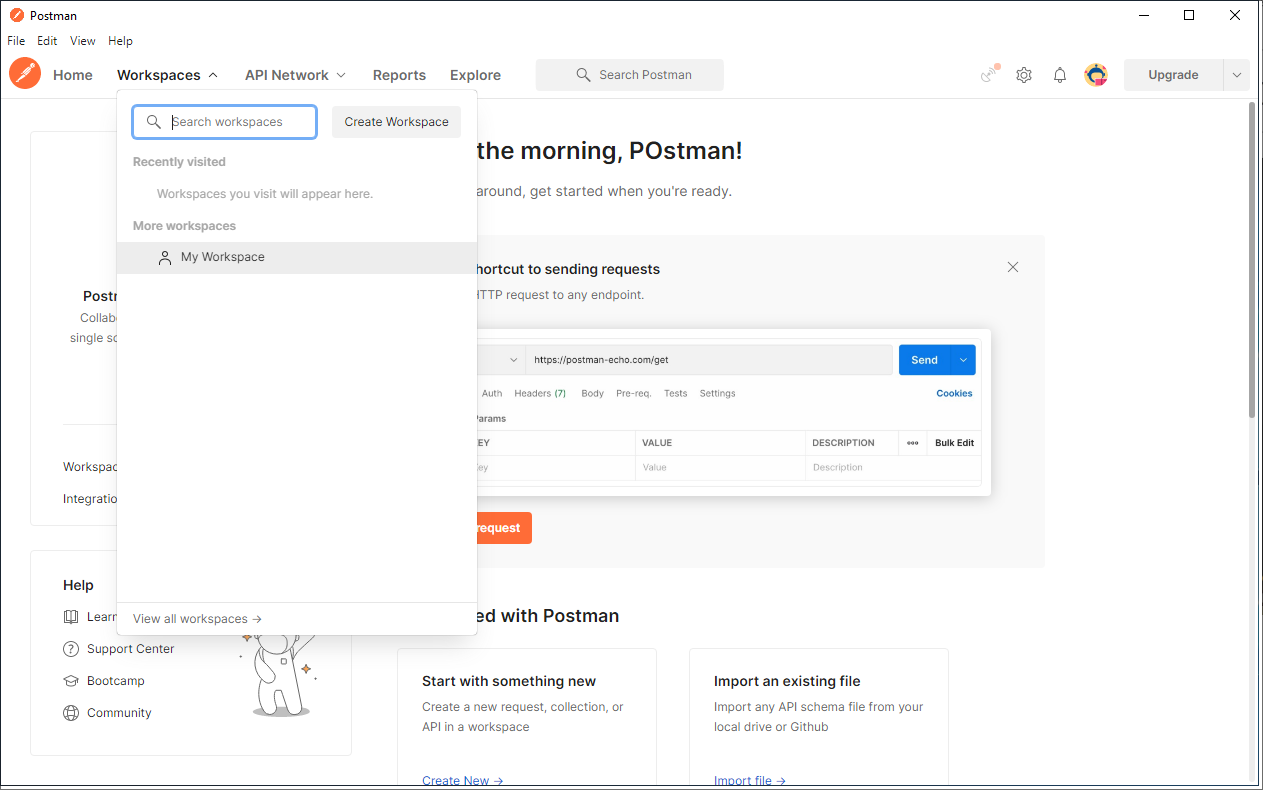
To access your ‘Private Workspace' please click on Workspaces on the toolbar and select My Workspace from the dropdown
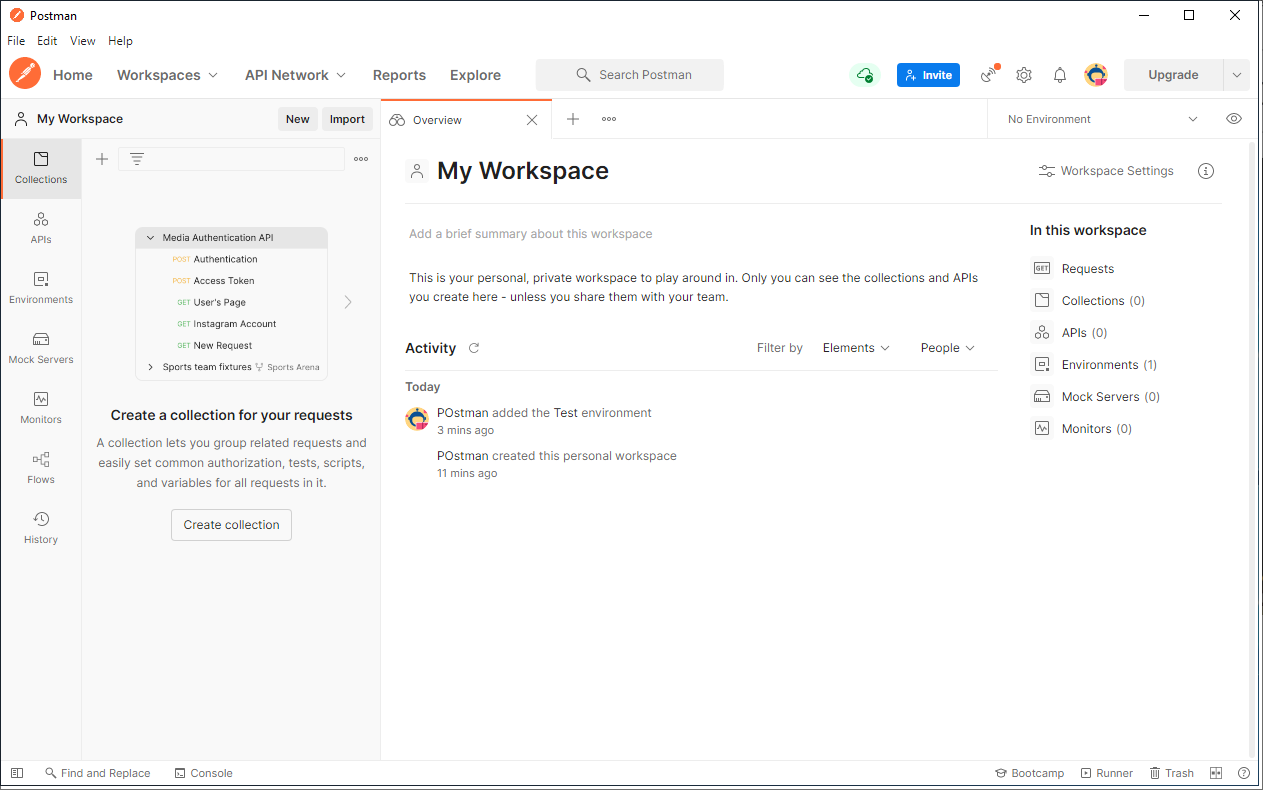
Once you selected ‘My Workspace' , you should now see the screen below where you can start to create an environment and adding variables
Create A Postman Environment
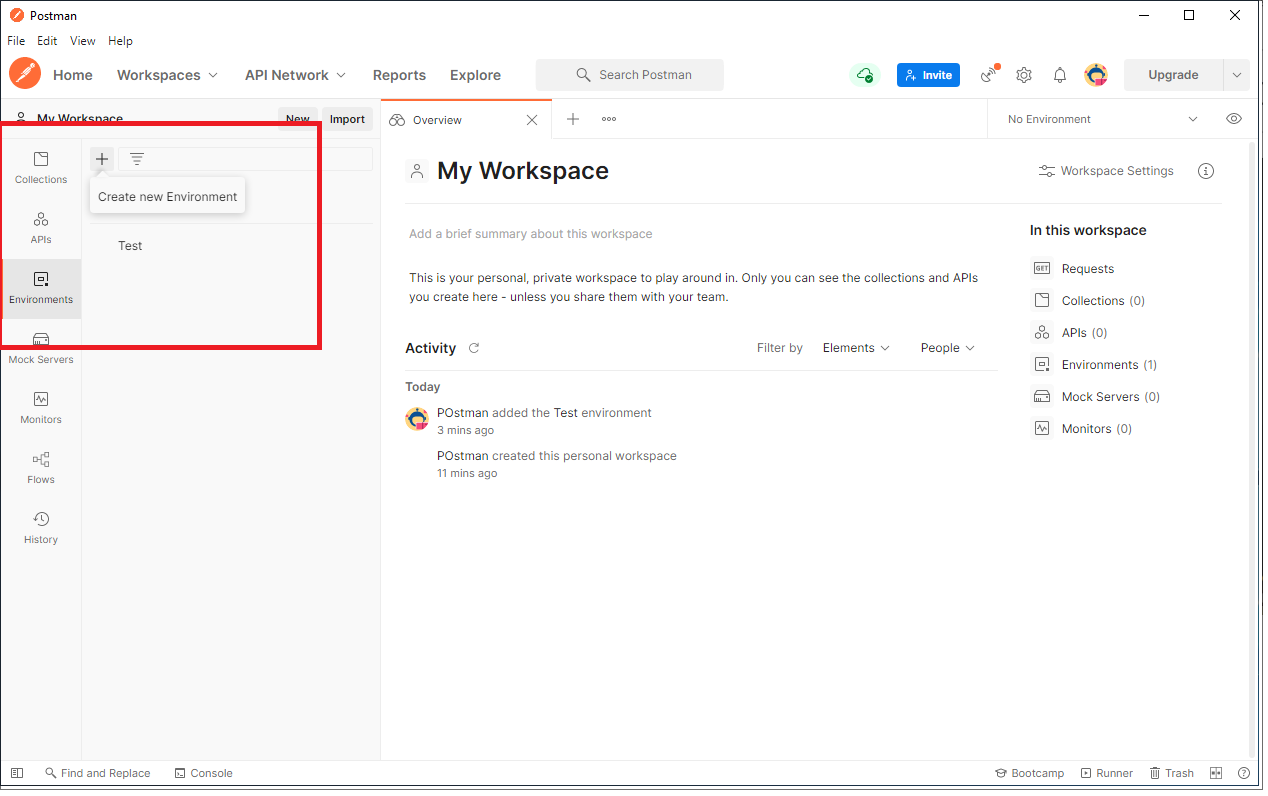
Click on Environments from the left Side Bar Section and then click on + Create New Environment as shown below
And give your environment a meaningful name. Once environment has been created, you will see your environment as shown below and now you are ready to add in local variables to your environment
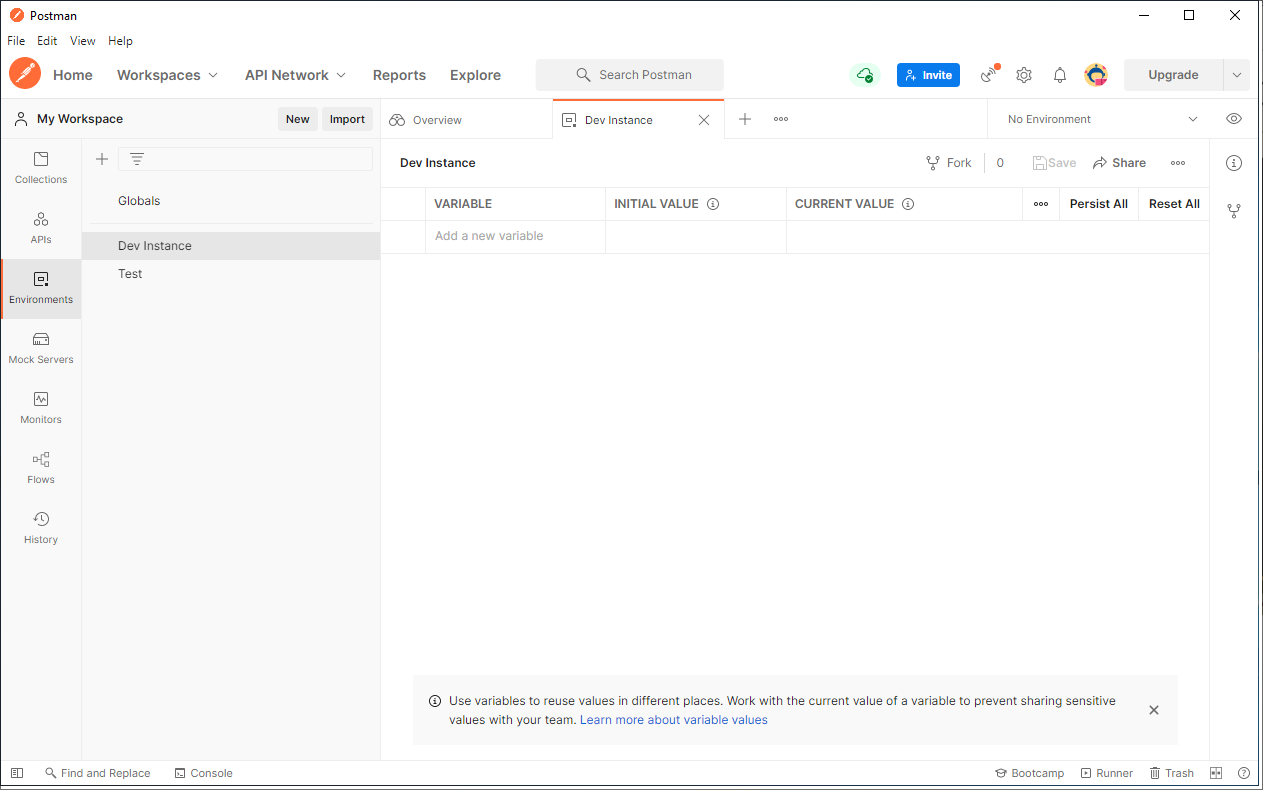
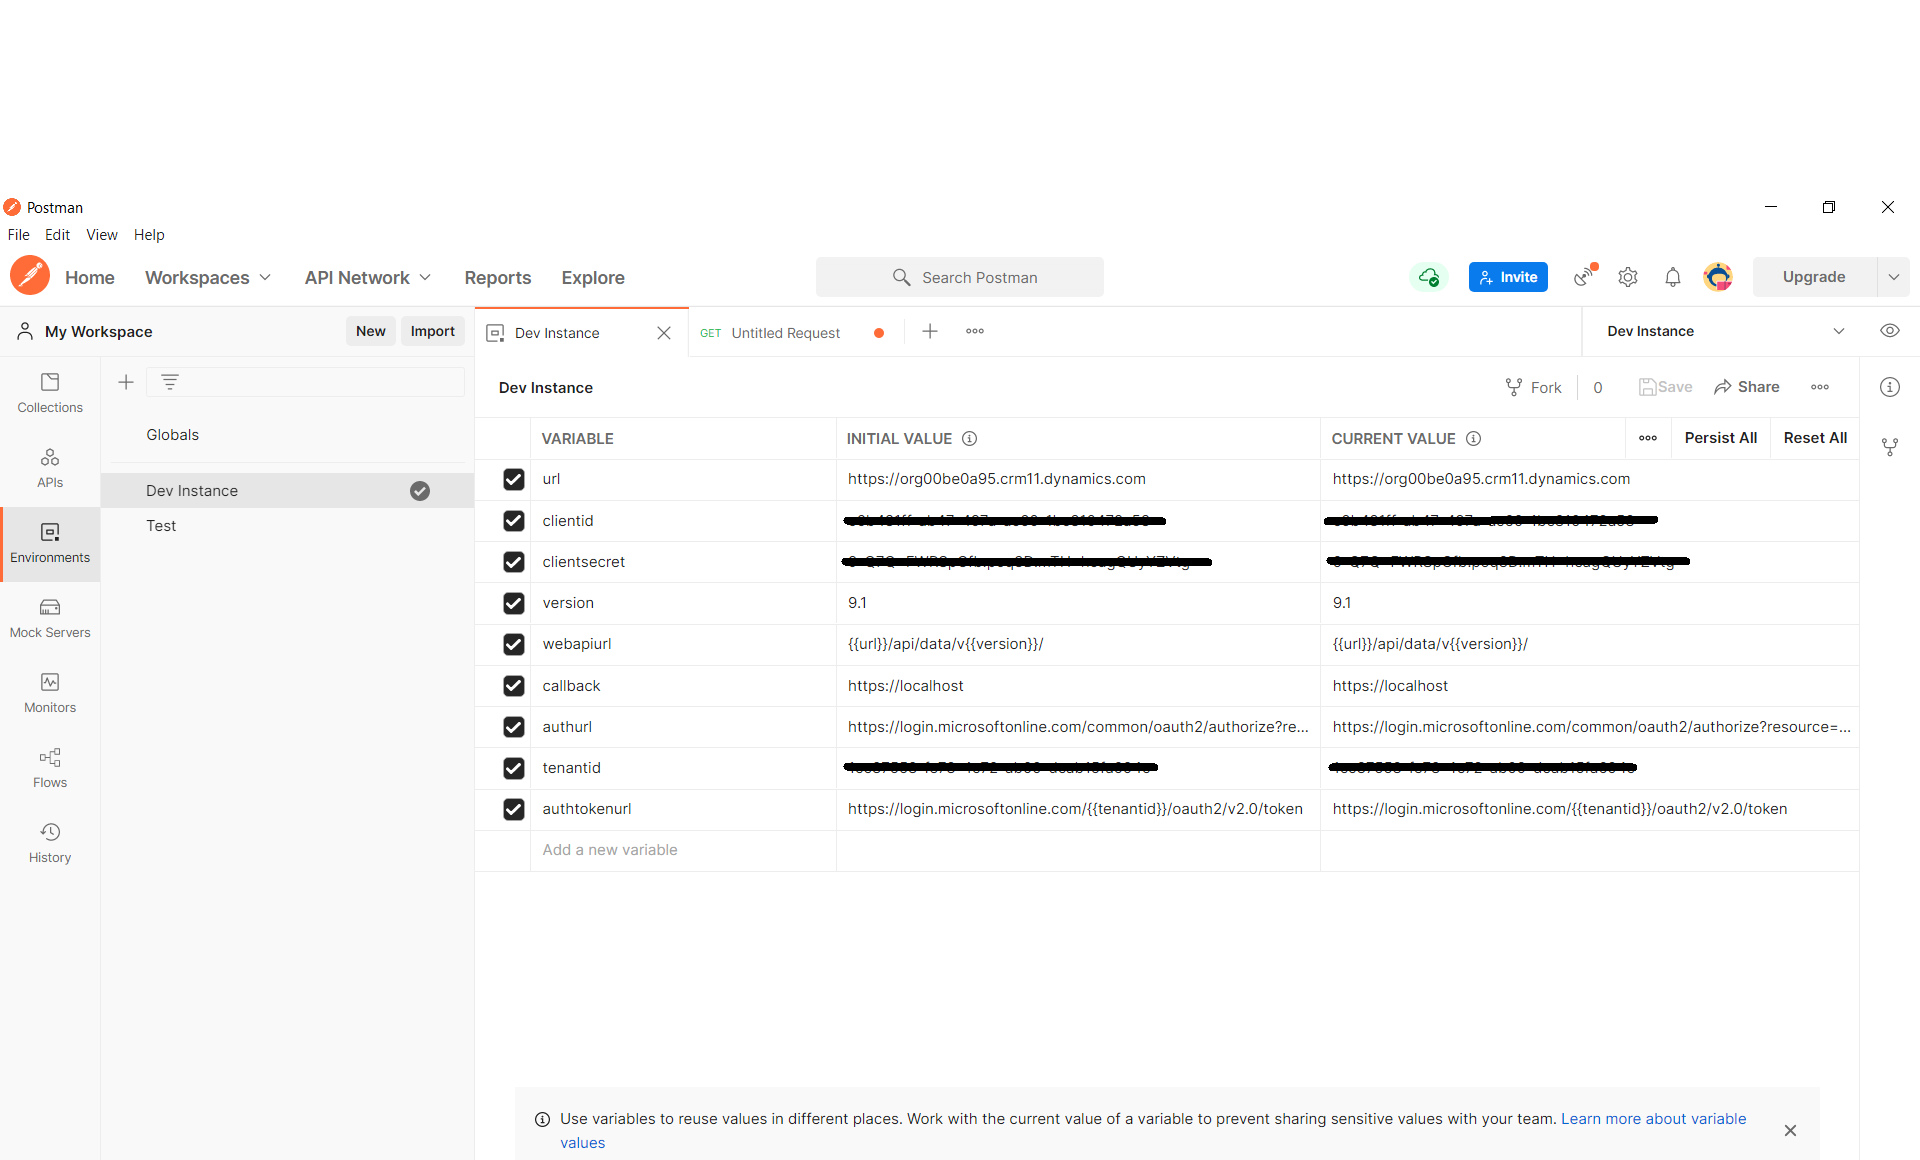
There is a set of variables required by Postman in order to authenticate to Power Platform using OAuth2.0. These variables are;
Variable Name | Value |
url | Power App instance url https://.crm11.dynamics.com |
clientid | Application Registration Client Id created in pre-requisites |
version | 9.1 |
webapiurl | {{url}}/api/data/v{{version}}/ |
callback | https://callbackurl |
authurl | https://login.microsoftonline.com/common/oauth2/authorize?resource={{url}} |
clientsecret | Application Registration Client Secret value created in pre-requisites |
tenantid | Application Registration tenant id in Azure Active Directory |
authtokenurl | https://login.microsoftonline.com/{{tenantid}}/oauth2/v2.0/token |
Once you created these in your environment then click on Save it should look as shown below
Generate an access token to use with Environment
There are multiple ways to getting a token in order to connect to Power App instance. First you will need to create a new tab in order to build a request. To do this please follow below:
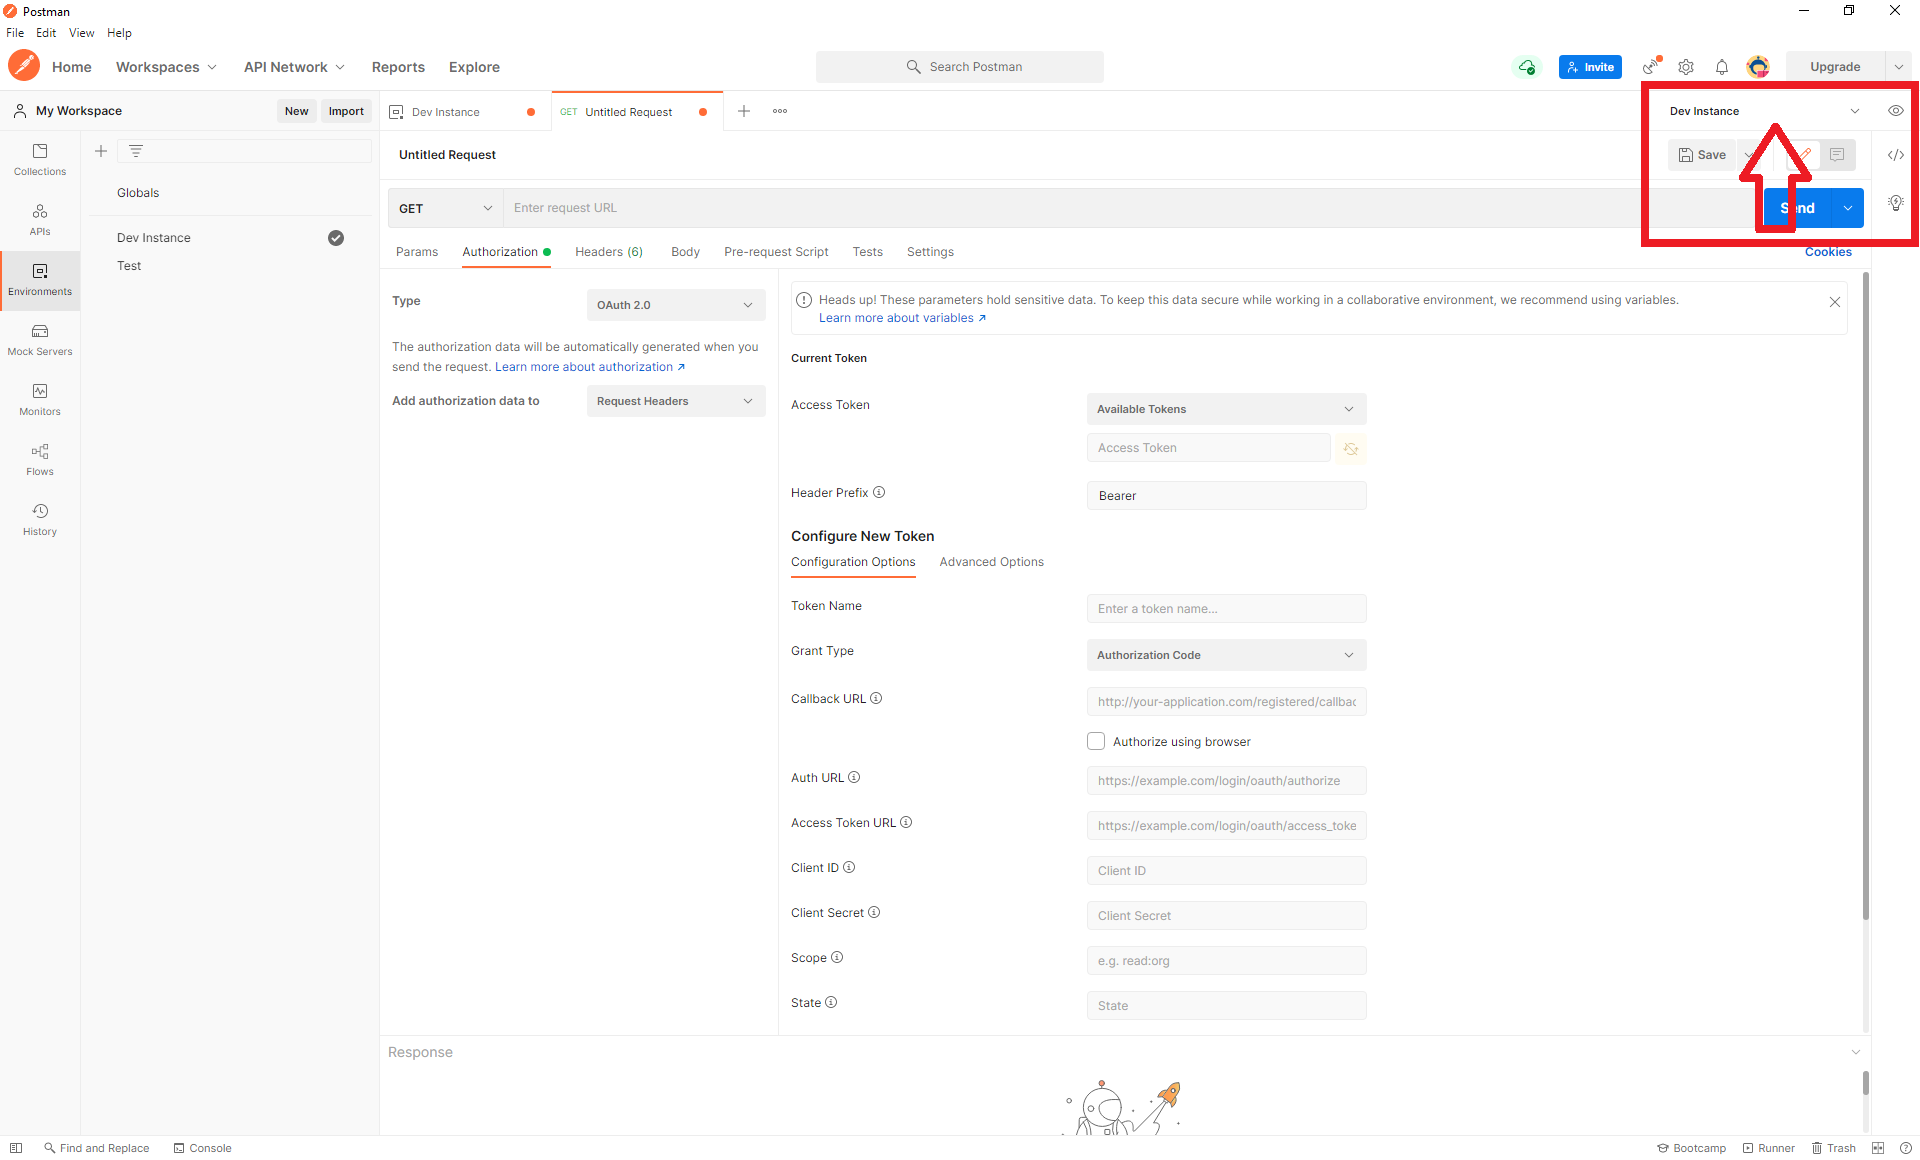
- Select File > New and from Create New dialog box, select HTTP Request. This will add a new tab into Request Builder Section . Please make sure you set the environment to the one created in the Create Environment Step as shown below.
To create a token using Client Credentials as Grant Type:
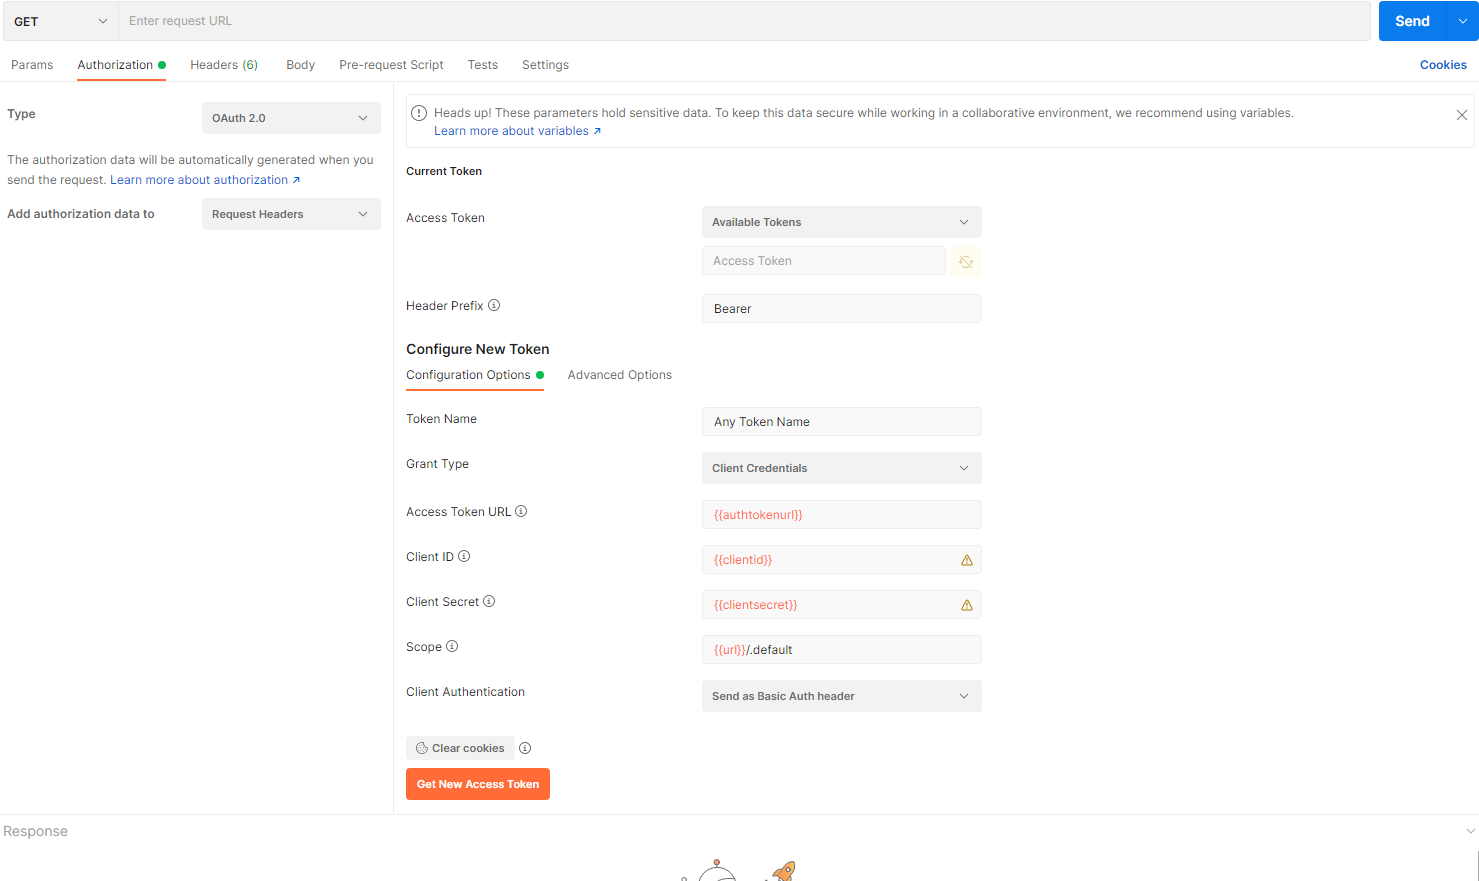
- Select Authorization and set Type to OAuth 2.0 and set the Grant Type to Client Credentials and then fill in the rest of the fields under Configure New Token section with the variables created in Create Environment Step. Once all set it should look like below.
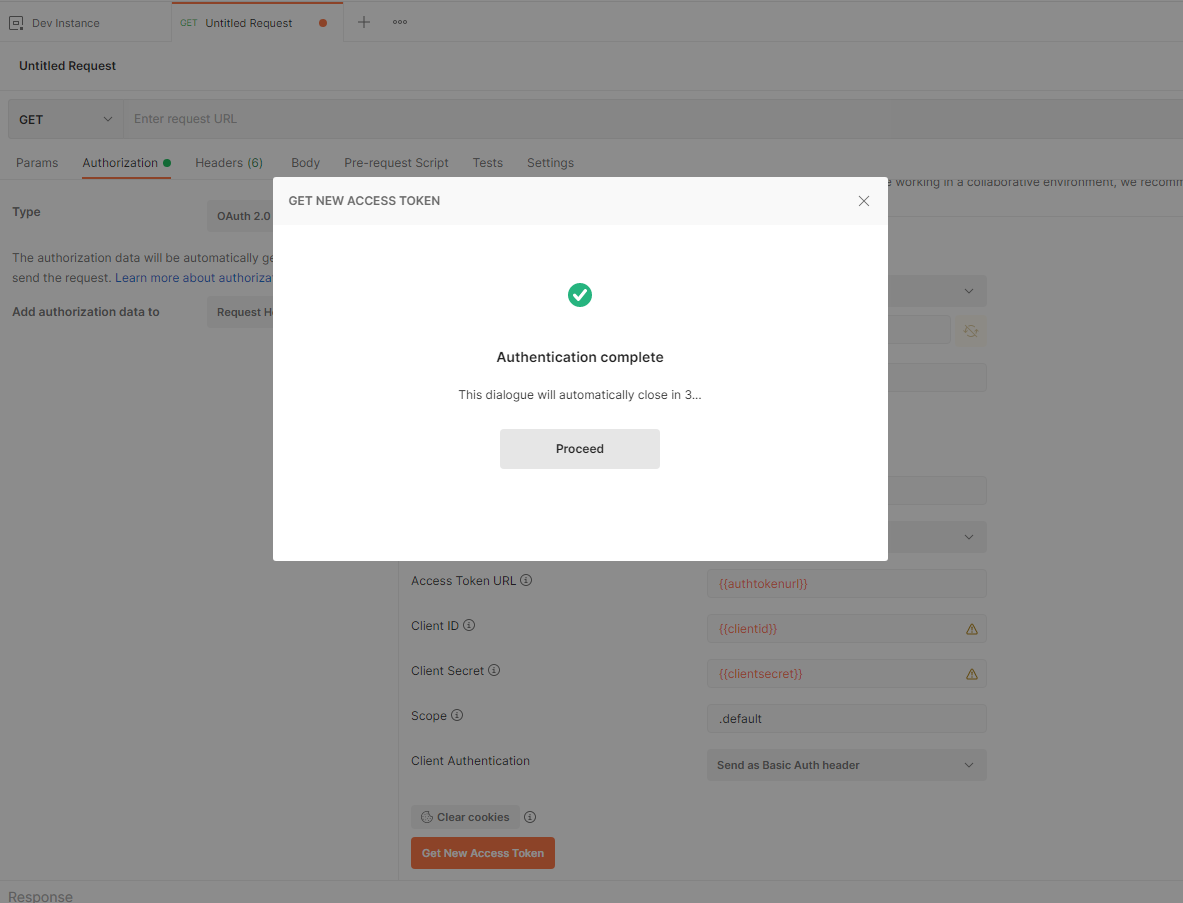
- Then to generate the token, click Generate New Access Token button and you will then be presented with Get New Access Token dialog window. Once this shows Authentication Complete then click Proceeed as shown below.
- Then you will be presented with the Manage Access Token dialog. Give the token any name and click on Use Token
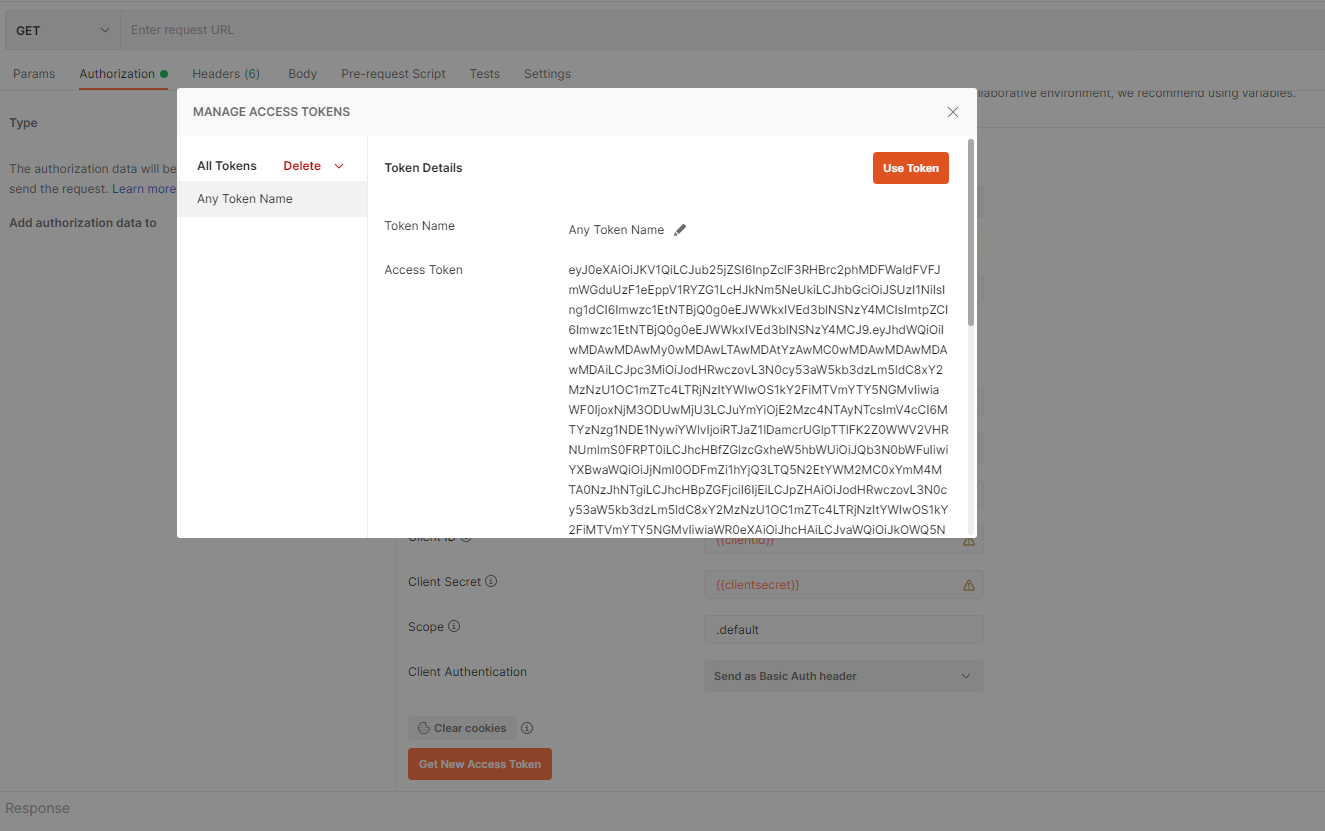
IMPORTANT NOTE Access Tokens DO expire. When expired you will receive 401 response. You can simply in the same tab click Generate Access Token button again and grab a new token. You can then continue sending your requests.
- You are now ready to execute your first request against the Power Platform instance using WhoAmI request to confirm connection is working. To do this please follow below: GET request will be used and request url will be set to {{webapiurl}}/WhoAmI as shown below. When you are ready to execute the request then click Send button.
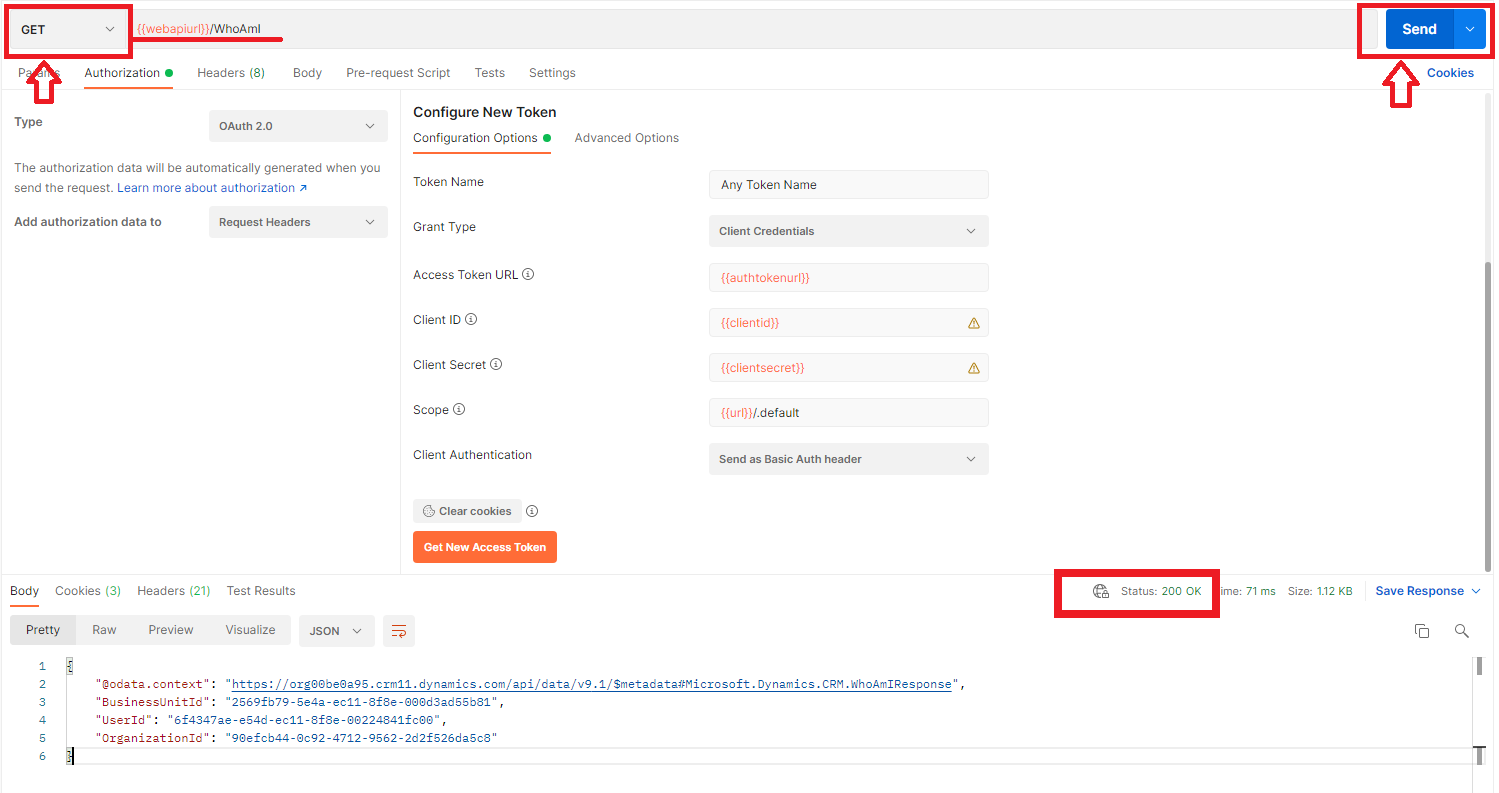 Response code 200 is a success. And we can see the response for the request sent
This chapter will cover different ways of retrieving records from Power App instance using Postman. GET request is used for retrieving records.
Microsoft Dataverse WebAPI documentation is a really good reference source when building requests.
1- Retrieve all fields for specific entity type
Notation used for retrieving all records for an entity type is "organizationurl.crm11.dynamics.com/api/data/v9.1/contacts".
Below is a GET request example to retrieve all contacts and all their properties in a Power App instance
request: 
response: 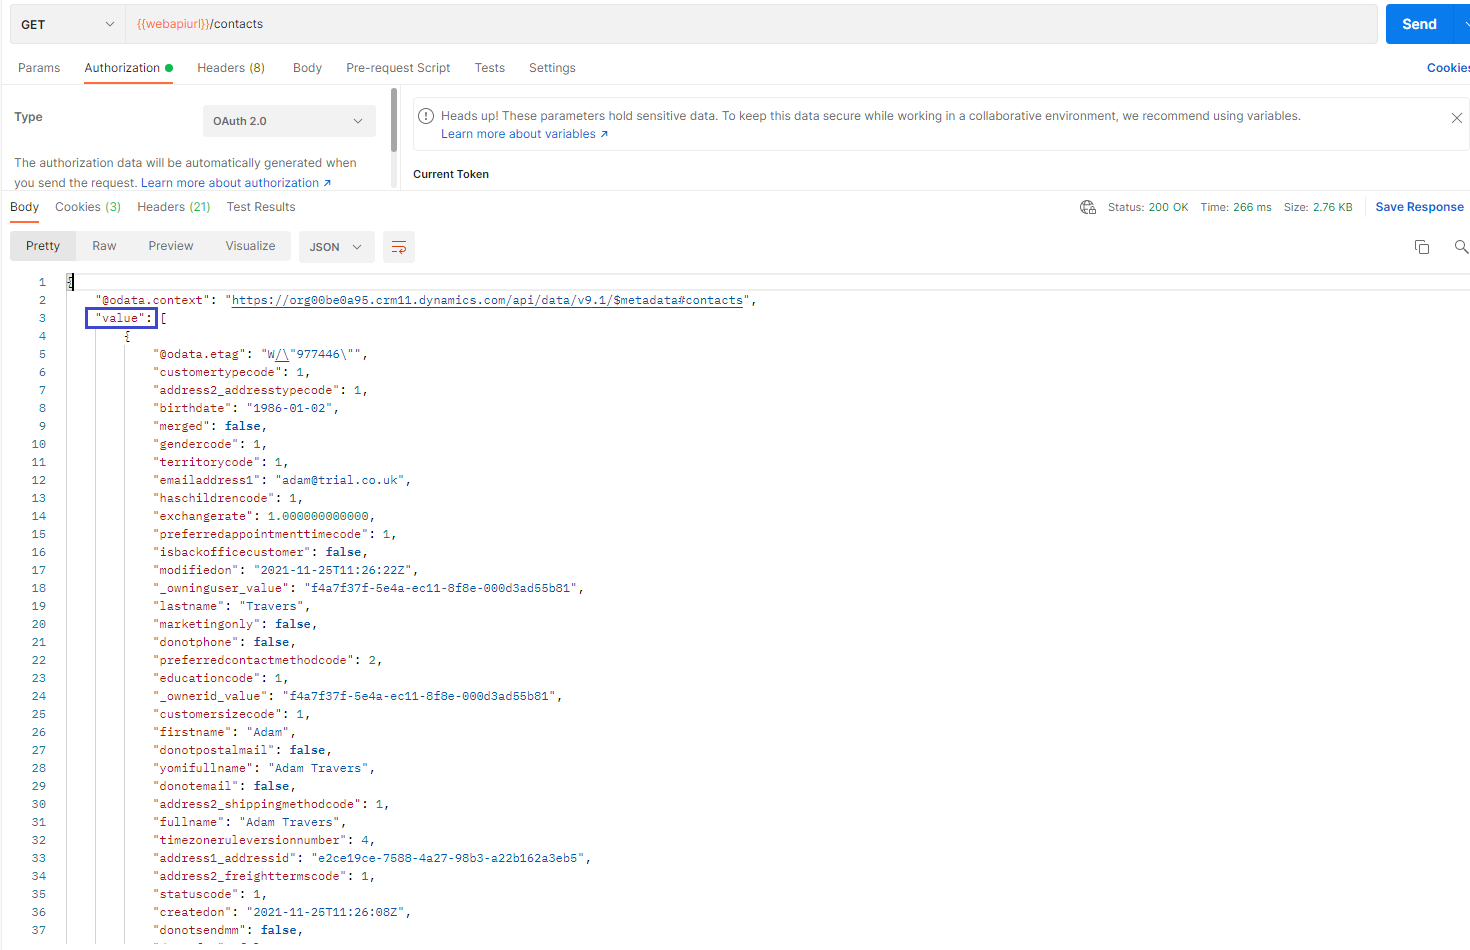
value property of the response is an array where all the returned results are and properties for each contact can be seen there.
2- Retrieve all fields for a specific record
Notation used for retrieving all fields for a specific record is "organizationurl.crm11.dynamics.com/api/data/v9.1/contacts(recordid)".
Below is a GET request example to retrieve all fields for a contact with id (26b4e52d-034e-ec11-8f8e-00224841fc00)
request: 
response: 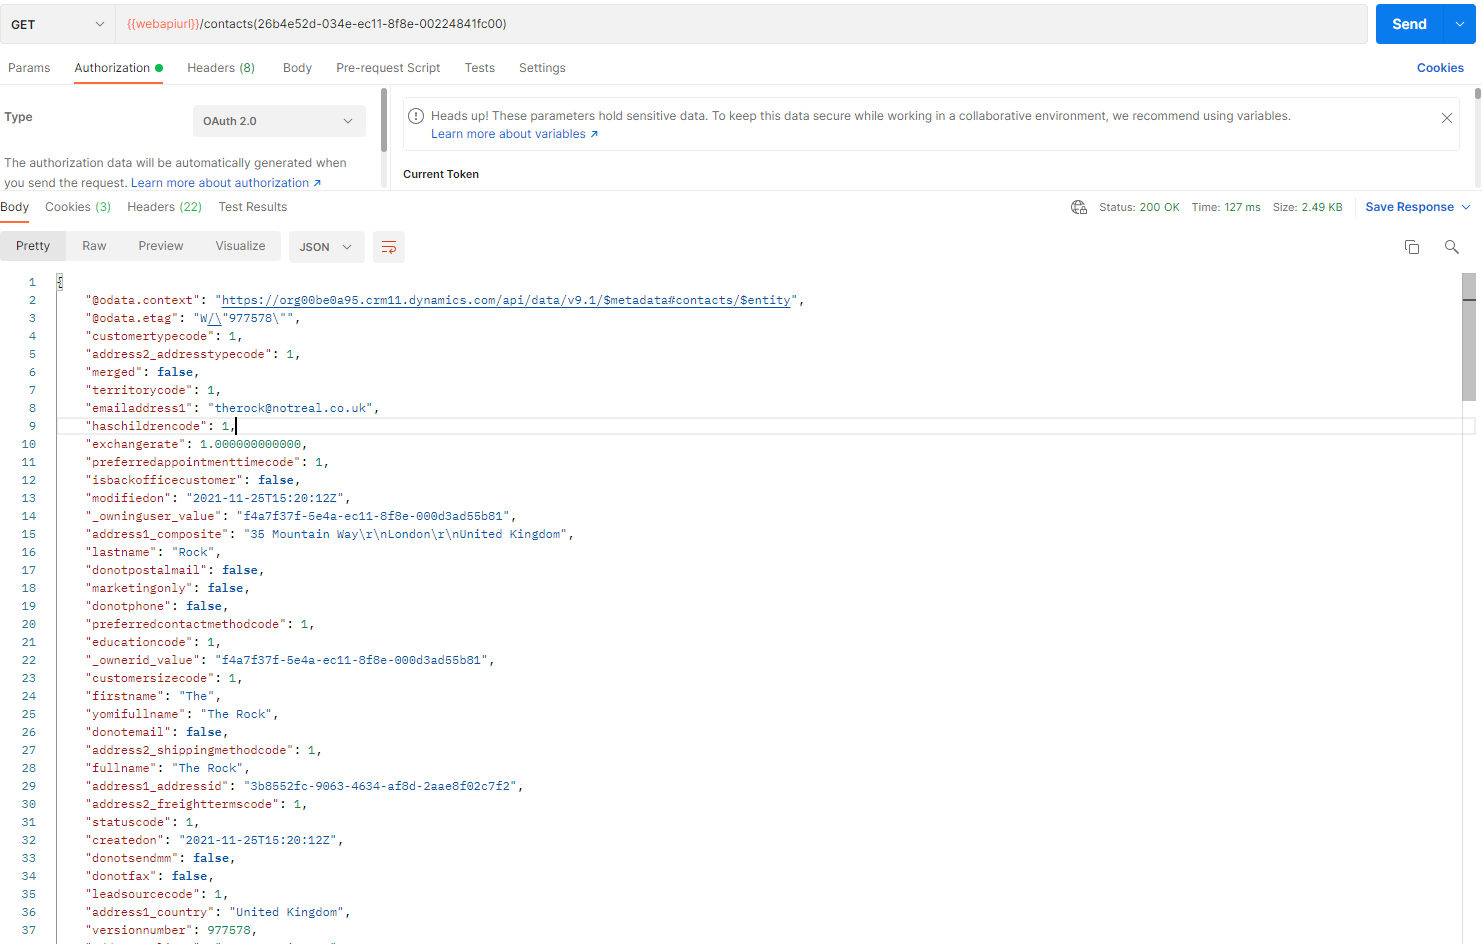
When executing a request to retrieve only one specific record, the response does not contain a value property.
3- Retrieve only selected fields for a record
Notation used for retrieving only selected few fields for a record is "organizationurl.crm11.dynamics.com/api/data/v9.1/contacts(recordid)?$select=field1name,field2name,field3name". Schema names for fields have to be used in webapi requests.
Below is a GET request example to retrieve selected fields for a contact with id (26b4e52d-034e-ec11-8f8e-00224841fc00)
request: 
response: 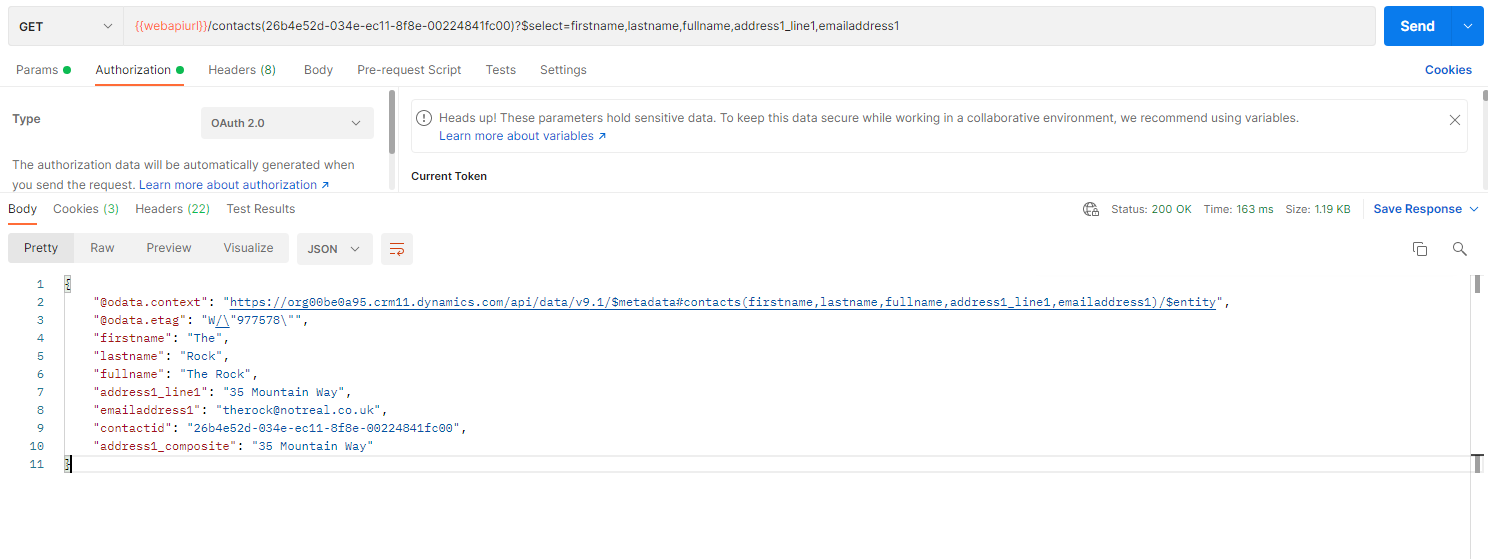
As it can be seen from the response above, only requested fields have been returned.
4- Retrieve data about lookup fields
$expand query option is used to control what data from related entities is returned.
Notation for this request is "organizationurl.crm11.dynamics.com/api/data/v9.1/contacts(recordid)?$select=field1name,field2name,field3name&$expand=lookfield($select=lookup.field1,lookup.field2)". Schema names for fields have to be used in webapi requests.
Please keep in mind, some lookup fields can be referencing more than one type of table. i.e. ‘Customer - schema name is parentcustomerid'. And then while writing webapi queries you will need to use "fieldname_entityname" like parentcustomerid_account or parentcustomerid_contact to define which entity type you are expanding.
Below is a GET request example for expand query
request and response: 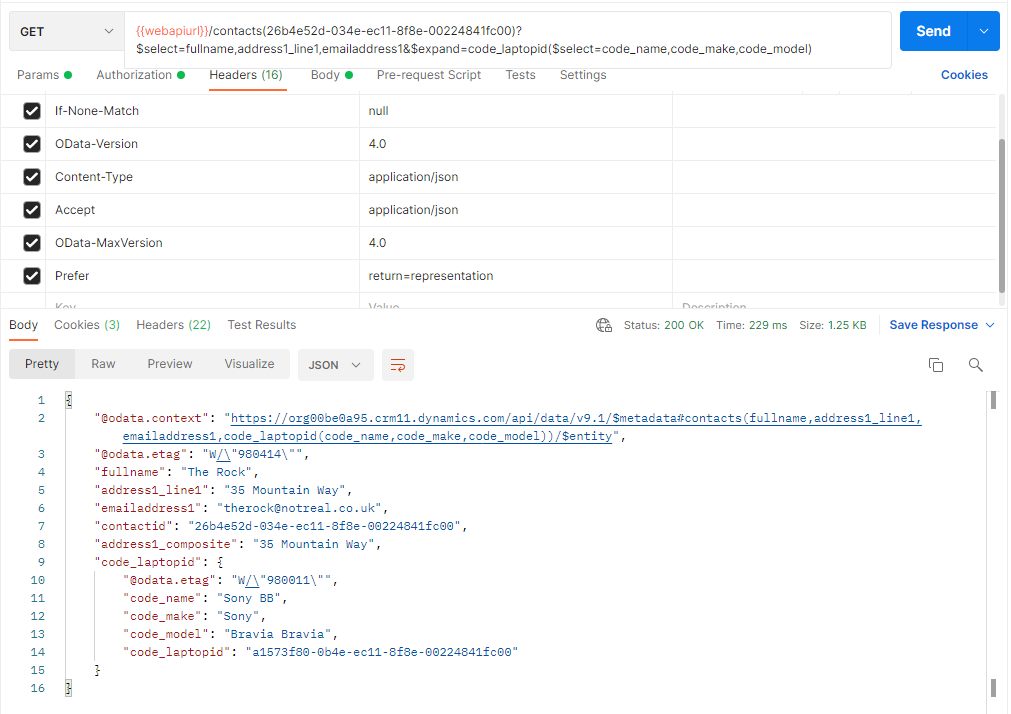
5- Retrieve related entities for an entity by expanding collection-valued navigation
This is achieved by using the $expand query again. The collection-valued navigation property is for a 1:N relationship on the entity. You will need to use the schema name of the relationship for this request. This can be found in the Power App Maker Portal.
Below is a GET request example for this
request and response: 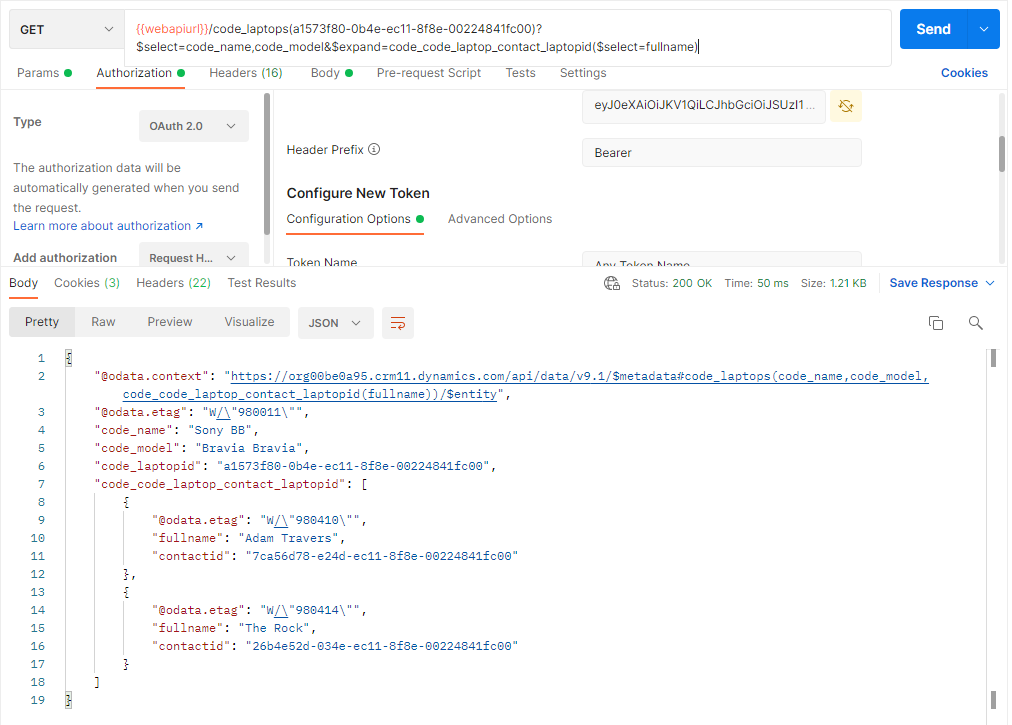
As it can be seen from the response both the contacts related to the record has been retrieved.
6- Retrieve records by running a filter criteria
Query Data with Web API - Filter Results documentation is a really good reference source when building these requests.
$filter query option is used to apply a criteria when running a retrieve request.
Notation for this request is "organizationurl.crm11.dynamics.com/api/data/v9.1/contacts(recordid)?$select=field1name,field2name,field3name&$filter=field eq criteria"
Below is a GET request example with filter query
request and response: 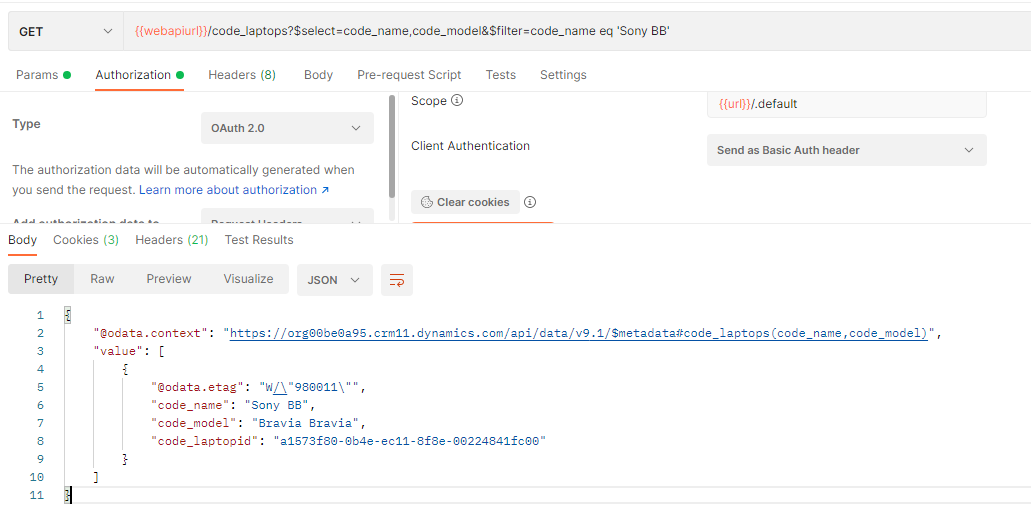
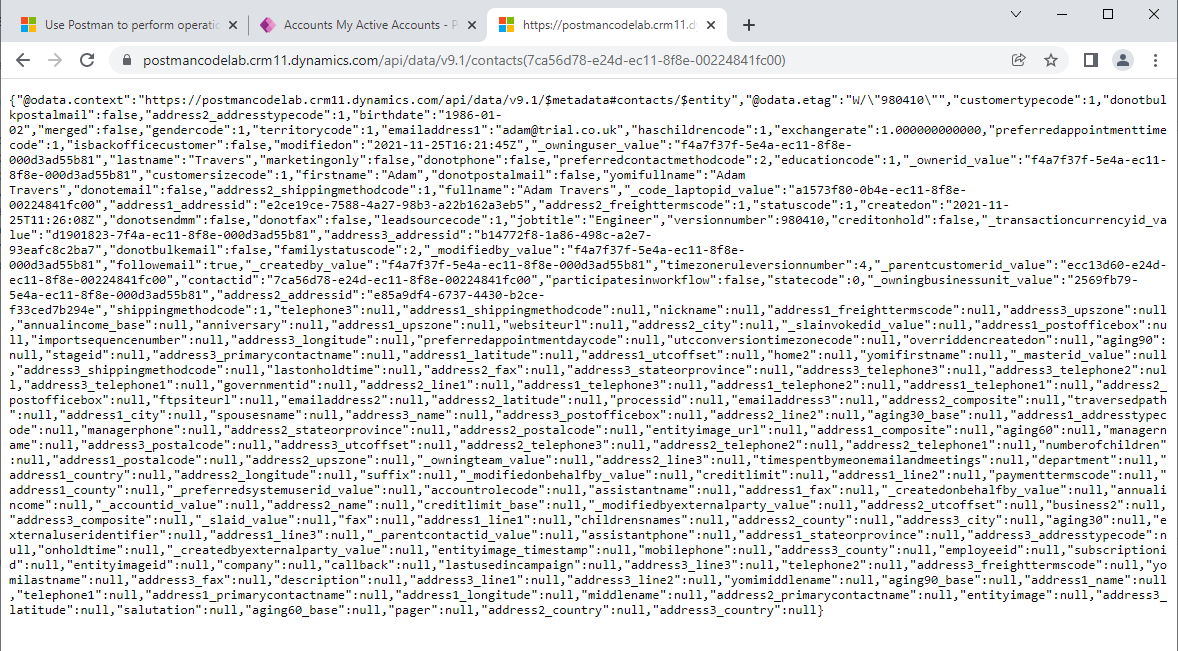
IMPORTANT TIP all the retrieve queries above can be executed in a browser too. To do this please follow below:
- Open a browser session and log into to a Power App instance
- Open a new browser tab and simply put any of the queries above into the url and hit enter as shown below. i.e. https://organizationname.crm11.dynamics.com/api/data/v9.1/contacts(recordid)
This chapter will cover creation of records in Power Platform instance using Postman. POST request is used for creating records.
Microsoft Dataverse WebAPI documentation is a really good reference source when building requests.
To create records using Postman please do below before trying to create any record.
- In Request Builder Section, the query type will need to changed to POST
- In Request Builder Section, enter {{webapiurl}}/entitypluralname into query url section
- Add below key value pairs as shown in the Query Headers
Key | Value |
If-None-Match | null |
OData-Version | 4.0 |
Content-Type | application/json |
Accept | application/json |
OData-MaxVersion | 4.0 |

IMPORTANT NOTE Properties that you want to set when creating the record needs to be added to the request Body section as a JSON value. Schema names of fields has to be used in request body.
1- Basic Create
Below is an example to create an account.
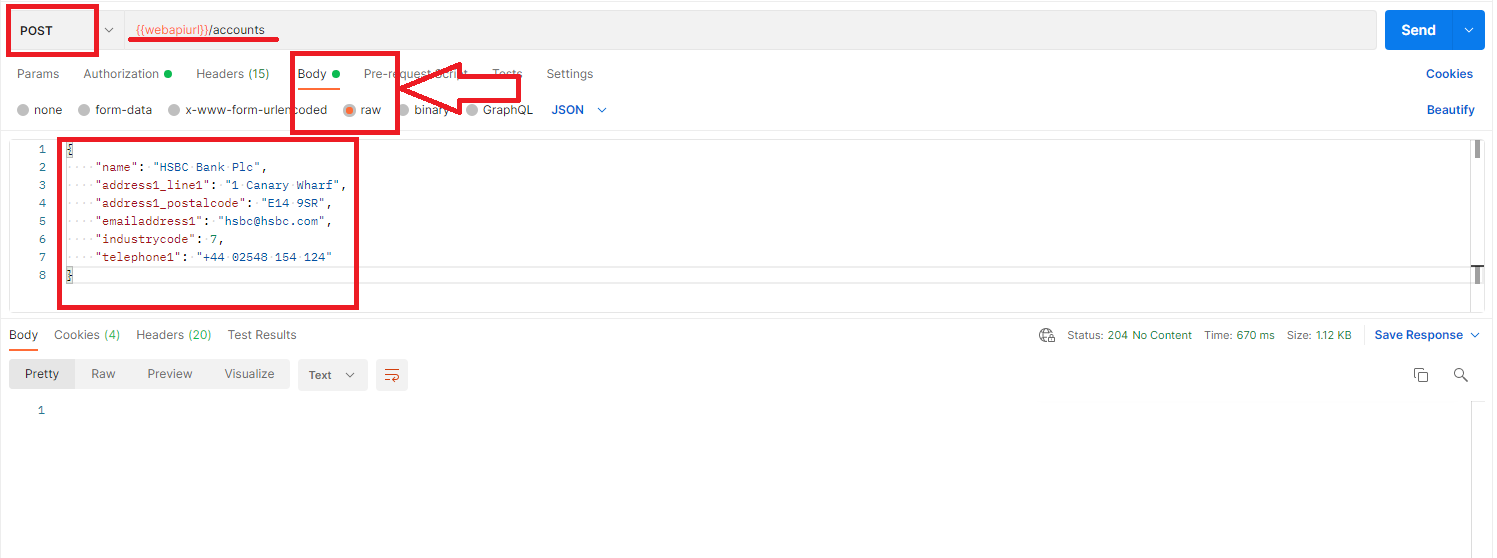
As it can be seen from the response, the 204 success is returned which means the request has been executed succesfully.
2- Create records with data returned
Data about the created record can be returned in the same request. To be able to do this please add below to the Headers key value pair.
- key = Prefer
- value = return=representation
and $select query needs to be amended to the end of the url. "organizationurl.crm11.dynamics.com/api/data/v9.1/accounts?$select=field1name,field2name,field3name"
Below is an example to create an account with data returned.
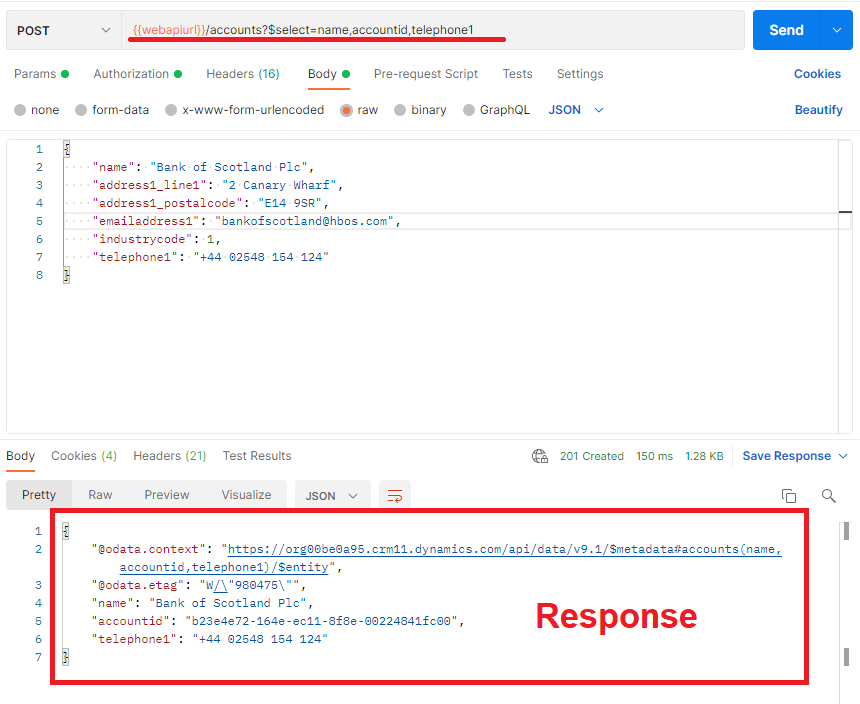
As it can be seen from the response, the 201 success is returned which means the request has been executed succesfully and data returned.
3- Create related records - Deep Insert
Related records can be created by defining them as navigation properties and this is known as deep insert.
Create a related record using single-valued navigation property
Below example is a request to create a contact and defining the code_laptopid(lookup) field navigation property as well. Because we defined the code_laptopid property without id, a laptop record should be created as well.
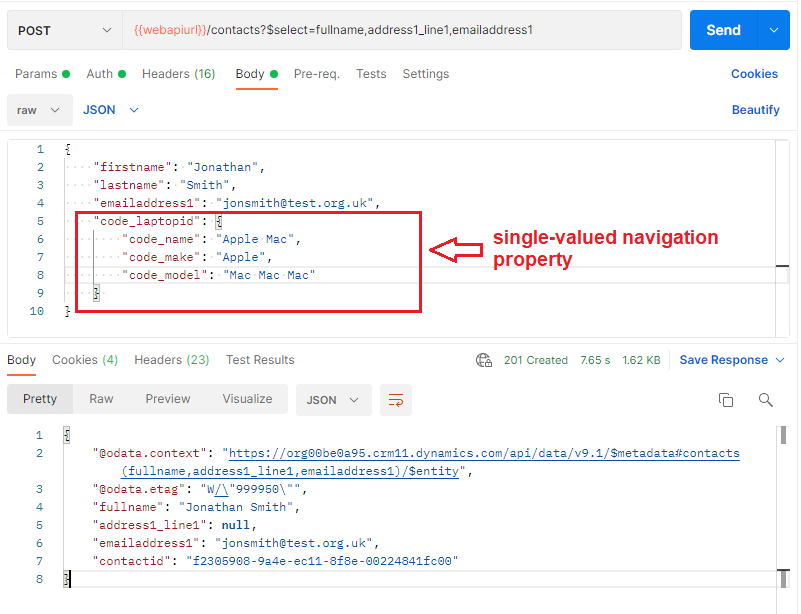
As it can be seen from the response, the 201 success is returned which means both contact and the laptop record have been created.
Create related records using collection-valued navigation property
Below example is a request to create a laptop record and multiple contact records related to it by defining the collection-valued navigation property. Collection-valued navigation property is the schema name of the 1:N relationship between laptop and contact tables. This can be found in the Power App Maker Portal. Collection-valued navigation property is set as a json array as it can be seen in the example below.
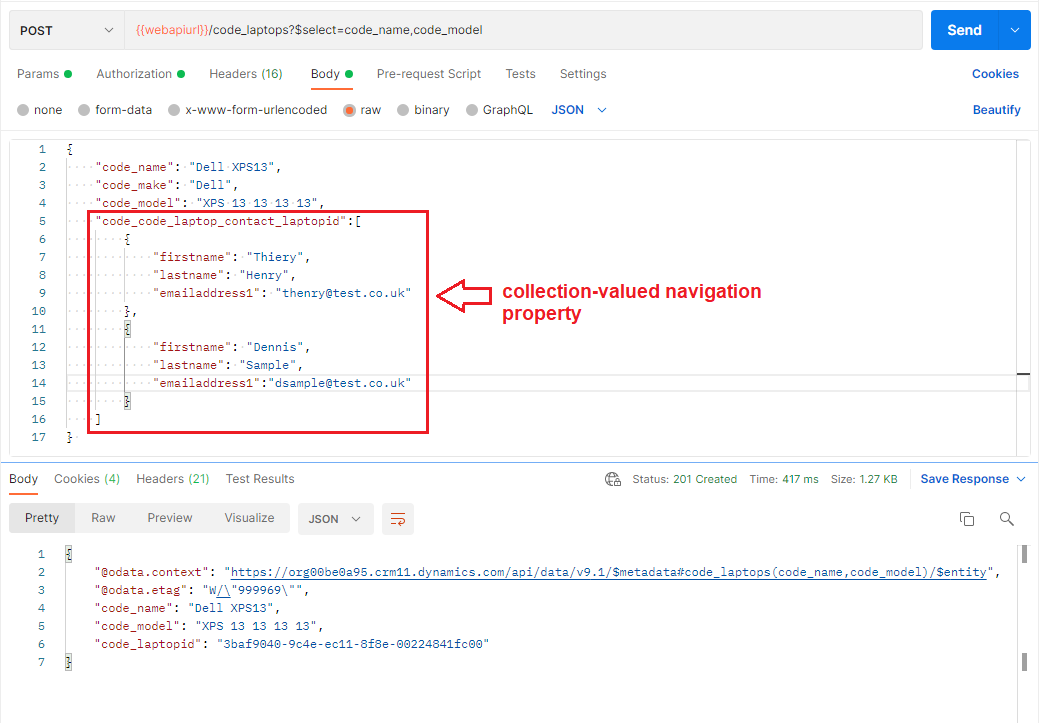
As it can be seen from the response, the 201 success is returned which means laptop record and both contact records have been created.
This chapter will cover update of records in Power Platform instance using Postman. PATCH request is used for updating records.
Microsoft Dataverse WebAPI documentation is a really good reference source when building requests.
To update records using Postman please do below before trying to update any record.
- In Request Builder Section, the query type will need to changed to PATCH
- In Request Builder Section, enter {{webapiurl}}/entitypluralname(recordid) into query url section
- Add below key value pairs as shown in the Query Headers
Key | Value |
If-None-Match | null |
OData-Version | 4.0 |
Content-Type | application/json |
Accept | application/json |
OData-MaxVersion | 4.0 |

IMPORTANT NOTE Properties that you want to update needs to be added to the request body section as a JSON value. This will be shown in the following examples.
1- Basic Update
Below is an example to update an existing record.
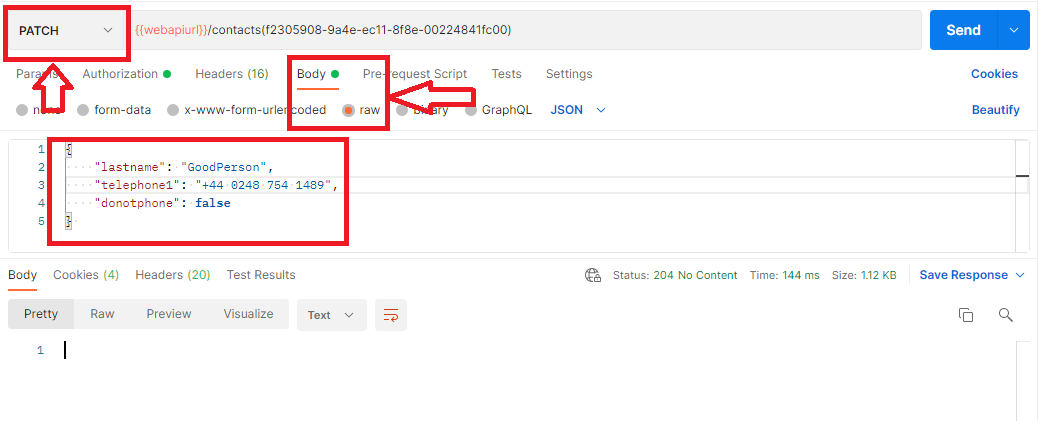
As it can be seen from the response, the 204 success is returned which means request has been executed succesfully.
2- Update records with data returned
Data about the updated record can be returned in the same request. To be able to do this please add below to the Headers key value pair.
- key = Prefer
- value = return=representation
and $select query needs to be amended to the end of the url. "organizationurl.crm11.dynamics.com/api/data/v9.1/accounts?$select=field1name,field2name,field3name"
Below is an example to update a contact with data returned.
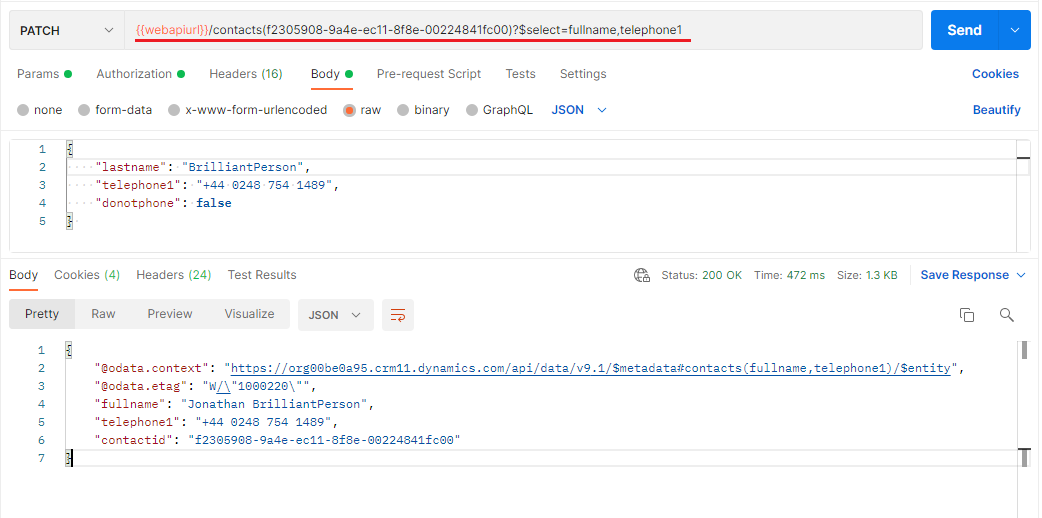
As it can be seen from the response, the 201 success is returned which means request has been executed succesfully and data returned.
This chapter will cover deletion of records in Power Platform instance using Postman. DELETE request is used for deleting records.
Microsoft Dataverse WebAPI documentation is a really good reference source when building requests.
In Request Builder Section, enter {{webapiurl}}/entitypluralname(recordid) into query url section. Request Body is not required to be set for a Delete request.
1- Basic Delete
Below is an example to delete an existing record.
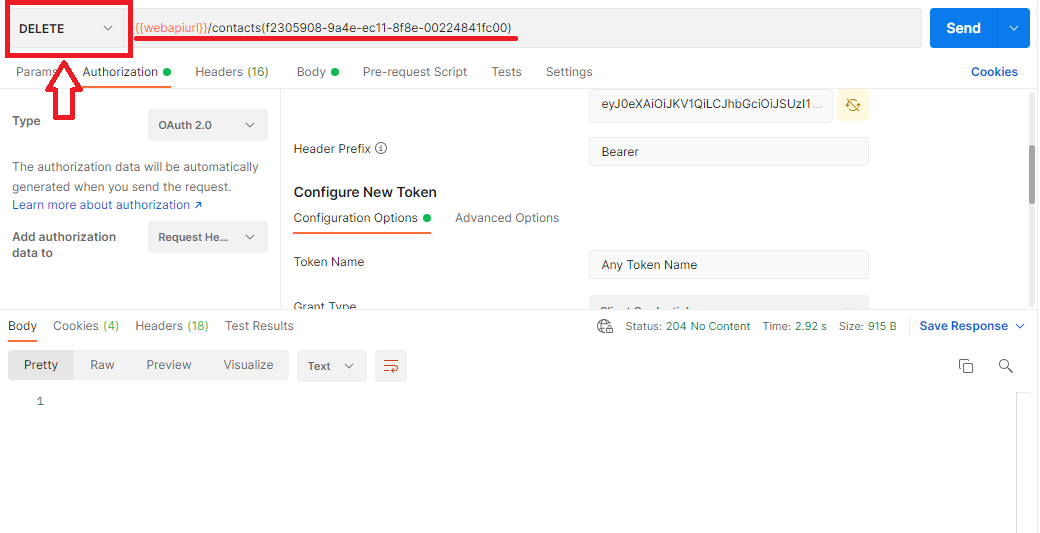
As it can be seen from the response, the 204 success is returned which means request has been executed succesfully.