Kubernetes is rapidly becoming the de facto industry standard for container orchestration. Initially a development of Google’s internal Borg orchestration software, Kubernetes provides a number of critical features including:
- Service discovery
- Container replication
- Auto scaling and load balancing
- Flexible and automated deployment options
- A HTTP based API
The existence of a comprehensive API in particular has allowed Kubernetes to be managed by a number of different tools that allow the rapid build up of a cluster, often targeted towards a particular cloud provider or underlying infrastructure architecture.
The PSDDO Digital Academy
The Public Sector Digital and DevOps Unit (PSDDO) is a new capability unit dedicated to enabling Capgemini to respond to the Governments Digital Transformation Agenda. As part of the build up of the unit the PSDDO Digital Academy was run over the course of 3 months, the aim of which was to assure that all members were up to date on the latest technologies, skills and methodologies. As part of the Academy process there were a number of practical weeks during which Developers, DevOps Engineers, Delivery Managers and Business Analysts were placed into agile teams. We were then given specific goals and had to develop a number of microservices and an infrastructure on which to run them. This was the perfect opportunity to develop an infrastructure from scratch using the tools most appropriate for the job, without legacy requirements.
Our developers wrote a web application consisting of two microservices (using AngularJS), for which we initially built an infrastructure on Amazon Web Services’ EC2 Container Service (AWS ECS). This could be deployed rapidly, was easily scalable and could be configured - and configured quickly - with fairly complicated behaviour in terms of scaling both at the node (i.e. host EC2 instance) and micro-scale level (i.e. the individual Docker containers on each host). While this was a capable production level system it did come with the normal caveats associated with AWS ECS: it was not portable to other cloud providers (or to local systems) and there are several “black box” infrastructure objects where detailed control is in the hands of Amazon. The normal (and oft repeated) discussions apply as to whether those caveats are sufficiently offset by the speed and ease of use of the Amazon tools. We were, however, fortunate to be in the position where after developing this initial architecture we could try an alternate approach and re-factor the infrastructure into a cloud-agnostic Kubernetes cluster.
Call the kops
We had a two week period to develop our Kubernetes infrastructure from scratch. As we were hosting on AWS we decided to use kops to build our Kubernetes cluster. This is, in effect, a shortcut to save time in building the cluster and was of minimal impact to our final architecture. There are a number of tools that can achieve the same goal in similar ways - kops is currently best suited for quickly spinning up a cluster directly in AWS (although it can also output Terraform templates).
The kops tool is available for OS X and Linux, and has two dependencies - kubectl and the AWS CLI. The aws tool needs configuring with an AWS user who has appropriate IAM rights in AWS to create EC2 instances, Autoscaling groups, write into the desired DNS zone and create an S3 bucket. Once those tools are installed and the appropriate user created in AWS then building a cluster can be achieved with a simple command, in our case:
kops create cluster --cloud aws --kubernetes-version 1.5.2 --dns-zone `$TEAMID`.example.com --master-size t2.medium --master-zones eu-west-1a,eu-west-1b,eu-west-1c --network-cidr 172.20.0.0/16 --node-count=3 --node-size t2.large --zones eu-west-1a,eu-west-1b,eu-west-1c --state s3://`$TEAMID`-store --name `$TEAMID`.example.com
Our cluster was built in the Ireland AWS region, however this can be changed as appropriate (it is worth checking on the number of zones available in each region, and the AWS tools available in your chosen region). The above command creates a cluster with 3 masters and 3 nodes - one in each availability zone. Kubernetes uses clustered etcd for storing it’s state files, which uses the Raft consensus algorithm. Raft requires a minimum of three members to provide failure tolerance (the quorum requirement is (n/2)+1) so production clusters should always start with a minimum of three masters and increase in steps of 2 as required. Kubernetes also currently requires this failure tolerance for rolling updates of the cluster masters themselves. The $TEAMID variable was passed in to allow rapid testing of different cluster builds. One very useful feature of kops is the storing of the cluster state file in an S3 bucket. This makes team working significantly easier as any team member can quickly download the cluster state file to their machine to enable them to operate directly on the cluster using kubectl:
export KOPS_STATE_STORE=s3://`$TEAMID`-store
kops export kubecfg `$TEAMID`.example.com
We wrapped our cluster standup procedure in a bash script (later deployed via Concourse - our CI/CD platform) which performed a number of tasks to automate the entire cluster standup:
- Build the cluster in AWS
- Wait 320 seconds.
- Create some persistent storage (EBS in AWS) for our mongoDB instances
- Deploy our backing services (elasticsearch, mongoDB, fluentd, ingress controller etc.)
- Deploy our microservices
- Update the Security Groups in AWS for our ingress controllers
- Create DNS entries in Route53 for all our services
The 320 second wait required is to allow Route53 to update with the internal DNS names of the cluster masters and nodes - without this wait the subsequent steps 3-5 (which all use the kubectl tool) would fail. The time chosen was based on average maximum values seen with a safety margin of around 20 seconds.
The full version of our script is available in our GitHub repository at ci/scripts/spin.sh, the system that runs that script requires the kops, kubectl and the AWS CLI as well as OpenSSH and jq (some JSON parsing is required in updating Route53). The repository has been sanitised but was built in a very short time so little refactoring or optimisation has been done, so use at your own risk! Please read the README file in the repository which contains important information about the code. The relative paths to files containing other example code included in this post are shown before each code block.
Grand Designs
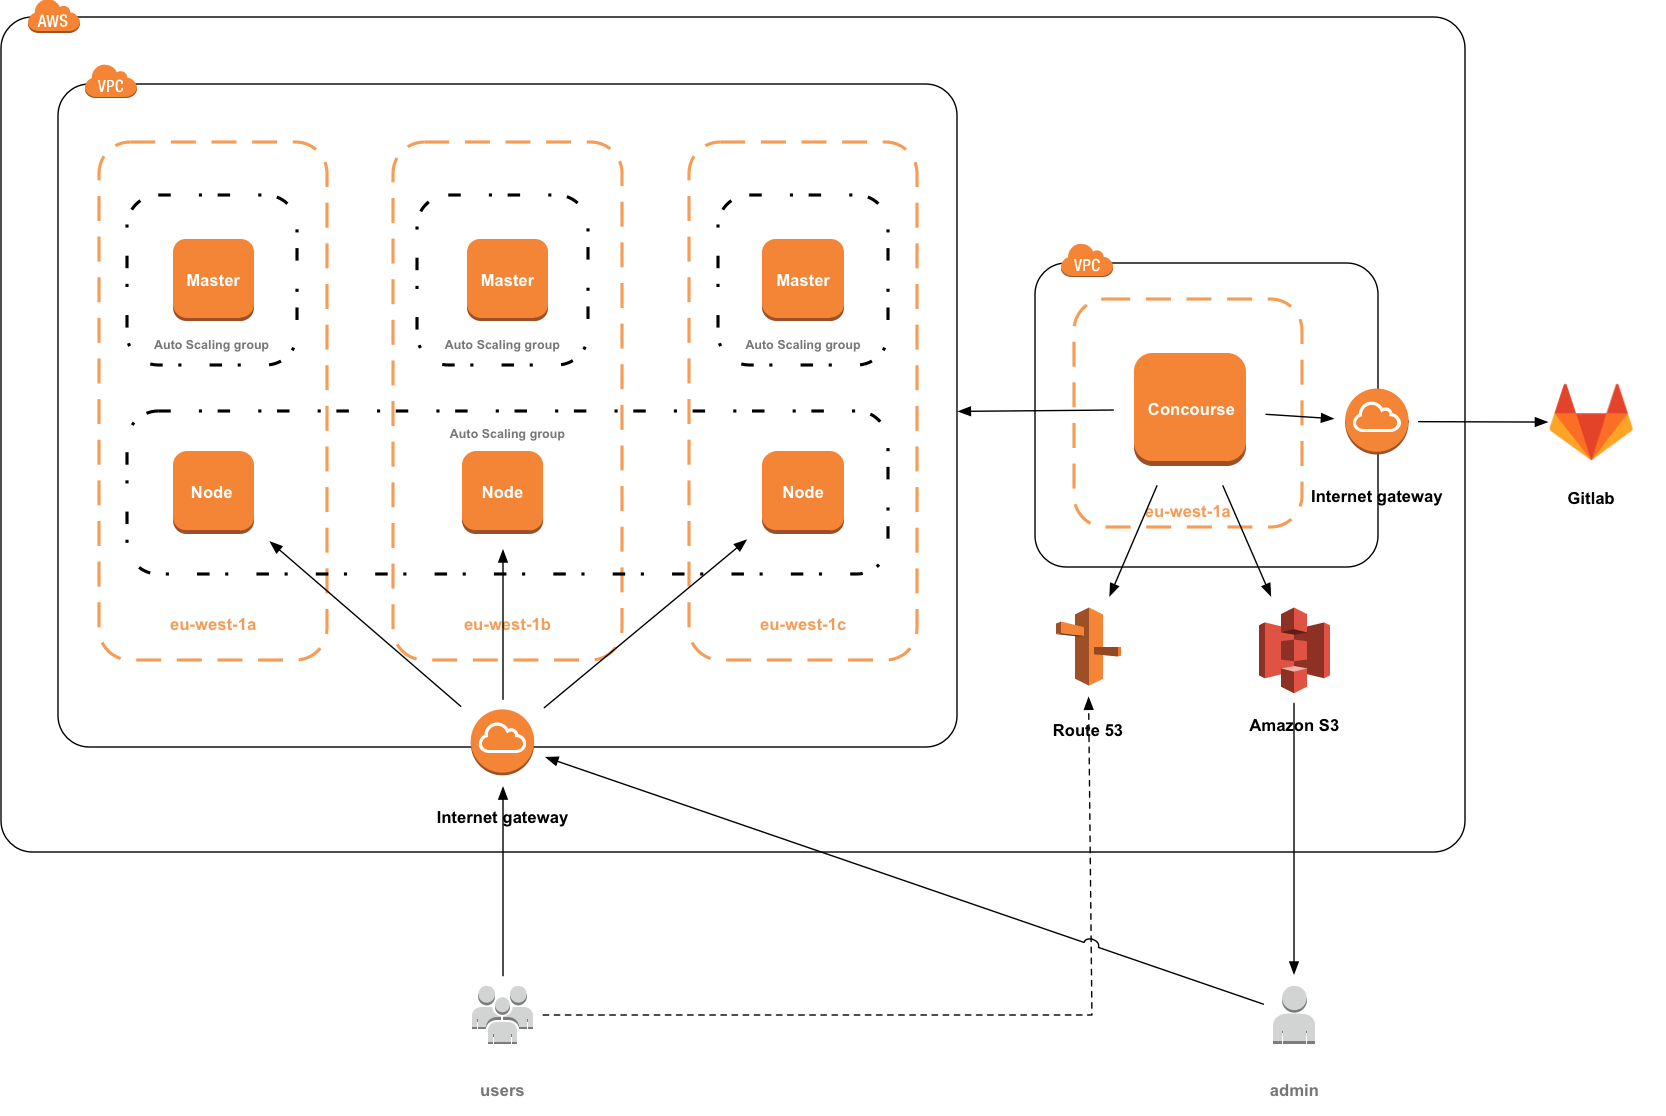
Our finished AWS architecture was relatively simple by the end, consisting of 6 EC2 instances, some EBS backing storage, an S3 bucket and some changes to Route53. We deliberately chose not to use an AWS ELB - instead relying on internal load balancing using nginx instances. There were a number of reasons for this - firstly this removed another AWS black-box and removed another AWS specific tool, which could be especially useful in situations where we could foresee cluster federation being used to deploy the cluster across two different cloud providers or between private and public clouds - potentially where IaaS type load balancers are not available (and/or not supported by the Kubernetes loadBalancer directive). While S3 and Route53 are both specific AWS features those do not need to be local to the cluster (i.e. Route53 could still provide DNS services for a cluster hosted in Azure) and could be rapidly replaced with other programmatic DNS and blob storage.
Secondly this gave us significantly greater ingress control. Kubernetes handles ingress control with nginx by re-writing the appropriate entries in the nginx config file whenever a service is moved, which is often quicker than an update to an ELB config. Furthermore advanced configuration could be included in the ingress config (such as L7 based routing) and it gave us the option for replacing our chosen nginx containers with other ingress controllers for a different feature set (such as nginx+, vamp or traefik) without re-architecting our cluster. The yaml for ingress specification is relatively straightforward, for instance to setup routing to one of our microservices (from ingress.yaml):
- host: msvc1.example.com
  http:
    paths:
    - backend:
        serviceName: msvc1
        servicePort: 8899
      path: /
The replication controller setup for our nginx instances was a little more complicated, mainly due to the extra arguments that we were passing, including the health check URLs (from ingress_rc.yaml):
	---
	apiVersion: v1
	kind: ReplicationController
	metadata:
	  name: nginx-ingress-controller
	  namespace: kube-system
	  labels:
		k8s-app: nginx-ingress-lb
	spec:
	  replicas: 3
	  selector:
		k8s-app: nginx-ingress-lb
	  template:
		metadata:
		  labels:
			k8s-app: nginx-ingress-lb
			name: nginx-ingress-lb
		spec:
		  terminationGracePeriodSeconds: 60
		  containers:
		  - image: gcr.io/google_containers/nginx-ingress-controller:0.8.3
			name: nginx-ingress-lb
			imagePullPolicy: Always
			readinessProbe:
			  httpGet:
				path: /healthz
				port: 10254
				scheme: HTTP
			livenessProbe:
			  httpGet:
				path: /healthz
				port: 10254
				scheme: HTTP
			  initialDelaySeconds: 10
			  timeoutSeconds: 1
			# Pass pod fields as environment variables
			env:
			  - name: POD_NAME
				valueFrom:
				  fieldRef:
					fieldPath: metadata.name
			  - name: POD_NAMESPACE
				valueFrom:
				  fieldRef:
					fieldPath: metadata.namespace
			ports:
			- containerPort: 80
			  hostPort: 80
			- containerPort: 443
			  hostPort: 443
			- containerPort: 18080
			  hostPort: 18080
			args:
			- /nginx-ingress-controller
There is also a “default-backend” service (a very basic HTTP responder) that answers 404 pages not covered by the ingress controller and responds to a health check with a 200. This handles unknown domains and is also a requirement if the cluster was moved to Google Cloud Platform.
A very small Docker container then runs a simple DNS script to keep Route53 updated with the appropriate node IPs for the Ingress Controller (again this needs the AWS CLI, kubectl and jq installed) and Route53 Health Checks are used to re-route requests away from failed nodes. Route53 is updated via a JSON document passed to the AWS API, so we start with a JSON template for Route53 (ci/scripts/dns_update.json):
{
    "Comment": "Update service DNS records",
    "Changes": [
		{
			"Action": "UPSERT",
			"ResourceRecordSet": {
				"Type": "A",
				"TTL": 300,
				"ResourceRecords": [
					{
					}
				]
			}
		}
	]
}
We then populate that template using a loop in our DNS script. For speed and simplicity during testing we added all Kubernetes services to DNS, but this can be limited to simply the services that you require. This example outputs all the services from Kubernetes and their associated ingress controller IPs, and then formats the output and builds the template for Route53 (from ci/scripts/spin.sh):
    services=$(kubectl get services --namespace kube-system -o template --template='{{range.items}}{{.metadata.name}}{{","}}{{end}}')
    ingress_ips=$(kubectl get ing --namespace kube-system -o template --template='{{range.items}}{{range.status.loadBalancer.ingress}}{{.ip}}{{","}}{{end}}{{end}}')

    rm -rf /tmp/dns_update
    mkdir /tmp/dns_update

    trim_ips=${ingress_ips::-1}
    IFS=',' read -ra addr <<< "$trim_ips"

    trim_services=${services::-1}
    IFS=',' read -ra svcs <<< "$trim_services"

    b=0
    for y in "${svcs[@]}"; do
    	echo svcs["$b"]="$y".`$TEAMID`.example.com
    	svcs["$b"]="$y".`$TEAMID`.example.com
    	b=$((b+1))
    done

    for x in "${svcs[@]}"; do
    	echo $x
    	jq '.Changes[].ResourceRecordSet |= .+ {"Name": "'$x'"}' ci/scripts/dns_update.json >> /tmp/dns_update/"$x"_0.json
    	a=0
    	for i in "${addr[@]}"; do
    		jq '.Changes[].ResourceRecordSet.ResourceRecords['$a'] |= .+{"Value": "'$i'"}' /tmp/dns_update/"$x"_"$a".json > /tmp/dns_update/"$x"_$((a+1)).json
    		a=$((a+1))
    	done

    	aws route53 change-resource-record-sets --hosted-zone-id $HZID --change-batch file:///tmp/dns_update/"$x"_"$a".json
We believe this gives us a very similar capability to the use of an ELB, without the associated drawbacks.
Supporting Containers
Our microservices required a mongoDB cluster, which we split across all three nodes and provided with persistent storage. In addition to that, and the microservices and ingress controllers, we built a significant number of other tools into our cluster to provide logging and metrics. Mostly these tools were chosen due to their simple integration with Kubernetes. We used fluentd to collect logs from our nodes and containers, which were shipped to elasticsearch, which was accessed by a Kibana frontend. On the metrics collection front we used InfluxDB to gather node metrics, and our developers also passed the microservice metrics to InfluxDB. Grafana then provides the graphing interface for the metrics.
What this meant is that despite only deploying two microservices each node was running a minimum of 4, but more likely an average of 7 containers, and as a result we had to initially up the size of our chosen EC2 instance (to a t2.large). This was needed to provide the speed and memory to host all of our required services but we do feel this got us close to the features required for a production level cluster. The layout below gives an overview of the general layout of our cluster (although Kubernetes itself is in charge of allocating each individual service).

Deployments
Our microservices were created as Deployments in Kubernetes. Deployments were added in Kubernetes last year (in version 1.2) and provide a declarative method for automating the update of Replica Sets and their associated pods, including being able to use schemes such as canary rollouts. Creating a deployment is a painless process and we were able to specify the requirements for our microservice in a small yaml file, which also exposed the appropriate service ports. An example for one of our microservices is shown below (from microservices.yaml):
apiVersion: extensions/v1beta1
kind: Deployment
metadata:
  name: msvc1
  namespace: kube-system
spec:
  replicas: 2
  template:
	metadata:
	  labels:
		ex1: ex1
	spec:
	  containers:
	  - name: msvc1
		image: example.docker-repo.com/teamid/server:latest
		ports:
		- containerPort: 8899

---

apiVersion: v1
kind: Service
metadata:
  name: msvc1
  namespace: kube-system
  labels:
	ex1: ex1
spec:
  ports:
  - port: 8899
  selector:
	ex1: ex1
In this example the microservice is deployed with 2 replicas, and port 8899 exposed as a service.
A Deployment rollout is triggered if, and only if, the Deployment’s pod template is changed. In a production system this would be triggered potentially by image labels changing or other Deployment information being changed. Given the short timescale and need for repeated testing of deployments we worked around this by adding an extra piece of metadata to the template whenever we wanted to force a deployment rollout (from ci/scripts/server_deploy.sh):
kubectl patch deployment msvc1 -p "{\"spec\":{\"template\":{\"metadata\":{\"labels\":{\"date\":\"`date +'%s'`\"}}}}}" --namespace=kube-system
In this case this simply added the date as a metadata field to the pod template - so whenever we ran that command we could guarantee that the pod template would change and therefore trigger a rollout - which is particularly useful for testing.
One caveat with this approach is that it is not recommended to use the same image label for a new deployment. This is because Kubernetes will cache the docker image, and if the label matches will not re-download the container (unless a pull policy of Always is specified). Kubernetes will assume the Always pull policy if the :latest tag is specified, although this is not recommended for production as it makes deployment rollbacks difficult. Kubernetes supports automated rollbacks on deployment issues so for production systems a proper versioning system should be used and deployments triggered by the version being updated in the appropriate template.
Concourse
Not directly related to Kubernetes but worthy of a mention is Concourse - our CI/CD tool of choice. Concourse merits significant discussion in and of itself; it is a modern, Docker-based CI/CD tool that is fast, scalable, pipeline based and (generally) snowflake free. By the end of the task our Concourse pipelines could build our Kubernetes cluster from our infrastructure code stored in gitlab (along with tests) and update and deploy our microservices on any push, test them and perform a rolling deployment as outlined above. We even had a separate pipeline that builds the Docker image that Concourse then uses in the creation of the pipeline - building kops, kubectl, jq and aws into a container using a Dockerfile which then could run our cluster standup script.
As a result our entire deployment can be started by standing up a single Concourse server in AWS, passing it a pipeline that includes links to our gitlab repository and our default variables, then starting the deployment pipeline. Within 14 minutes Concourse will have stood up our entire cluster, including all services, and will be watching our microservice repositories for any new commits.
Conclusion
It’s hard to overstate the power and flexibility of Kubernetes and it’s certainly not a unique observation. Within a day we had our initial cluster built within AWS and were able to deploy containers - despite no member of the team having prior experience with Kubernetes. We then built a system that we consider close to production ready within a 2 week period - not everything is perfect and there are certainly areas that could be tidied up and refactored but, in general, the system works well as a highly available, highly scalable and highly portable cluster. Using nginx as the ingress controller internal to the cluster also expands the options that are available to develop this further - both in terms of having more intelligent load balancing than is currently available with AWS ELBs and in terms of multi-cloud federated clusters.
Personally, I also believe that the process was incredibly useful in terms of reinforcing the benefits of agile working and modern DevOps techniques - not merely in terms of the techniques themselves but as a clear example in showing how the processes really can very quickly produce working systems that can be iterated and improved rapidly without compromising on quality.
Finally it’s worth highlighting how useful just being able to “play” with new technology is to engineers - being in a situation where a group of tools can really be pushed to see what they can do. The practical weeks during the digital academy gave us a focussed goal with freedom to try out a variety of tools and this gave everyone involved a much better idea of the scope and limitations of those tools, and what they can be used to build. The advantages of this kind of approach can be seen in the success of Capgemini’s Applied Innovation Exchange (AIE) which aims to solve client problems using the latest technologies and tools. Malcolm Young recently wrote a great article, “A Blurry Look Into the Future” which describes his visit to AIE’s London Lab.
We’ll be giving a demo of this cluster at the Birmingham Digital and DevOps Meetup on May 4th, so please come along, watch it in action and join in the discussions.
Team Members
- Developers: John Eccleston, Yen Kee Miu, Jon Pike
- DevOps Engineers: James Relph, Jack Doherty, Lee Clench, James Fegan & Ian Galt
- Scrum Master: Anita Preece
Thanks also to Andy Eltis, Darren Rockell, Sam Tate and Andy Gibbs who worked on the initial iteration based on AWS ECS. Thanks to Doug Thomson and James Devaney for setting the practical week challenges and nudging us towards Kubernetes and the associated toolchains.