Migrating an application to a new framework is mostly painful and challenging. We started to migrate our existing Jakarta EE applications which have been using Liquibase to manage the database changes. Quarkus has native support for Flyway which is another tool to manage the database changes. One option was to migrate the Liquibase change log file to Flyway SQL. Liquibase is also widely used in open source community, and has some advantages that you may find useful in daily DevOps processes. We chose to stay with Liquibase and minimize the changes in the projects. Native support for Liquibase would be highly favorable to avoid another Java JDK dependency in the Docker environment. So we started to create Liquibase extension for Quarkus.
Quarkus Kubernetes native Java stack comes with an extendable framework. There is a very nice guide on Quarkus page how to write your own extension. We are already using our own extensions for logs, Java Persistence API (JPA) and testing specific to our projects and needs. But much more exciting is to write an extension that would become a part of the Quarkus and would contribute to the open source community. I believe we are not the only ones who have been using the Liquibase framework to manage database changes in recent years in projects. With the help of Quarkus and Liquibase community, we designed and implemented the Liquibase extension which is now part of Quarkus framework. In this article we are going to create an example Quarkus Application which will show how to use this Liquibase extension.
Quarkus Liquibase extension
In our example we will use Maven to manage the project. First, we will create simple REST + JPA application. For this we can use the Quarkus maven plugin:
mvn io.quarkus:quarkus-maven-plugin:1.3.0.Final:create \
    -DprojectGroupId=org.tkit \
    -DprojectArtifactId=quarkus-liquibase-blog \
    -DclassName="org.tkit.quarkus.liquibase.EventRestController" \
    -Dpath="/event" \
    -Dextensions="hibernate-orm,resteasy-jackson,quarkus-jdbc-postgresql"
The project structure is created and we can add our JPA model for Event.
package org.tkit.quarkus.liquibase;

import javax.persistence.*;
import java.util.UUID;

@Entity
@Table(name="EVENT")
public class Event {

    @Id
    @Column(name = "GUID")
    private String guid = UUID.randomUUID().toString();

    @Column(name = "SOURCE")
    private String source;

    public String getGuid() { return guid; }

    public void setGuid(String guid) { this.guid = guid; }

    public String getSource() { return source; }

    public void setSource(String source) { this.source = source; }
}
The REST controller for the Event resource will have methods for create, findByGuid and findAll.
package org.tkit.quarkus.liquibase;

import javax.enterprise.context.ApplicationScoped;
import javax.inject.Inject;
import javax.persistence.EntityManager;
import javax.transaction.Transactional;
import javax.ws.rs.*;
import javax.ws.rs.core.*;
import java.util.List;

@Path("event")
@ApplicationScoped
@Consumes(MediaType.APPLICATION_JSON)
@Produces(MediaType.APPLICATION_JSON)
public class EventRestController {

    @Inject
    EntityManager em;

    @GET
    @Produces(MediaType.TEXT_PLAIN)
    public String hello() {
        return "hello";
    }

    @GET
    public Response findAll() {
        List<Event> entities = em.createQuery("SELECT e FROM Event e", Event.class)
                .getResultList();
        if (entities == null) {
            return Response.noContent().build();
        }
        return Response.ok(entities).build();
    }

    @GET
    @Path("{guid}")
    public Response findByGuid(@PathParam("guid") String guid) {
        Event event = em.find(Event.class, guid);
        if (event == null) {
            return Response.status(Response.Status.NOT_FOUND).build();
        }
        return Response.ok(event).build();
    }

    @POST
    @Transactional(Transactional.TxType.REQUIRED)
    public Response create(@Context UriInfo uriInfo, Event event) {
        em.persist(event);;
        UriBuilder builder = uriInfo.getAbsolutePathBuilder()
            .path(event.getGuid());
        return Response.created(builder.build()).entity(event).build();
    }
}
In the next step we need to set up the database connection in our application.properties.
quarkus.datasource.url=jdbc:postgresql://localhost:5432/liquibase?sslmode=disable
quarkus.datasource.driver=org.postgresql.Driver
quarkus.datasource.username=liquibase
quarkus.datasource.password=liquibase
quarkus.hibernate-orm.database.generation=validate
For the local development we will use the PostgreSQL Docker image to run the database server.
docker run --name quarkus-liquibase \
-e POSTGRES_DB=liquibase \
-e POSTGRES_USER=liquibase \
-e POSTGRES_PASSWORD=liquibase \
-p 5432:5432 postgres:10.5
The newly created database is still empty. Now we can add the Liquibase extension to our project. Just add this Maven dependency:
<dependency>
    <groupId>io.quarkus</groupId>
    <artifactId>quarkus-liquibase</artifactId>
    <version>1.3.0.Final</version>
</dependency>
For our database changes we need to put the changeLog.xml file in the src/main/resources/db/ directory.
In the changeLog we can use the includes and the other formats yaml, json and sql are also supported.
You can create the file by hand or also use a generator to evaluate the recent changes of the entity model.
<databaseChangeLog
        xmlns="http://www.liquibase.org/xml/ns/dbchangelog"
        xmlns:xsi="http://www.w3.org/2001/XMLSchema-instance"
        xsi:schemaLocation="http://www.liquibase.org/xml/ns/dbchangelog
          http://www.liquibase.org/xml/ns/dbchangelog/dbchangelog-3.5.xsd">
    <changeSet author="dev" id="create-table-1">
        <createTable tableName="EVENT">
            <column name="GUID" type="VARCHAR(255)">
                <constraints nullable="false" primaryKey="true"/>
            </column>
            <column name="SOURCE" type="VARCHAR(255)"/>
            <column name="TARGET" type="VARCHAR(255)"/>
        </createTable>
    </changeSet>
</databaseChangeLog>
To update our database schema automatically at the start of the application add this property quarkus.liquibase.migrate-at-start
in the application.properties and set its value to true. This will start the migration during the starting of the application.
quarkus.liquibase.migrate-at-start=true
Now we can start the application in development mode
mvn compile quarkus:dev

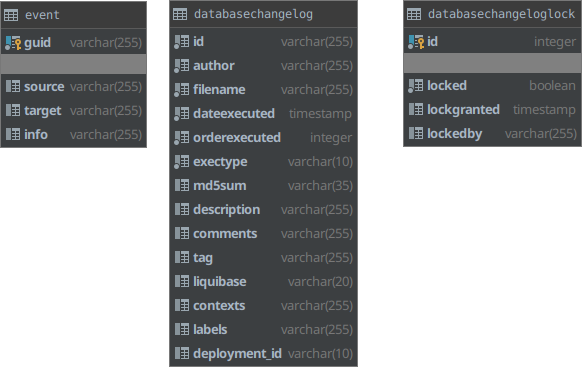
From the logs we can see that Liquibase runs the database update. In the database we will have new table and we can start to create objects. Let’s create event in the database.
curl -s -H "Content-Type:application/json" \
--data '{"guid":"1","source":"s"}' http://localhost:8080/event
Output:
{
  "guid": "1",
  "source": "s"
}
We can load the data through this command
curl -s http://localhost:8080/event/1
Output:
{
  "guid": "1",
  "source": "s"
}
We have data in the table, now we are going to add new fields. First we need to update the Java class and add field and getter and setter.
public class Event {

    // add this field and methods to the Event class
    @Column(name = "INFO")
    private String info;

    public String getInfo() { return info; }

    public void setInfo(String info) { this.info = info; }
}
Next step would be to add the changeSet in our changeLog.xml.
<changeSet author="dev" id="2">
    <addColumn tableName="EVENT">
        <column name="INFO" type="varchar(255)"/>
    </addColumn>
</changeSet>
One of Quarkus benefits is that we do not need to restart the application just to make a call to get our object through the rest interface and Quarkus will do the job for us and run the latest version of our application with database update.
curl -s http://localhost:8080/event/1
Output:
{
  "guid": "1",
  "source": "s",
  "info": null
}

From the output, we can see that the model has a new field and also the database table has been updated. Another useful configuration are drop all tables before migration, disable Liquibase validation and changeLog file path.
quarkus.liquibase.clean-at-start=true
quarkus.liquibase.validate-on-migrate=false
quarkus.liquibase.change-log=db/changeLog.xml
Also, you can use Liquibase directly in the application. We need to inject LiquibaseFactory and create the Liquibase object.
@Inject
LiquibaseFactory liquibaseFactory;

try (Liquibase liquibase = liquibaseFactory.createLiquibase()) {
        liquibase.update();
}
For example we can create the REST controller to return all run changes.
package org.tkit.quarkus.liquibase;

import io.quarkus.liquibase.LiquibaseContext;
import io.quarkus.liquibase.LiquibaseFactory;
import liquibase.changelog.ChangeSetStatus;
import liquibase.changelog.RanChangeSet;
import liquibase.exception.LiquibaseException;

import javax.enterprise.context.ApplicationScoped;
import javax.inject.Inject;
import javax.ws.rs.*;
import javax.ws.rs.core.MediaType;
import javax.ws.rs.core.Response;
import java.util.List;
import java.util.stream.Collectors;

@Path("liquibase")
@ApplicationScoped
@Consumes(MediaType.APPLICATION_JSON)
@Produces(MediaType.APPLICATION_JSON)
public class LiquibaseRestController {

    @Inject
    LiquibaseFactory liquibaseFactory;

    @GET
    public Response getChangeLogs() {
        try (Liquibase liquibase = liquibaseFactory.createLiquibase()) {
            List<RanChangeSet> tmp = liquibase
                    .getChangeSetStatuses()
                    .stream()
                    .map(ChangeSetStatus::getRanChangeSet)
                    .collect(Collectors.toList());
            return Response.ok(tmp).build();
        } catch (LiquibaseException e) {
           throw new InternalServerErrorException(e);
        }
    }
}
To get all executed changes from Liquibase we need to call this URL:
curl -s http://localhost:8080/liquibase/
Then we will get output like this:
[
  {
    "changeLog": "db/create-table.xml",
    "id": "create-table-1",
    "author": "dev",
    "lastCheckSum": {
      "version": 8
    },
    "dateExecuted": 1579863712791,
    "tag": null,
    "execType": "EXECUTED",
    "description": "createTable tableName=EVENT",
    "comments": "",
    "orderExecuted": 1,
    "contextExpression": {
      "contexts": [],
      "empty": true
    },
    "labels": {
      "labels": [],
      "empty": true
    },
    "deploymentId": "9863712779"
  },
  {
    "changeLog": "db/add-column.xml",
    "id": "2",
    "author": "dev",
    "lastCheckSum": {
      "version": 8
    },
    "dateExecuted": 1579864675965,
    "tag": null,
    "execType": "EXECUTED",
    "description": "addColumn tableName=EVENT",
    "comments": "",
    "orderExecuted": 2,
    "contextExpression": {
      "contexts": [],
      "empty": true
    },
    "labels": {
      "labels": [],
      "empty": true
    },
    "deploymentId": "9864675959"
  }
]
Now Quarkus provides first class support for using Liquibase as will be explained in the Liquibase guide. All this configuration can be found in the Quarkus Liquibase guide
We have also use cases where we need to run Liquibase separately from the microservice. One option is to install Liquibase directly but in the case we have native application we want to avoid a JVM installation. For this case, we created the Liquibase native build (currently only for PostgreSQL database and Linux) which can be downloaded from 1000kit-liquibase
wget https://github.com/1000kit/liquibase/releases/download/0.4.0/liquibase
chmod +x liquibase
./liquibase --url=jdbc:postgresql://localhost:5432/liquibase?sslmode=disable \
--username=liquibase \
--password=liquibase \
--changeLogFile=src/main/resources/db/changeLog.xml
This Liquibase binary is also provided as a base Docker image which you can use in your docker image. 1000kit/liquibase Docker image as build image. The source code of the example is in the github repository 1000kit/quarkus-liquibase-example where we need to first build the native application.
mvn clean package -Pnative
Then we can build the Docker image with native Liquibase inside and copy the Liquibase changelog files also in the Docker image.
FROM 1000kit/liquibase:3.8.7 as liquibase

FROM registry.access.redhat.com/ubi8/ubi-minimal
WORKDIR /work/

# copy liquibase binary
COPY --from=liquibase liquibase /work/liquibase

# copy liquibase changelog
COPY target/classes/db /work/db

# copy application
COPY target/*-runner /work/application

RUN chmod 775 /work
EXPOSE 8080

# execute the liquibase changes and start the application
CMD ./liquibase --changeLogFile=db/changeLog.xml \
     --url=${QUARKUS_DATASOURCE_URL} \
     --username=${QUARKUS_DATASOURCE_USERNAME} \
     --password=${QUARKUS_DATASOURCE_PASSWORD} \
     update && \
    ./application -Dquarkus.http.host=0.0.0.0
The CMD command of the Docker image will run Liquibase before the application and the Liquibase configuration is using the standard Quarkus environment variables for the database connection.
For testing, use the docker-compose.yml which is in the git repository. First start the database and the application.
docker-compose up liquibase-postgres
docker-compose up quarkus-liquibase-example
The database connection for the application and for Liquibase is configured in the docker-compose.yml file.
  quarkus-liquibase-example:
    container_name: quarkus-liquibase-example
    image: tkit/quarkus-liquibase-example:latest
    environment:
      QUARKUS_DATASOURCE_URL: jdbc:postgresql://liquibase-postgres:5432/liquibase?sslmode=disable
      QUARKUS_DATASOURCE_USERNAME: liquibase
      QUARKUS_DATASOURCE_PASSWORD: liquibase
      QUARKUS_LIQUIBASE_MIGRATE_AT_START: "false"
    networks:
      - test
The environment variable QUARKUS_LIQUIBASE_MIGRATE_AT_START is setup to false and it will disable running Liquibase
second time by the Quarkus Liquibase extension. The output of the application will look like this:
quarkus-liquibase-example    | Liquibase: Update has been successful.
quarkus-liquibase-example    | 2020-02-28 12:25:37,791 INFO  [io.quarkus] (main) quarkus-liquibase-example 1.0.0-SNAPSHOT (running on Quarkus 1.3.0.Final) started in 0.053s. Listening on: http://0.0.0.0:8080
quarkus-liquibase-example    | 2020-02-28 12:25:37,791 INFO  [io.quarkus] (main) Profile prod activated.
quarkus-liquibase-example    | 2020-02-28 12:25:37,791 INFO  [io.quarkus] (main) Installed features: [agroal, cdi, hibernate-orm, jdbc-postgresql, liquibase, narayana-jta, resteasy, resteasy-jackson]
I hope that this extension will be useful for other teams - if you’re building Quarkus applications that work with Liquibase, please try it out, and if you use it on your project, I’d love to hear about it.