Based on my presentations at DrupalCamp London, on Saturday 28th February 2015 and DrupalCamp Bristol, July 4th 2015
Concept of a field
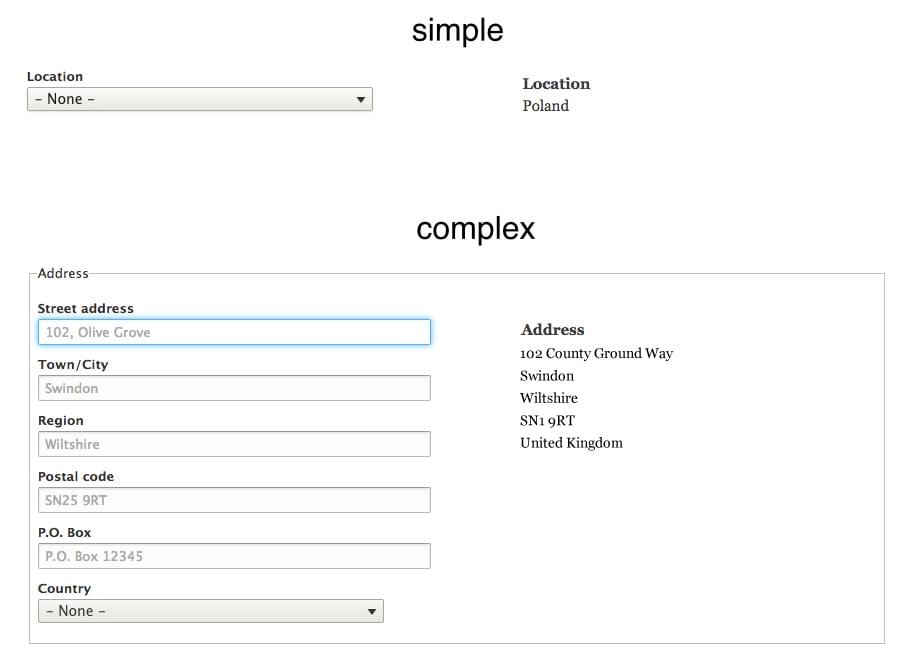
Fields are the data entry points to a web application. Usually, they provide HTML elements and may be responsible for any manipulation of data before it goes into and comes out of the application. The data captured from a single field can be simple or complex.
Assuming we want to create a field for country, all we need is a single HTML element - textfield or select options. An address field, on the other hand, is a collection of discrete data which may include standalone simple fields including a textfield representing postcode (provided by a core module) and a country field (maybe from a custom or contributed module).
In the Drupal world, when considering solutions the first phrase you may hear is, “there’s a module for that!”. However, for the task at hand, “you need a module for that!”. We are now going to write a module which provides this custom country field..
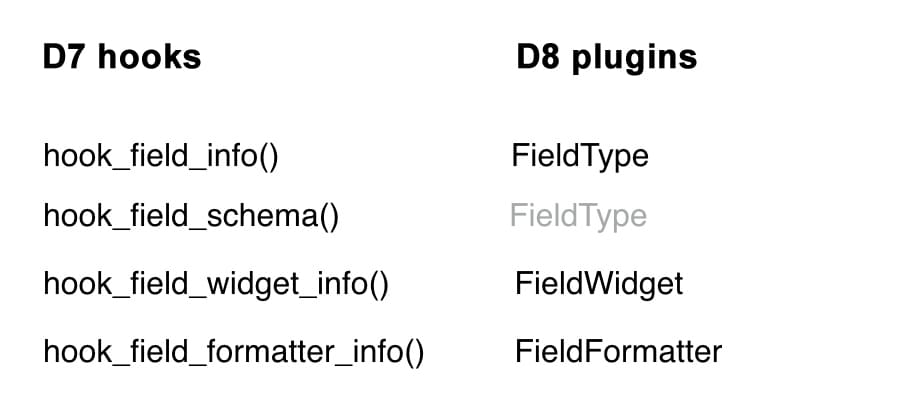
To create a new field in Drupal 7, a number of hooks need to be implemented in a custom module and these include the following:
- hook_field_info() - the field type definition as well as its settings.
- hook_field_schema() - the database schema for the field structure.
- hook_field_widget_info() - the widget types to use for the field type.
- hook_field_formatter_info() - the display of field values.
The task in Drupal 8 is founded on the same principles although the implementation differs. The first thing to remember here is, “there is a class for that!”. A lot of the hard work has been done in Drupal core and all we need to do is extend some classes and override default methods to suit our implementation.
Creating a module
All contrib and custom modules should be placed inside the “modules” folder in your site root. Core-related code is now in “core”. However, it’s also best practice to have “contrib” and “custom” sub-folder in “modules” for clear separation of these types of modules. So we’ll create our “country” folder under modules\custom. What used to go inside *.info file is now in country.yml, so we create that file too and add the following:
name: Country
type: module
description: Defines a simple country field type.
package: Field types
version: VERSION
core: 8.x
dependencies:
  - field
Inside your module directory, you need a “src” subdirectory to keep all your class files. To organise things further, you need a “Plugin” sub-folder in “src”. There are different types of plugins e.g. fields, actions, blocks and menus. So you need to create another folder called “Field” inside Plugin and you’ll end up with a directory structure like src\Plugin\Field
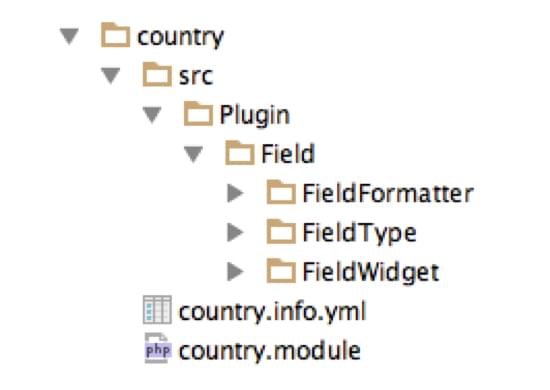
Next, we need to define our data type, widget and formatter. These will be in classes with each occupying its own folder again. Let’s take them one by one.
Data Type
The folder is called FieldType, so create it - src\Plugin\Field\FieldType. Create a class, which we shall call “CountryItem”. The file is called CountryItem.php and in it we should have:
class CountryItem {
}
How do we define our field type? With the new plugin system, this requires an annotation1 - something like a special comment block to allow core classes know about our field type. Your code should now look like this:
/**
 * Plugin implementation of the 'country' field type.
 *
 * @FieldType(
 *   id = "country",
 *   label = @Translation("Country"),
 *   description = @Translation("Stores the ISO-2 name of a country."),
 *   category = @Translation("Custom"),
 *   default_widget = "country_default",
 *   default_formatter = "country_default"
 * )
 */
class CountryItem {
}
The information provided in our annotation is quite similar to that provided when implementing hook_field_info() in Drupal 7. Next, at the top of our file, we add a few things like namespaces and import required core classes.
namespace Drupal\country\Plugin\Field\FieldType;

use Drupal\Core\Field\FieldItemBase;
use Drupal\Core\TypedData\DataDefinition;
use Drupal\Core\Field\FieldStorageDefinitionInterface;
Then we make our class inherit from core FieldItem class by extending it.
class CountryItem extends FieldItemBase {
}
There are two functions we must implement in our class - schema() and propertyDefinitions(). They’re as follows:
public static function schema(FieldStorageDefinitionInterface $field_definition) {
    return array(
      'columns' => array(
        'value' => array(
          'type' => 'char',
          'length' => static::COUNTRY_ISO2_MAXLENGTH,
          'not null' => FALSE,
        ),
      ),
      'indexes' => array(
        'value' => array('value'),
      ),
    );
  }
Here we define the schema for this field. The column is to be called “value”, and will hold a 2-character string, representing the ISO-2 name of countries. Oh, don’t forget to add the constant for the length in your class:
const COUNTRY_ISO2_MAXLENGTH = 2;
public static function propertyDefinitions(FieldStorageDefinitionInterface $field_definition) {
    $properties['value'] = DataDefinition::create('string')
      ->setLabel(t('Country'));
    return $properties;
  }
However, we need to add two methods to make our life easier. Firstly, we want to know when our field is considered empty which is what hook_field_is_empty() does in Drupal 7. Then, we want to add some validation so that the country code we want to store doesn’t exceed the maximum length we have defined for our schema. When we are through, our class should look like this:
/**
 * @file
 * Contains \Drupal\country\Plugin\field\field_type\CountryItem.
 */

namespace Drupal\country\Plugin\Field\FieldType;

use Drupal\Core\Field\FieldItemBase;
use Drupal\Core\TypedData\DataDefinition;
use Drupal\Core\Field\FieldStorageDefinitionInterface;

/**
 * Plugin implementation of the 'country' field type.
 *
 * @FieldType(
 *   id = "country",
 *   label = @Translation("Country"),
 *   description = @Translation("Stores the ISO-2 name of a country."),
 *   category = @Translation("Custom"),
 *   default_widget = "country_default",
 *   default_formatter = "country_default"
 * )
 */
class CountryItem extends FieldItemBase {

  const COUNTRY_ISO2_MAXLENGTH = 2;

  /**
   * {@inheritdoc}
   */
  public static function propertyDefinitions(FieldStorageDefinitionInterface $field_definition) {
    $properties['value'] = DataDefinition::create('string')
      ->setLabel(t('Country'));
    return $properties;
  }

  /**
   * {@inheritdoc}
   */
  public static function schema(FieldStorageDefinitionInterface $field_definition) {
    return array(
      'columns' => array(
        'value' => array(
          'type' => 'char',
          'length' => static::COUNTRY_ISO2_MAXLENGTH,
          'not null' => FALSE,
        ),
      ),
      'indexes' => array(
        'value' => array('value'),
      ),
    );
  }

  /**
   * {@inheritdoc}
   */
  public function isEmpty() {
    $value = $this->get('value')->getValue();
    return $value === NULL || $value === '';
  }

  /**
   * {@inheritdoc}
   */
  public function getConstraints() {
    $constraint_manager = \Drupal::typedDataManager()->getValidationConstraintManager();
    $constraints = parent::getConstraints();
    $constraints[] = $constraint_manager->create('ComplexData', array(
      'value' => array(
        'Length' => array(
          'max' => static::COUNTRY_ISO2_MAXLENGTH,
          'maxMessage' => t('%name: the country iso-2 code may not be longer than @max characters.', array('%name' => $this->getFieldDefinition()->getLabel(), '@max' => static::COUNTRY_ISO2_MAXLENGTH)),
        )
      ),
    ));
    return $constraints;
  }
}
Data Input
Now we have defined our data type and we want to store the ISO-2 country code. How do we want users to input data? We have two options - select dropdown options and an autocomplete textfield. The select options can be the default widget.
We start by creating a class called CountryDefaultWidget in src\Plugin\Field\FieldWidget\CountryDefaultWidget.php with the following code:
namespace Drupal\country\Plugin\Field\FieldWidget;

use Drupal;
use Drupal\Core\Field\FieldItemListInterface;
use Drupal\Core\Field\WidgetBase;
use Drupal\Core\Form\FormStateInterface;

class CountryDefaultWidget extends WidgetBase {
}
There’s still an important thing missing from our widget class - annotation of the class as provider of a FieldWidget. Add this just above the class statement;
/**
 * Plugin implementation of the 'country_default' widget.
 *
 * @FieldWidget(
 *   id = "country_default",
 *   label = @Translation("Country select"),
 *   field_types = {
 *     "country"
 *   }
 * )
 */
This is similar to the old array keys for the old hook_widget_info() in Drupal 7. Additional annotation keys may be defined by a hook_field_widget_info_alter() function.
Our CountryDefaultWidget class isn’t complete yet. Widgets handle how fields are displayed in edit forms. The missing method we need to implement will do this for us. Add this formElement() method:
public function formElement(FieldItemListInterface $items, $delta, array $element, array &$form, FormStateInterface $form_state) {
    $countries = \Drupal::service('country_manager')->getList();
    $element['value'] = $element + array(
        '#type' => 'select',
        '#options' => $countries,
        '#empty_value' => '',
        '#default_value' => (isset($items[$delta]->value) && isset($countries[$items[$delta]->value])) ? $items[$delta]->value : NULL,
        '#description' => t('Select a country'),
      );
    return $element;
}
Other modules may alter the form element provided by this function using hook_field_widget_form_alter() or hook_field_widget_WIDGET_TYPE_form_alter().
This default country widget is a simple widget of select options. Drupal core provides a list of all countries in the world as an array of country names keyed by ISO-2 country codes. This is made available as a service for use anywhere in a Drupal project.
Country autocomplete widget
Let’s start off with a complete implementation for this. Create src\Plugin\Field\FieldWidget\CountryAutocompleteWidget.php with this code:
namespace Drupal\country\Plugin\Field\FieldWidget;

use Drupal\Core\Field\FieldItemListInterface;
use Drupal\Core\Field\WidgetBase;
use Drupal;
use Drupal\Core\Form\FormStateInterface;

/**
 * Plugin implementation of the 'country_autocomplete' widget.
 *
 * @FieldWidget(
 *   id = "country_autocomplete",
 *   label = @Translation("Country autocomplete widget"),
 *   field_types = {
 *     "country"
 *   }
 * )
 */
class CountryAutocompleteWidget extends WidgetBase {
}
There’s nothing unusual here at all. We need to implement same defaultSettings() and formElement() methods as for the default widget. Add this to the class:
public static function defaultSettings() {
    return array(
      'size' => '60',
      'autocomplete_route_name' => 'country.autocomplete',
      'placeholder' => '',
    ) + parent::defaultSettings();
  }
We want a textfield that’s wide enough (‘size’ => 60). For the autocomplete_route_name key we provide the name of the route from which our autocomplete functionality will return matching values. We’ll be implementing that shortly. We don’t want anything as the placeholder.
Finally, let’s add our formElement() method:
public function formElement(FieldItemListInterface $items, $delta, array $element, array &$form, FormStateInterface $form_state) {
    $countries = \Drupal::service('country_manager')->getList();
    $element['value'] = $element + array(
      '#type' => 'textfield',
      '#default_value' =>  (isset($items[$delta]->value) && isset($countries[$items[$delta]->value])) ? $countries[$items[$delta]->value] : '',
      '#autocomplete_route_name' => $this->getSetting('autocomplete_route_name'),
      '#autocomplete_route_parameters' => array(),
      '#size' => $this->getSetting('size'),
      '#placeholder' => $this->getSetting('placeholder'),
      '#maxlength' => 255,
      '#element_validate' => array('country_autocomplete_validate'),
    );
    return $element;
  }
This is a standard autocomplete widget. Looking at the FAPI array keys, some are very familiar. #autocomplete_route_name matches what we entered in our defaultSettings() a while ago. The value is retrieved from there with $this->getSetting(‘autocomplete_route_name’). The same goes for #size and #placeholder. Our #autocomplete_route_parameters has no default value. In order to ensure that the final value to be submitted doesn’t include unwanted values, we add #element_validate and enter the name of our callback function. We will also implement this shortly.
Creating a route
Create a YAML configuration file called country.routing.yml in your main module directory with the following:
country.autocomplete:
  path: '/country/autocomplete'
  defaults:
    _controller: '\Drupal\country\Controller\CountryAutocompleteController::autocomplete'
  requirements:
    _permission: 'administer content types'
The key or name of the route is country.autocomplete which is how this route will be referred to anywhere in the application. At least a route should define 3 things: path, code to execute and who can access the path.
- path: This is the URL for our AJAX autocomplete calls.
- _controller: This is the code we want to execute when we visit the defined path. It’s written as CLASS::FUNCTION. If our function requires any parameters, this is where they will be specified. We will be creating our controller shortly.
- _permission: The string representation of the permission for access control
Now we move on to the creation of our controller class. Create a folder called Controller under src. Then add CountryAutocompleteController.php inside it. Add this code:
/**
 * @file
 * Contains \Drupal\country\Controller\CountryAutocompleteController.
 */

namespace Drupal\country\Controller;

use Symfony\Component\HttpFoundation\JsonResponse;
use Symfony\Component\HttpFoundation\Request;
use Drupal\Component\Utility\Unicode;
use Drupal;

/**
 * Returns autocomplete responses for countries.
 */
class CountryAutocompleteController {

  /**
   * Returns response for the country name autocompletion.
   *
   * @param \Symfony\Component\HttpFoundation\Request $request
   *   The current request object containing the search string.
   *
   * @return \Symfony\Component\HttpFoundation\JsonResponse
   *   A JSON response containing the autocomplete suggestions for countries.
   */
  public function autocomplete(Request $request) {
    $matches = array();
    $string = $request->query->get('q');
    if ($string) {
      $countries = \Drupal::service('country_manager')->getList();
      foreach ($countries as $iso2 => $country) {
        if (strpos(Unicode::strtolower($country), Unicode::strtolower($string)) !== FALSE) {
          $matches[] = array('value' => $country, 'label' => $country);
        }
      }
    }
    return new JsonResponse($matches);
  }
}
Whatever we type in our autocomplete widget will get passed to our autocomplete method. Then, we simply search for it in the array of country names which we pull from the country_manager service we have come across before. Finally, we return any matches or an empty array in a JSON response.
That looks more like it now and we’re nearly there. If you look back at our formElement() method in CountryAutocompleteWidget.php we specified a validation callback. We are going to do that now in our country.module file. Add this code:
/**
 * @file
 * Defines simple country field type.
 */

use Drupal\Core\Routing\RouteMatchInterface;
use Drupal\Core\Form\FormStateInterface;

/**
 * Form element validate handler for country autocomplete element.
 */
function country_autocomplete_validate($element, FormStateInterface $form_state) {
  if ($country = $element['#value']) {
    $countries = \Drupal::service('country_manager')->getList();
    $iso2 = array_search($country, $countries);
    if (!empty($iso2)) {
      $form_state->setValueForElement($element, $iso2);
    }
  }
}
We get our array of countries, and compare the value we want to send to the database with possible values. Now that we’re here, let’s just implement hook_help to give some information about our module. Just add this below the last use statement:
/**
 * Implements hook_help().
 */
function country_help($route_name, RouteMatchInterface $route_match) {
  switch ($route_name) {
    case 'help.page.country':
      $output = '';
      $output .= '<h3>' . t('Country') . '</h3>';
      $output .= '<p>' . t('The Country module defines a simple country field type for the Field module. It provides 2 widgets - select options and autocomplete textfield - for this purpose.  See the <a href="!field-help">Field module help page</a> for more information about fields.', array('!field-help' => url('admin/help/field_ui'))) . '</p>';
      return $output;
  }
}
We have now finished our autocomplete widget and learned something about routing. Not bad at all!
Data Output
We have everything ready for creating our field and allowing users to input data. Everything should work. There’s little work left before we can display the output. That’s where the need for a field formatter comes in. Add a new folder: src\Plugin\Field\FieldFormatter and inside it create CountryDefaultFormatter.php. Then add this code.
/**
 * @file
 * Definition of Drupal\country\Plugin\field\formatter\CountryDefaultFormatter.
 */

namespace Drupal\country\Plugin\Field\FieldFormatter;

use Drupal\Core\Field\FieldItemListInterface;
use Drupal\Core\Field\FormatterBase;
use Drupal;

/**
 * Plugin implementation of the 'country' formatter.
 *
 * @FieldFormatter(
 *   id = "country_default",
 *   module = "country",
 *   label = @Translation("Country"),
 *   field_types = {
 *     "country"
 *   }
 * )
 */
class CountryDefaultFormatter extends FormatterBase {
}
If we don’t do anything now, everything will work except where we expect to see a country name, we will see the ISO-2 which was saved as the value of the field. To display our country name, we need to override the viewElements() method. So let’s do it:
/**
 * {@inheritdoc}
 */
public function viewElements(FieldItemListInterface $items) {
    $elements = array();
    $countries = \Drupal::service('country_manager')->getList();
    foreach ($items as $delta => $item) {
      if (isset($countries[$item->value])) {
        $elements[$delta] = array('#markup' => $countries[$item->value]);
      }
    }
    return $elements;
}
Once again, we get our array of countries, find the country name for our ISO-2 value and return it as markup. Job done. The module we have created is now functional and can now be installed.
Field UI
Let’s take a look at what fields UI offer us with our Country field. You may use an existing content type or start off with a new one. From the list of content types (admin/structure/types) clicking on the Edit operation will take you to the edit form with three tabs at the top: Manage fields, Manage form display, and Manage display which give us access to our field type, field widget and field formatter, respectively.
- Field type (Manage fields):
Click “Add field”. Select “Country” from the “Add a new field” select dropdown. That dropdown is populated by all @FieldType plugins from all enabled modules. They are grouped according to the “category” key of field plugins. This is optional, and if it isn’t defined for a field, it goes under “General”. If you inspect it, you’ll see that the name is “country_default” which matches the “id” key of our plugin and the “Country” we see there is the “label”.
Enter “Location” as the field name in the “Label” textfield and save it.
If you want to see how the field type settings are reflected in the field UI, go back to the annotation in CountryItem.php. Edit your plugin label, change it to something like “Country - edited” and save it. Then go back to the fields UI page and you’ll see not only the new value in the select dropdown when creating a new field but also under the “Field Type” column for the new Location field. You can revert the change now.
- Field widget (Manage form display):
On this screen you can see what was defined in the FieldWidget plugin. In the URL you can see the plugin “id” and the “label” is the description.
- Field formatter (Manage display):
There isn’t much choice here so we just leave the default formatter as is.
You may now take the completed field module for a spin. Finish by adding it to a content type, create a node and view the output. That’s all. We’ve come to the end of looking at how to create custom field modules and in the process learned a few things about Drupal 8. Go make yourself a coffee. You deserve it!
1: See https://www.drupal.org/node/1882526 for an excellent introduction to annotation-based plugins.
