I have previously written blog posts about securing Spring Boot configuration with standard Kubernetes resources. In this post I’m going to take it a step further with a more productionised pattern of securing Spring Boot microservices with Vault in Kubernetes.
Keep It Secret, Keep It Safe
As a famous wizard once said; keep it secret, keep it safe. Whilst this applies to rings and other precious objects, it also applies to the sensitive data that we keep within our applications.
Security is paramount in productionised applications, often being one of the more challenging patterns to implement correctly.
Not All Secret Stores Were Created Equal
As I spoke about in my previous post, using Kubernetes secrets for storing sensitive data is considered bad practice for two main reasons:
- The secrets themselves are stored in base64 format, which provides minimal security on its own.
- By default, secrets are stored unencrypted in the underlying API’s data store (etd), meaning anyone with API access can retrieve and modify them.
There are several alternatives to using Kubernetes default secrets, and one of the most widely used tools is HashiCorp Vault. Vault is an identity-based secrets and encryption management system, that provides encryption services protected by authentication and authorization mechanisms. This makes it a much more secure way to store sensitive data. Additionally, Vault offers integration and authentication mechanisms with Kubernetes out-of-the-box, providing a proven and secure approach to managing secrets within your Kubernetes cluster.
Secure Doesn’t Mean Complex
Whilst being a challenging pattern to get right, security doesn’t need to be complex. Let’s walk through a simple example of how to set up the Kubernetes auth method locally, and retrieve secrets from a Spring Boot application using Spring Cloud Vault.
Configuring Vault
To begin with, we will configure Vault locally. HashiCorp has a set of available helm charts that you can apply, in order to test and work with Vault. For our example, we will be using the vault helm chart.
We will use Helmsman to manage our helm deployments. If you are interested in learning more about Helmsman, I recently wrote a blog post about it.
Our dev state file looks like this:
helmRepos:
  vault: https://helm.releases.hashicorp.com

apps:
  ...
  vault:
    namespace: dev
    enabled: true
    chart: vault/vault
    version: 0.24.1
    valuesFile: values/vault/values-dev.yaml
This will tell Helmsman to deploy the vault helm chart into our local dev namespace using the values file located at values/vault/values-dev.yml. The values file contains some simple overriding configuration to enable development mode for Vault. In doing so, it allows us to experiment with Vault without needing to unseal or store keys against it (Note: This should not be done in a production environment).
server:
  dev:
    enabled: true
Kube Auth Method
After applying the helmsman state file, we can proceed with configuring the Vault instance. There are two main ways to configure Vault: through the Vault UI or programatically via the CLI. Since we prefer repeatable processes, having our Vault configuration in code is a better approach. Taking it a step further, we could use the Vault Terraform approach to treat this configuration as infrastructure-as-code. However, that goes beyond the scope of this example.
Configuration
Next we need to enable the Kube auth method. The easiest way to do this (programatically) is via the Vault CLI (which comes pre-installed in the Vault container from the installed helm chart).
vault auth enable kubernetes
After enabling this feature, we need to configure the auth method to work with our local kubernetes cluster. There are several ways to configure this, but with the changes introduced in Kubernetes 1.21, there are some documented and recommended approaches. It’s worth reading through the different approaches and understanding their differences. However, for the purpose of this example, we will be using a local service account as the reviewer JWT because we have Vault running locally in a pod within our cluster.
To enable this configuration, we can run the following command:
vault write auth/kubernetes/config kubernetes_host=https://$KUBERNETES_SERVICE_HOST:$KUBERNETES_SERVICE_PORT
This configures the Vault auth method to use the service account token running in the Vault pod itself. This works because the Vault pod is running in our local cluster, the same cluster that Vault will be authenticating against later on when we send requests from our sample service. If Vault was running as an externally managed service (which is typical in a production environment), this approach wouldn’t work, and we’d have to configure the auth method using a more robust approach, such as using the Vault client’s JWT as the reviewer token or possibly using long-lived tokens.
Roles
Now that we have enabled and configured our auth method, we can proceed to add the other important pieces of configuration. Firstly, we need to configure the role against the authentication method. We will create a role that allows our Spring Boot application to retrieve secrets from our Vault instance.
`
vault write auth/kubernetes/role/demo bound_service_account_names=’*’ bound_service_account_namespaces=dev policies=spring-boot-demo
`
The role above will be called demo, and it will be bound to any service account (for finer grained security you would usually limit this to a specific account), it will be bound to our dev namespace and will have a policy attached to it named spring-boot-demo (more on this later).
Each Kubernetes auth method can have any number of roles created against it. The purpose of these roles is to restrict each integrating service to a specific set of secrets through roles and policies. The role component of this configuration determines which service(s), bound to which service account(s) can authenticate against this method (the auth aspect). The attached policy determines which secrets that service account(s) (and consequently service(s)) can access.
Policies
Vault policies define the fine grained, path based access to specific secrets held within Vault itself. The policy we’re using for this example looks like this:
path "kv/spring-boot-demo" {
  capabilities = ["read"]
}

path "kv/spring-boot-demo/dev" {
  capabilities = ["read"]
}

path "auth/token/lookup-self" {
  capabilities = ["read"]
}

path "auth/token/create" {
  capabilities = ["create", "read", "update", "list"]
}
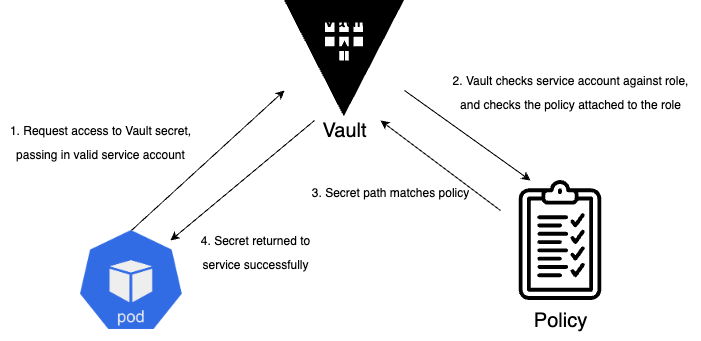
This policy will give access to secrets held at kv/spring-boot-demo and kv/spring-boot-demo/dev, it also has some default Vault policies which allows the JWT token lookup to occur during login and authentication. For secret lookups, we only need to provide read access because our service will only be trying to get specific secrets, not create or update them.
The following diagram gives a high-level view as to how Policy look-ups and authorisation occur.
Secrets
Lastly, we need to enable a secrets engine and create a secret for our application to use. For this example, we will be using the Key-Value secrets engine. The following CLI command will enable the KV engine for us, with a name of kv (this should look familiar from our policy outlined earlier).
vault secrets enable kv
Next, we can put a secret into our new kv store:
vault kv put kv/spring-boot-demo/dev admin=password
Now that we have our Vault instance configured with the kube auth method, a role, an appropriate policy and secret data, we can integrate a sample application to test it.
Spring Cloud Vault
To test our Vault configuration and close the loop with our example setup, we will use a Spring Boot microservice, which has endpoint security configured with Spring Security. For this demo, we will be using actuator which only exposes /health by default for security reasons. Let’s expose some actuator endpoints that could contain sensitive information such as /env and /heapdump, and secure them with spring security.
Securing Our Endpoints
In Spring Boot it’s fairly straightforward to enable various actuator endpoints. Spring provides a management config block, which allows developers finer-grained control over which endpoints are exposed, and also which sub-sets of information are exposed at those levels.
management:
  endpoint:
    ...
    env:
      enabled: true
    heapdump:
      enabled: true
We will be enabling the env and heapdump endpoints as mentioned above, this means we could be exposing sensitive information about our service if not secured correctly.
In order to secure the actuator routes properly we need to implement spring security. A simple pattern I like to follow is to split my routes into secure and insecure, allowing pass-through traffic for any non-secure route, and then handling secure routes with appropriate role-based access controls. Our configuration will look like as follows, including a ‘management’ style user for access purposes.
application.yml
appsecurity:
  management:
    username: ADMIN
    password: ${admin:test}

securedroutes:
  management:
    - "/actuator/shutdown"
    - "/actuator/loggers/**"
    - "/actuator/heapdump"
    - "/actuator/env"
  unprotected:
    - "/actuator/info"
    - "/actuator/prometheus"
    - "/actuator/health/**"
    - "/hello"
The config above allows us to use a placeholder value for our management user password. This is useful for unit test purposes where we don’t want to create another application.yml test resource file. If we don’t supply a value at runtime, the default value of test will be used.
In order for our application to use this configuration, simple configuration properties can be used to map the values to a configuration class:
@Getter
@Setter
@Configuration
@ConfigurationProperties(prefix = "securedroutes")
public class SecuredRoutesConfig {

  private String[] management;
  private String[] unprotected;
}
Our Spring security config will configure our application to allow any requests accessing non-secure routes to pass-through without any auth checks, whereas any requests to our secured routes will be subject to authentication and authorisation checks. An example of this config is show below.
private final SecuredRoutesConfig securedRoutesConfig;

@Value("${appsecurity.management.username}")
private String managementUsername;

@Value("${appsecurity.management.password}")
private String managementPassword;

@Bean
public PasswordEncoder encoder() {
return new BCryptPasswordEncoder();
}

@Bean
public SecurityFilterChain securityFilterChain(HttpSecurity http) throws Exception {
http
    .formLogin().disable()
    .csrf().disable()
    .authorizeHttpRequests((requests) -> requests
        .requestMatchers(securedRoutesConfig.getUnprotected()).permitAll()
        .requestMatchers(securedRoutesConfig.getManagement()).hasRole(ROLE_MANAGEMENT_USER)
    )
    .httpBasic(withDefaults());

return http.build();
}

@Bean
public UserDetailsService userDetailsService() {
UserDetails user =
    User.builder()
        .username(managementUsername)
        .password(encoder().encode(managementPassword))
        .roles(ROLE_MANAGEMENT_USER)
        .build();

return new InMemoryUserDetailsManager(user);
}
Configuring Vault
In order to configure our Spring Boot service to integrate with Vault, we need two key parts; the Spring Cloud Vault library and our application configuration to integrate with Vault itself.
Adding the following library to the POM file gives us the full spring-cloud-vault implementation:
<dependency>
    <groupId>org.springframework.cloud</groupId>
    <artifactId>spring-cloud-starter-vault-config</artifactId>
</dependency>
And the following configuration enables our application to integrate with Vault:
spring:
  config:
    import: optional:vault://
  cloud:
    vault:
      enabled: ${vault-enabled:false}
      application-name: spring-boot-demo
      connection-timeout: ${vault-connection-timeout:5000}
      read-timeout: ${vault-read-timeout:15000}
      authentication: KUBERNETES
      kv:
        backend: kv
        enabled: true
        profile-separator: '/'
        application-name: spring-boot-demo
        default-context: spring-boot-demo
        profiles: dev
Some of the configuration above might already start to make sense based on how we configured our Vault instance earlier. The main aspects to point out are the kv engine configuration;
backend: kv- this tells Spring Boot the name of the kv secrets engine to lookup in Vaultprofile-separator: '/'- this tells Spring Boot the path separator used in the secrets engine, e.g.kv/application-name: spring-boot-demo- this tells Spring Boot the naming convention of the secret lookup, e.g. kv/spring-boot-demoprofiles: dev- this refers to the active profile Spring Boot is running, as Spring Cloud Vault uses that profile to determine the secret path to use, so dev would give uskv/spring-boot-demo/dev.
Bringing It All Together
Given that we have a local Vault instance set up and a Spring Boot service to integrate with it, we can deploy our app and test the successful retrieval of secrets to secure our application.
Firstly, we will add our Spring Boot service to our Helmsman desired state file.
apps:
  spring-boot-demo:
    namespace: dev
    enabled: true
    chart: '../service-helm-chart'
    version: 1.0.0
    valuesFile: values/service/values-dev.yaml
  vault:
    ...
Then we can apply the updated state file:
helmsman --apply -f dev.yaml
Once the new Spring Boot service is running successfully, we can test the actuator endpoint has been secured properly with our secret we set up in Vault.
> kubectl get deploy -n dev
NAME                     READY   UP-TO-DATE   AVAILABLE   AGE
vault-agent-injector     1/1     1            1           64s
spring-boot-vault-demo   1/1     1            1           65s
We can port-forward to the running pod to establish a localhost connection and conduct some basic cURL tests. When calling a secure endpoint without any authentication using cURL, we should receive a 401 response.
kubectl port-forward deploy/spring-boot-vault-demo 8080:8080 -n dev
> curl http://localhost:8080/actuator/env -v
*   Trying 127.0.0.1:8080...
* Connected to localhost (127.0.0.1) port 8080 (#0)
> GET /actuator/env HTTP/1.1
> Host: localhost:8080
> User-Agent: curl/7.79.1
> Accept: */*
>
* Mark bundle as not supporting multiuse
< HTTP/1.1 401
...
Now, when we use cURL to call the same endpoint while providing the authentication secret stored in Vault, we should receive a 200 response, along with the JSON payload that outlines the environment properties stored in the service.
> curl http://localhost:8080/actuator/env --user ADMIN:password -v
*   Trying 127.0.0.1:8080...
* Connected to localhost (127.0.0.1) port 8080 (#0)
* Server auth using Basic with user 'ADMIN'
> GET /actuator/env HTTP/1.1
> Host: localhost:8080
> Authorization: Basic QURNSU46cGFzc3dvcmQ=
> User-Agent: curl/7.79.1
> Accept: */*
>
* Mark bundle as not supporting multiuse
< HTTP/1.1 200
...
{"activeProfiles":["dev"],"propertySources":[{"name":"server.ports","properties":{"local.server.port":{"value":"******"}}},...
And that’s it! All working as expected.
Conclusion
Keeping sensitive information secure in production systems is paramount. With the vast number of data breaches last year, which caused chaos for those who fell victim, ensuring data security and mitigating attack vectors is critical for engineering robust, well-designed systems. While this post has outlined a simpler approach to integrating a Spring Boot microservice with a secrets management solution, it hopefully demonstrates that it doesn’t have to be incredibly complex to get it right.
You can see all the code to accompany this post over on my github.
